IPv6 or Internet Protocol version 6 is the latest version of Internet Protocol (IP). IPv4 or Internet Protocol version 4 is already being widely used. But it has some limitations. The first one is that, IPv4 has 32-bit address scheme. That means only 4.3 billion unique address is possible with IPv4. That is quite limited in today’s world. These days we have many IoT (Internet of Things) devices, smartphones, computers, laptops, servers connected to the internet. Each of these devices need an IP address to communicate to the outside world. So the IPv4 address has shortage.
IPv6 address in the other hand is a 128-bit address. It means about 340,282,366,920,938,463,463,374,607,431,768,211,456 unique IPV6 address is possible in IPv6. That's a huge number of IP addresses. It is said that, if IPv6 is used, every single device in the world can have its own unique IPv6 address and IPv6 would still be available for new devices. So IPv6 solves issues with limited IP address as in IPv4.
But at the time of this writing, IPv6 support is not available in many countries. It’s not even supported in my country. Though the world is moving to IPv6 slowly, still not everything is IPv6.
If your country has no support for IPv6 yet, there’s no need to keep it enabled on your operating system. So many people tend to disable IPv6 in their operating system.
In this article, I will s how do you how to disable IPv6 on CentOS 7.5. Let's get started.
Check Whether IPv6 is Enabled
You can check whether IPv6 is enabled on your CentOS 7.5 operating system with the following command:
$ip a | grep inet6
As you can see, I have IPv6 enabled.
If IPv6 is disabled, you should see no output if you run this command.
Disable IPv6 Using the Kernel Parameter
In this section, I will show you how to disable IPv6 permanently.
You can disable IPv6 when your computer boots by changing the kernel parameter.
First edit the GRUB configuration
$ sudo vim /etc/default/grub
You should see the following window.

First press i to go to INSERT mode.
Now add ipv6.disable=1 before crashkernel=auto in GRUB_CMDLINE_LINUX as marked in the screenshot below.

Now press
Now update the GRUB configuration file with the following command:
$ sudo grub2-mkconfig -o /boot/grub2/grub.cfg
The GRUB configuration should be updated.

Now restart your computer with the following command:
$ sudo reboot
If you run the following command again, you should see no output.
$ip a | grep inet6
Disable IPv6 Using /etc/sysctl.conf Configuration File
You can also disable IPv6 permanently using the /etc/sysctl.conf configuration file.
First open the /etc/sysctl.conf file with the following command:
Now add the following lines to it:
net.ipv6.conf.all.disable_ipv6 = 1
net.ipv6.conf.default.disable_ipv6 = 1

Now save the file and reboot your computer with the following command:
$ sudo reboot
IPv6 should be disabled.
Disable IPv6 of Specific Network Interface
You can also disable IPv6 of specific network interface.
First you have to find the network interface that you want to disable with the following command:
$ip link show
You should see the network interface name as marked in the screenshot below.

Let's say, you want to disable IPv6 for ens36 interface.
First open /etc/sysctl.conf file with the following command:
$ sudo vim /etc/sysctl.conf
Now add the following line to the end of the file:
net.ipv6.conf.ens36.disable_ipv6 = 1

Disable IPv6 Temporarily Using sysctl Command
You can also disable IPv6 temporarily. That way IPv6 will be enabled once you reboot your system. This is good for testing whether everything on your CentOS 7.5 operating system works before disabling IPv6 permanently.
Run the following commands to disable IPv6 temporarily:
$ sudo sysctl -w net.ipv6.conf.all.disable_ipv6=1
$ sudo sysctl -w net.ipv6.conf.default.disable_ipv6=1

IPv6 should be disabled.
That’s how you disable IPv6 on CentOS 7.5 permanently and temporarily. Thanks for reading this article.
As you know, the IPv6 protocol appeared as an alternative to the IPv4 protocol, since it allows the use of more addresses than its predecessor. However, the transition from IPv4 to IPv6 continues to this day, and IPv6 support is not available everywhere. IPv6 support requires support like operating system, and network infrastructure in general. For this reason, if this protocol is not supported on your server, then it is better to disable it so that the network works using functioning protocols. When IPv6 is enabled but not working, delays may occur due to routing, for example, when searching for a domain, trying to connect to IPv6 addresses, and the problem may also manifest itself in various programs that use network connections.
Let's look at several ways to disable IPv6 in Linux CentOS 7. For these purposes, we will need access to the server console with superuser rights.
Method one
We disable the IPv6 protocol for all interfaces of the operating system; for this we need to make changes to the /etc/sysctl.conf file. Open the file in the built-in:
Vi /etc/sysctl.conf
Add the following lines:
Net.ipv6.conf.all.disable_ipv6 = 1 net.ipv6.conf.default.disable_ipv6 = 1
You may also need to disable the IPv6 protocol for individual interfaces, suppose the interface name enp0s3, in this case add the following line:
Net.ipv6.conf.enp0s3.disable_ipv6 = 1
We save the changes to the file, and then apply the changes to the configuration:
Sysctl -p
Method two
If you need to disable IPv6 without restarting the configuration, you can use the commands below, which will make the changes on the fly.
Echo 1 > /proc/sys/net/ipv6/conf/all/disable_ipv6 echo 1 > /proc/sys/net/ipv6/conf/default/disable_ipv6
Enter the commands one after the other, you can also use the following commands:
Sysctl -w net.ipv6.conf.all.disable_ipv6=1
After executing these commands, IPv6 will be disabled. In addition, after disabling IPv6, problems may appear with some programs, where you should also specify not to try to use IPv6. More on this later.
Problems with SSH after disabling IPv6
If you have problems with SSH after disabling IPv6, follow these steps: Open the configuration file /etc/ssh/sshd_config
Vi /etc/ssh/sshd_config
Find the line:
#AddressFamily any
We bring it to this form:
AddressFamily inet
Or you can uncomment (remove the # symbol at the beginning) the line:
Systemctl restart sshd
Problems with Posfix after disabling IPv6
Problems may also appear with Postfix after disabling IPv6; to correct the situation, you must perform the following steps.
Opening the configuration file /etc/postfix/main.cf:
Vi /etc/postfix/main.cf
Finding the line inet_interfaces with meaning localhost and comment it out, leaving only the line with the value 127.0.0.1.
#inet_interfaces = localhost inet_interfaces = 127.0.0.1 systemctl restart postfix
If you have the opportunity to use IPv6, you can return the settings to their original positions in the same way; this will not be difficult. After disabling non-functioning IPv6, you may notice improved network performance.
In this material I will touch upon current topic, with which almost any initial work with the server begins. Configuring basic network parameters in CentOS - ip address, dhcp, ipv6, dns, hostname, static routes, network cards and other network parameters. We will move through the topic step by step from simple to complex, examining all the nuances in order and answering the most popular questions.
Network settings on a CentOS 7 server
The first time we encounter the network settings of a CentOS server is when we perform the installation. On the initial setup screen there is a separate item regarding setting up network interfaces:
Having entered it, we see a list of connected network cards. Each of them can be turned on using the corresponding slider (point 1 in the picture). When the interface is activated, it automatically receives settings via dhcp. You can see the result of dhcp work right there. If you are not happy with these settings, you can edit them by clicking configure(point 3 in the picture). Here you can also set hostname(point 2 in the picture):


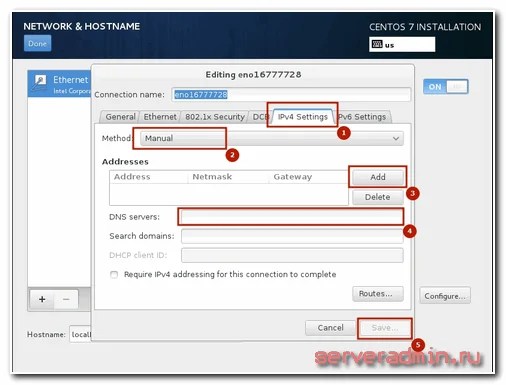
By opening the Ehernet additional settings window, you can change the name of the network interface, specify the IP settings (item 1 in the picture), select manual settings(point 2 in the picture), assign ip address(point 3 in the picture), install dns server(point 4 in the picture) and save the network settings (point 5 in the picture):

After completing the remaining settings, the installation will begin. After installation, you will have a server with the network settings you specified.
Now let's consider another situation. You did not create the server, and therefore the network configuration, but now you need to look at it or change it. The server console is at your disposal, and we will work in it. If you installed from a distribution kit minimal, then when you try to view the network settings using the command ifconfig in the console you will see the following:
Bash: ifconfig: command not found
or in Russian version:
Bash: ifconfig command not found
To work with ifconfig and other network utilities you need to install the package net-tools. Let's do this:
# yum -y install net-tools.x86_64
Now you can see the network settings:
If you do not want to install an additional package, you can use a simpler command ip with parameters:
# ip addr 1: lo:
We have seen the network configuration, now let's edit it. Let's say we need to change the IP address. To do this, go to the /etc/sysconfig/network-scripts directory and open the file for editing ifcfg-eth0. This file has approximately the following content:


Using the settings from this file, we get the IP address via dhcp. To manually register a static IP, we bring the file to the following content:

We have changed the parameters:
For the changes to take effect, you need to re-read the network settings:
Restarting network (via systemctl): [OK]
We check whether the new network configuration has been applied:
# ifconfig: eno16777728: flags=4163
Everything is fine, the new network interface settings are installed.
How to get network settings via DHCP
Now let's consider the opposite situation. Let's say your network card has some settings set manually. But you want your computer to receive network settings via dhcp as a client. To do this, you need to perform the opposite operation to what we did before. That is, open the file /etc/sysconfig/network-scripts/ifcfg-eth0 and delete the lines there with the parameters DNS, IPADDR, PREFIX, GATEWAY and specify the value in the BOOTPROTO parameter "dhcp". Save the file and restart the network:
# /etc/init.d/network restart
Then we check whether our client has received the settings via dhcp.
How to configure DNS in CentOS 7
The current dns server settings in CentOS can be viewed in two places:
- In the file with the settings of the network card ifcfg-eth0, which we have previously edited several times.
- In the /etc/resolv.conf file
Why they are now in two places, I don’t know, but before, the DNS server settings in some distributions, I don’t remember exactly which ones, were indicated only in resolv.conf, but at some point this changed. And all network settings began to be stored in one file along with the address, gateway, mask, and so on. If you now edit the resolv.conf file and add some server dns there, then after a reboot they will be replaced with the values from the ifcfg-eth0 file.
So in order to set the DNS server parameters, you need to edit the ifcfg-eth0 network settings file, adding as many servers as required. For example like this:
DNS1="192.168.159.2" DNS2="8.8.8.8" DNS3="8.8.4.4"
To apply the settings, save the file and restart the network, everything is as usual. After rebooting the server, the dns settings will be written to the resolv.conf file
# cat /etc/resolv.conf # Generated by NetworkManager nameserver 192.168.159.2 nameserver 8.8.8.8 nameserver 8.8.4.4
How to disable ipv6 in CentOS 7
Currently active use protocol ipv6 no, and it is not needed in normal work. Although we have been afraid for many years that there are practically no free IP addresses left, in reality there are still enough for everyone. So for practical reasons, ipv6 is not currently needed on the server and can be disabled.
Before disabling ipv6, just in case, you need to check which programs use it in their work. This is necessary in order to avoid errors in their operation by first disabling ipv6 in the configurations. In order to see what programs are hanging on the ipv6 interface, use the netstat command:
# netstat -tulnp Active Internet connections (only servers) Proto Recv-Q Send-Q Local Address Foreign Address State PID/Program name tcp 0 0 127.0.0.1:25 0.0.0.0:* LISTEN 2317/master tcp 0 0 0.0.0.0 :22 0.0.0.0:* LISTEN 1333/sshd tcp6 0 0::1:25:::* LISTEN 2317/master tcp6 0 0:::22:::* LISTEN 1333/sshd udp 0 0 0.0.0.0:49252 0.0.0.0:* 694/avahi-daemon: r udp 0 0 0.0.0.0:123 0.0.0.0:* 715/chronyd udp 0 0 0.0.0.0:5353 0.0.0.0:* 694/avahi-daemon: r udp 0 0 127.0.0.1:323 0.0.0.0:* 715/chronyd udp6 0 0:::123:::* 715/chronyd udp6 0 0::1:323:::* 715/chronyd
All lines with ::: are ipv6 protocol. In my case it is sshd, postfix and chronyd. Let's disable ipv6 for them and leave only ipv4.
Let's start with sshd. Open the settings file /etc/ssh/sshd_config and find the lines:
#AddressFamily any #ListenAddress 0.0.0.0
Let's uncomment them and change them. It should look like this:
AddressFamily inet ListenAddress 0.0.0.0
Now open the postfix settings file /etc/postfix/main.cf. We are looking for the line there:
#inet_protocols = all
Change to:
Inet_protocols = ipv4
Disable ipv6 in chronyd. To do this, create the file /etc/sysconfig/ chronyd and add the line:
OPTIONS=-4
Now we disable ipv6 in CentOS. Open the file /etc/ sysctl.conf and add the lines there:
Net.ipv6.conf.all.disable_ipv6 = 1 net.ipv6.conf.default.disable_ipv6 = 1
Editing the /etc/sysconfig/ file network, adding there:
NETWORKING_IPV6=no IPV6INIT=no
Reboot and check the result:
# reboot # ifconfig eno16777728: flags=4163
There is no mention of inet6 and ipv6 format addresses anywhere. So everything is fine, we have disabled ipv6 in CentOS. Now let's check the list of open ports:
# netstat -tulnp Active Internet connections (only servers) Proto Recv-Q Send-Q Local Address Foreign Address State PID/Program name tcp 0 0 127.0.0.1:25 0.0.0.0:* LISTEN 2291/master tcp 0 0 0.0.0.0 :22 0.0.0.0:* LISTEN 1322/sshd udp 0 0 0.0.0.0:123 0.0.0.0:* 2453/chronyd udp 0 0 0.0.0.0:5353 0.0.0.0:* 697/avahi-daemon: r udp 0 0 127.0.0.1:323 0.0.0.0:* 2453/chronyd udp 0 0 0.0.0.0:57259 0.0.0.0:* 697/avahi-daemon: r
All ports are ipv4. Everything is in order, our task is completed.
How to change hostname in CentOS 7
By default, during CentOS installations puts the hostname localhost.localdomain. If you haven't changed it, you can do it later. First, let's check what hostname you have set. This is done using the command in the console hostname, or using uname:
# hostname localhost.localdomain # uname -n localhost.localdomain
In order to change the hostname in CentOS, you need to edit the file /etc/hostname. Let's check its contents:
# cat /etc/hostname localhost.localdomain
Let's edit this file to change the hostname:
# mcedit /etc/hostname centos.localhost
Save the file and check:
# hostname centos.localhost
There is a ready-made command that immediately sets the required server name:
# hostnamectl set-hostname centos.localhost
Everything is ok, we changed the hostname to centos.localhost
Set the default gateway in CentOS 7
If for some reason you did not set the default gateway when setting up network parameters, you can do this manually. First, let's check which default gateway is installed in the system in at the moment:
# netstat -nr Kernel IP routing table Destination Gateway Genmask Flags MSS Window irtt Iface 0.0.0.0 149.154.71.254 0.0.0.0 UG 0 0 0 eth0 0.0.0 0 0 0 eth0 192.168.1.0 10.8.0.2 255.255. 255.0 UG 0 0 0 tun0
The line with Destination 0.0.0.0 specifies the gateway address. If you don’t have it, or the wrong gateway is set in the Gateway field, you can change this. Set the default gateway:
route add default gw 192.168.0.1Network Manager in CentOS 7
CentOS by default has a service that manages all network connections - NetworkManager. It constantly monitors network settings and, using a configuration management daemon, makes appropriate changes to active network devices. It supports standard ifcfg configuration files.
List of network utilities and applications:
Users do not interact with NetworkManager on CentOS directly; they use graphical and command line utilities to do so. One such utility is system config network tui.
System config network tui in CentOS 7
To manage network settings in CentOS, you can use a graphical utility nmtui. It is very easy to check its presence in the system. Just run it in the console:

If you don't have it installed, it's very easy to fix. Install in CentOS system config network tui:
# yum install NetworkManager-tui
By using tui you can specify any network settings that we did before through the command line and editing configuration files. Let's do this. Call the program:
Select the first item Edit a connection, then select the network interface and click “Edit”: 

Here we can change the name of the network card, mac address, specify the type of network settings - manual or dhcp, manually specify the ip address, gateway address, dns server, add routes and some other settings:


After editing is complete, save the settings by clicking OK.
If you select the item on the first screen of the utility Set System Hostname, you can quickly specify the hostname. The result will be the same as we did before in the console.
How to add a static route in CentOS 7
To control routing on CentOS, you may need to add a static route. This is quite easy to do using the console command. First, let's check the existing routes using netstat:
# netstat -nr Kernel IP routing table Destination Gateway Genmask Flags MSS Window irtt Iface 0.0.0.0 192.168.159.2 0.0.0.0 UG 0 0 0 eno16777728 192.168.159.0 0.0.0.0 255.255.255.0 U 0 0 eno16777728
IN in this case We have one route for the address 0.0.0.0/0.0.0.0; the gateway is 192.168.159.2, which is also the default gateway. That is, in essence, there are no static routes. Let's add one of them.
Let's say we have a subnet 192.168.8.0 mask 255.255.255.0, traffic to this subnet is routed by the gateway 192.168.159.5 Add a route:
# route add -net 192.168.8.0/24 gw 192.168.159.5
Check if the added route has appeared in routing table:
# netstat -nr Kernel IP routing table Destination Gateway Genmask Flags MSS Window irtt Iface 0.0.0.0 192.168.159.2 0.0.0.0 UG 0 0 0 eno16777728 192.168.8.0 192.168.159.5 255.255.255.0 U G 0 0 0 eno16777728 192.168.159.0 0.0.0.0 255.255.255.0 U 0 0 0 eno16777728
Everything is ok, the route has been added. But after reboot this static route will be deleted. To prevent this from happening and to save the added routes, you need to write them to a special file. In the /etc/sysconfig/network-scripts folder, create a file called route-eth0 the following content:
# mcedit /etc/sysconfig/network-scripts/route-eth0 192.168.8.0/24 via 192.168.159.5
Reboot and check if the route is in place:
# reboot # netstat -nr Kernel IP routing table Destination Gateway Genmask Flags MSS Window irtt Iface 0.0.0.0 192.168.159.2 0.0.0.0 UG 0 0 0 eno16777728 192.168.8.0 192.168.159.5 255.255.25 5.0 UG 0 0 0 eno16777728 192.168.159.0 0.0 .0.0 255.255.255.0 U 0 0 0 eno16777728
Everything is fine, the static route has been added.
How to configure 2 IP addresses on one interface
If you need to configure 2 IP addresses on one interface in CentOS, then doing this is quite simple. Let's use the ifconfig command. First, let's check the list of network interfaces:
# ifconfig eno16777728: flags=4163
Let's add another IP address 192.168.159.120 to the eno16777728 interface:
# ifconfig eno16777728:1 192.168.159.120 up
Let's check what happened:
# ifconfig eno16777728: flags=4163
Everything is fine, we added a second IP address to the same interface. But after a reboot, the additional address will not be saved. To save it, you need to create an interface settings file in the /etc/sysconfig/network-scripts folder
# mcedit /etc/sysconfig/network-scripts/ ifcfg-eno16777728:1 DEVICE=eno16777728:1 BOOTPROTO=static IPADDR=192.168.159.120 NETMASK=255.255.255.0 ONBOOT=yes
Save the file, reboot and check what happened. The second IP address must be in place.
How to do a network restart in CentOS 7
I have already touched on this issue earlier, but just in case, we will repeat it separately. Let's say you've made some changes to your network configuration. How can I apply these settings without rebooting the server? Very simple. To restart the network in CentOS, just use the command:
# /etc/init.d/network restart
The NetworkManager service will re-read all network settings and apply the changes.
How to find out the IP address in CentOS 7
In order to quickly find out the current IP address in CentOS, you need to use the following commands:
# ifconfig | grep inet inet 192.168.159.129 netmask 255.255.255.0 broadcast 192.168.159.255 inet 127.0.0.1 netmask 255.0.0.0
Or the second option for determining the local IP address:
# ip addr | grep inet inet 127.0.0.1/8 scope host lo inet 192.168.159.129 /24 brd 192.168.159.255 scope global eno16777728
Both commands allow you to quickly find out your IP address.
What to do if CentOS does not see the network card?
You installed the server, booted up and discovered that there is not a single network card in the system. What to do in this case? First of all, look at the output of the dmesg command and look for a memory of your card there. Perhaps it is in the system, just not activated. You can activate it using nmtui, which I told above.
There is a menu item Activate connection, you need to go into it and activate your network card. After this you can configure it.


If your network card is not in the system, then you need to search the Internet for information about this network card by model. Perhaps there will be drivers for it in the repositories. This is a fairly common situation. Most often, drivers will be found and they will need to be installed correctly.
There is still a possibility that you will not see your card when outputting the ifconfig command if a network wire is not plugged into this card. To be sure to view all interfaces, you must use the -a switch:
# ifconfig -a
There is another way to look for a network card in the system. Install the package pciutils:
# yum -y install pciutils
And look at the output of the command:
#lspci | grep Ethernet
If the network card is seen by the system, then there should be something like this:
02:00.0 Ethernet controller: Intel Corporation 82545EM Gigabit Ethernet Controller (Copper) (rev 01)
If the output is empty, then the network card is not defined.
What to do if the network is not available on CentOS?
Let's say you are trying to ping some address, for example 8.8.8.8, and you receive a response that the network is not available:
#ping 8.8.8.8
And in response you get:
Connect: Network is unavailable
This situation may arise if you do not have a default gateway installed. You can add it using the command:
# route add default gw 192.168.0.1
If the problem is not with the gateway, then you need to check the settings of the network adapters. If there is no active adapter, then you will also receive a message that the network is not working. It is necessary that at least one network adapter is correctly configured on the system. How to do this is written above.
Using network utilities traceroute, dig in CentOS
To diagnose network connections in CentOS, it is useful to use special utilities. But if you used the minimal installation, then most likely they will not be on the system. For example, the popular utility traceroute When you try to launch it, it will display the following message:
# traceroute ya.ru bash: traceroute: command not found
It needs to be installed separately from the repository:
# yum -y install traceroute
Same thing with the popular program dig to work with DNS servers and records:
# dig ya.ru bash: dig: command not found
For this network utility to work, you must install the package bind-utils:
# yum -y install bind-utils
Configuring 802.1Q VLAN in CentOS 7
To raise a tagged interface on CentOS, you first need to check kernel support 8021q:
#modprobe8021q
If there are no error messages, then everything is in order, the module has loaded. If the module is not found, you need to rebuild the kernel modules, enabling support for the required module. Let’s check, just in case, whether the module has loaded:
# lsmod | grep 8021q 8021q 29022 0 garp 14384 1 8021q mrp 18542 1 8021q
Everything is fine, the 8021q module is loaded, let's add it to startup:
# echo 8021q >> /etc/modules-load.d/8021q.conf
Now create a configuration file for vlan in /etc/sysconfig/network-scripts:
# mcedit ifcfg-eth0.2000 VLAN=yes DEVICE=eth0.2000 BOOTPROTO=static ONBOOT=yes TYPE=Vlan IPADDR=192.168.100.2 NETMASK=255.255.255.0
I draw your attention to what is highlighted in bold. In all the instructions on the Internet that I came across, this parameter was indicated as TYPE=Ethernet, but with this setting the interface with vlan did not rise, an error appeared:
Error: no device found for connection "System eth0.2000".
Only after I fixed it did everything work as it should. So save and activate the interface:
# ifup eth0.2000 Connection successfully activated (D-Bus active path: /org/freedesktop/NetworkManager/ActiveConnection/7)
Checking our vlan:
# ip l ls 1: lo:
Everything is fine, the tagged interface is up. By analogy, you can create several more similar interfaces, not forgetting to change their names and addresses.
This concludes my voluminous material on the topic of network setup in CentOS. I will be very glad to receive comments, remarks, and corrections. They probably will. By creating such materials, I first of all learn myself and improve my knowledge in the subject area. There may be errors and typos here somewhere, although I check everything on live systems when writing manuals, but inaccuracies and typos are still possible.
Online course "Linux Administrator"
If you have a desire to learn how to build and maintain highly available and reliable systems, I recommend that you get acquainted with online course “Linux Administrator” in OTUS. The course is not for beginners, for admission you need basic knowledge on networks and installing Linux on a virtual machine. The training lasts 5 months, after which successful course graduates will be able to undergo interviews with partners. Test yourself for entrance test and see the program for more details.Starting with EL6, the software vendor decided to remove boot.iso from the /images directory and ship it as a separate independent media. Because of large size For this image we decided to do the same. Currently, the network installation disk image is called netinstall.iso and is located in the isos/ directory along with other installation images.
2. Why do I need to log in and use it myself in order for my Ethernet network card to work?
And why, compared to common practice, are the network interface names named "incorrectly"? After all, this violates the Unix rule of "don't change expectations."
The software vendor has added NetworkManager to the default configuration, and network interfaces are (somehow inexplicably) disabled by default. This can be fixed during the installation process at the stage where the installer prompts you to configure the language/keyboard/storage device/software in the main installer window, making your network card active. To do this, you need to click "Network & Hostname", select the Ethernet network connection you want to change, and click the "Off" button in the upper right corner. Assuming that you can use DHCP, then your network connection will go into the state of obtaining a network address. If you need to manually set network settings, click "Configure", then enter and save required values. In order for the changes to take effect, you will most likely need to disable and then enable the newly configured network interface. Click "Done". In addition to the above method, the network connection after installation can be configured using “NetworkManager” (located in “System; Preferences; Network Connections”, or right-click on the small network icon in the notification area, then “Edit Connections”).
If you do not use NetworkManager , then a similar result can be achieved by changing the configuration file of the corresponding network interface (usually /etc/sysconfig/network-scripts/ifcfg-eth0): "ONBOOT=no" to "ONBOOT=yes". If you are using DHCP, you may need to add the line "BOOTPROTO=dhcp". For a static IP you will need "BOOTPROTO=static".
Assuming that the network device name is eth0, then changing the ONBOOT line can be done (as root) as follows:
# cd /etc/sysconfig/network-scripts/ # sed -i -e "s@^ONBOOT="no@ONBOOT="yes@" ifcfg-eth0
Regarding "changed expectations": the previous example uses the "traditional" network interface naming: eth0. However, other names are also possible, such as em1, p3p1 etc. Like it or not, this naming concept is a further development of Linux. This was described earlier in the "test distribution" of the software vendor. See also Dell's writeup and blog post
3. What if I want to return to the old naming?
To do this there are 3 necessary steps:
- add "inet.ifnames=0" and "biosdevname=0" - grub boot loader kernel parameters;
- change the config file for your network interface, located in /etc/sysconfig/network-scripts/, renaming it to "ifcfg-ethX";
- If you have multiple network interfaces and want to control the naming of each one instead of letting the kernel do it, replace /usr/lib/udev/rules.d/60-net.rules with /etc/ udev/rules.d/60-net.rules
4. But I just need everything to work and be able to manually change configuration files
Most installation options do not require the excessive complexity of interacting with NetworkManager; manual modification of configuration files is sufficient. Below is a fragment of setting up a network interface using DHCP without the participation of NetworkManager:
# cat /etc/sysconfig/network-scripts/ifcfg-eth0 DEVICE="eth0" BOOTPROTO=dhcp NM_CONTROLLED="no" PERSISTENT_DHCLIENT=1 ONBOOT="yes" TYPE=Ethernet DEFROUTE=yes PEERDNS=yes PEERROUTES=yes IPV4_FAILURE_FATAL=yes IPV6INIT=yes IPV6_AUTOCONF=yes IPV6_DEFROUTE=yes IPV6_PEERDNS=yes IPV6_PEERROUTES=yes IPV6_FAILURE_FATAL=no NAME="eth0" #
or the usual setup using "static":
$ cat /etc/sysconfig/network-scripts/ifcfg-eth0 DEVICE="eth0" HWADDR="00:21:70:10:7E:CD" NM_CONTROLLED="no" ONBOOT="yes" BOOTPROTO=static # BOOTPROTO= dhcp IPADDR=10.16.1.106 NETMASK=255.255.255.0 # # the GATEWAY is sometimes in: /etc/sysconfig/network GATEWAY=10.16.1.1
after which you can add other common properties, such as hostname or DNS server:
$ cat /etc/sysconfig/network HOSTNAME=acme.example.com DNS1=10.16.1.112 DNS2=8.8.8.8 ## DNS2=76.242.0.28 SEARCH=example.com
These parameters are optional because The DHCP server itself can operate with them. Initscript You can determine settings such as Computer Name using PTR records in a properly configured DNS environment, but some users may need to manually change the settings. Complete documentation on initscripts can be found using:
Rpm -qd initsscripts
even in an environment where there is no man-package and its dependencies.
5. How to disable IPv6?
One of the software vendor's employees recommends leaving the IPv6 module enabled, because... disabling may affect the operation of SELinux and other components. Instead, it is suggested to add the following lines to /etc/sysctl.conf:
Net.ipv6.conf.all.disable_ipv6 = 1 net.ipv6.conf.default.disable_ipv6 = 1
And to disable IPv6 on a running system:
Echo 1 > /proc/sys/net/ipv6/conf/all/disable_ipv6 echo 1 > /proc/sys/net/ipv6/conf/default/disable_ipv6
Sysctl -w net.ipv6.conf.all.disable_ipv6=1 sysctl -w net.ipv6.conf.default.disable_ipv6=1
Note 1: If IPv6 is disabled, problems may arise with forwarding Xs via ssh. To solve this you need to change /etc/ssh/sshd_config as follows: either change
#AddressFamily any
AddressFamily inet
("inet" corresponds to "ipv4 only", "inet6" - ipv6)
Or remove the "#" sign before the line
#ListenAddress 0.0.0.0
and restart ssh
Note 2: If you experience problems starting Postfix when IPv6 is disabled, then either change /etc/postfix/main.cf - comment out the “localhost” part and replace it with ipv4 loopback:
#inet_interfaces = localhost inet_interfaces = 127.0.0.1
or remove the line with ipv6 localhost from the /etc/hosts file.
Note 3: To disable RPCBIND ipv6 (rpc, rpc.mountd, rpc,statd), comment out the lines with "udp6" and "tcp6" in the /etc/netconfig file:
UDP TPI_CLTS V Inet UDP - - TCP tpi_cots_ord v inet tcp - - #udp6 tpi_clts v Innet6 udp - #tcp6 tpi_cots_ord v Innet6 tcp - - rawip tpi_RARAW - Inet - - - - Local tpi_cots_cor D - loopback - - - unix tpi_cots_ord - lookback - - - - - - - - - - - - - - - - - - - - - -
6. Where can I download the 32-bit version?
The 32-bit version of CentOS 7 is located here: http://mirror.centos.org/altarch/7/isos/i386/
7. Where did ifconfig/netstat go?
Because utilities ifconfig And netstat Since the man pages for CentOS-5 and CentOS-6 have been marking them as obsolete for over a decade, RedHat has decided not to install the net-tool package by default on CentOS-7. One reason for this, for example, is that ifconfig does not display all the information on the interface's IP address - use the "ip" command instead. The utilities that came in return are "ss" and "ip". However, if you really need the ifconfig and netstat utilities, you can install the net-tools package: yum install net-tools.