Physics lesson notes, grade 7
Topic: Determining the center of gravity
Physics teacher, Argayash Secondary School No. 2
Khidiyatulina Z.A.
"Determination of the center of gravity of a flat plate"
Target : finding the center of gravity of a flat plate.
All bodies have a center of gravity. The center of gravity of a body is the point relative to which the total moment of gravity acting on the body is equal to zero. For example, if you hang an object by its center of gravity, it will remain at rest. That is, its position in space will not change (it will not turn upside down or on its side). Why do some bodies tip over while others don't? If you draw a line perpendicular to the floor from the center of gravity of the body, then if the line goes beyond the boundaries of the body’s support, the body will fall. The larger the area of support, the closer the center of gravity of the body is to the central point of the area of support and the center line of the center of gravity, the more stable the position of the body will be. For example, the center of gravity of the famous Leaning Tower of Pisa is located just two meters from the middle of its support. And the fall will happen only when this deviation is about 14 meters. The center of gravity of the human body is approximately 20.23 centimeters below the navel. An imaginary line drawn vertically from the center of gravity passes exactly between the feet. For a tumbler doll, the secret also lies in the center of gravity of the body. Its stability is explained by the fact that the tumbler's center of gravity is at the very bottom; it actually stands on it. The condition for maintaining body balance is to pass vertical axis his general center gravity within the body support area. If the vertical center of gravity of the body leaves the support area, the body loses balance and falls. Therefore, the larger the area of support, the closer the center of gravity of the body is located to the central point of the area of support and the central line of the center of gravity, the more stable the position of the body will be. The area of support when a person is in a vertical position is limited by the space that is under the soles and between the feet. Center point plumb line The center of gravity on the foot is 5 cm in front of the heel tubercle. The sagittal size of the support area always prevails over the frontal one, therefore the displacement of the vertical line of the center of gravity occurs more easily to the right and left than backward, and is especially difficult forward. In this regard, stability during turns during fast running is significantly less than in the sagittal direction (forward or backward). A foot in shoes, especially with a wide heel and a hard sole, is more stable than without shoes, as it gains large area supports.
Purpose of the work: Using the proposed equipment, experimentally find the position of the center of gravity of two figures made of cardboard and a triangle.
Equipment:Tripod, thick cardboard, triangle from a school kit, ruler, tape, thread, pencil...
Task 1: Determine the position of the center of gravity flat figure free form
Using scissors, cut out a random shape from cardboard. Attach the thread to it at point A with tape. Hang the figure by the thread to the tripod leg. Using a ruler and pencil, mark the vertical line AB on the cardboard.
Move the thread attachment point to position C. Repeat the above steps.
Point O of the intersection of lines AB andCDgives the desired position of the center of gravity of the figure.
Task 2: Using only a ruler and pencil, find the position of the center of gravity of a flat figure
Using a pencil and ruler, divide the shape into two rectangles. By construction, find the positions O1 and O2 of their centers of gravity. It is obvious that the center of gravity of the entire figure is on the O1O2 line
Divide the figure into two rectangles in another way. By construction, find the positions of the centers of gravity O3 and O4 of each of them. Connect points O3 and O4 with a line. The intersection point of lines O1O2 and O3O4 determines the position of the figure’s center of gravity
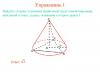
Task 2: Determine the position of the center of gravity of the triangle
Using tape, secure one end of the thread at the top of the triangle and hang it from the tripod leg. Using a ruler, mark the direction AB of the line of gravity (make a mark on opposite side triangle)
Repeat a similar procedure, hanging the triangle from vertex C. On opposite the vertex Make a mark on the side of the triangleD.
Using tape, attach pieces of thread AB andCD. Point O of their intersection determines the position of the center of gravity of the triangle. IN in this case the center of gravity of the figure is outside the body itself.
III . Solution quality tasks
1.For what purpose do circus performers hold heavy poles in their hands when walking on a tightrope?
2. Why does a person carrying a heavy load on his back lean forward?
3. Why can’t you get up from a chair unless you tilt your body forward?
4.Why does the crane not tip towards the load being lifted? Why, without a load, does the crane not tip towards the counterweight?
5. Why do cars and bicycles, etc. Is it better to put brakes on the rear wheels rather than the front wheels?
6. Why does a truck loaded with hay overturn more easily than the same truck loaded with snow?
Lesson objectives:
- educational: reveal the concept of the center of gravity of the body, experimentally confirm the studied theoretical knowledge.
- developing : develop students’ ability to work in a group, develop the ability to observe and research.
- educational: cultivate curiosity, attentiveness, perseverance, and develop a caring attitude towards equipment.
Lesson type: studying new material, laboratory work.
Equipment: computer, multimedia projector, screen, presentation, didactic material, flat plate figures, wooden block, ruler, pencil, tripod, suspension.
Lesson structure:
- Organizational moment.
- Accounting for knowledge.
- Learning new material.
- Physical education minute.
- Performing laboratory work.
- Summing up.
- Homework.
Lesson progress
1. Organizational moment. Greeting the class, checking the class's readiness for the lesson, communicating the topic and goals of the lesson.
2. Accounting for knowledge.
In the last lesson we studied body weight and the formula for gravity. Can you answer the question? Are we correct in saying that body weight is 50 kg?
I suggest you check whether you have understood the material well. To do this, run the test. On the screen you will see a question and three answer options, choose the correct one. Take the prepared leaves from your desks and sign them.
1. What force is called weight?
a) the force with which the Earth attracts bodies to itself;
b) force arising from tensile or compressive deformation;
c) the force with which a body, due to attraction to the Earth, acts on a support or suspension.
2. Body weight is determined by the formula:
a) Fcontrol =k ∆l;
b)Р=m g;
3. How is the body weight directed?
A) vertically down;
b) vertically upward;
c) to the right.
4. Body weight is indicated
5. What is the approximate mass of a body weighing 120N?
b)≈ 12 kg;
I see that this task did not turn out to be difficult for you, and you all understood the concept of body weight and the formula for gravity well.
3. Studying new material.
Studying the movement of bodies under the influence various forces, we have not yet paid attention to the fact that bodies have sizes, we considered them material points. This simplification is true if all points of the body move equally, i.e. if the body moves forward. It is necessary to find out at what point of the body the force must be applied in order for its movement to be truly translational.
Let's do a demonstration.
Take a ruler, attach a thread to its end and pull it in a direction perpendicular to the axis of the ruler. She will turn around. With such a turn different points rulers pass different ways and move with different speeds, i.e. their movements are not the same and the ruler does not move forward. Let's change the direction and pull along its length. The ruler moves so that all its points have the same speed and travel the same paths. Similar experiences lead us to the conclusion that in every body there is a point at which the directions of action of the forces that impart to the body intersect forward movement. This point is called the center of mass.
Review flashcards. (Figure 1, 2)
Figure 1

Figure 2
Why do we need to know the position of the center of mass? If a body moves translationally under the influence of one or more forces, then this force or the resultant of all forces passes through the center of mass of the body. The center of mass of the body in this case moves as if the entire mass of the body is concentrated in it and all the forces acting on it are applied to it. Therefore, when we see that a body is moving translationally, this means that the resultant of all forces applied to the body passes through its center of mass. The center of mass is often called the center of gravity of bodies. Slide 9-11, appendix.
Center of gravity called the point of application of the resultant forces of gravity acting on individual parts of the body. In order to find the center of gravity, you need to hang the figure several times (2-3 times), attaching the suspension thread first to one and then to another point of the body. The point of intersection of the suspension threads will be the desired center of gravity.
The condition of body equilibrium depends on the position of the center of gravity. Equilibrium, in which a body removed from an equilibrium position returns to it again, is called sustainable.
Equilibrium in which a body removed from its equilibrium position does not return to starting position, called unstable.
Laboratory work. Determination of the center of gravity of a flat plate.
Work order:
- Using a needle that sticks into the cork, hang the plate and plumb line.
- Using a sharpened pencil, mark a plumb line on the lower and upper edges of the plate.
- After removing the plate, draw a line on it connecting the marked points.
- Repeat the experiment by hanging the plate at another point.
- Make sure that the intersection point of the drawn lines is the center of gravity of the plate.
6. Summing up.
7. Homework. Slide 21, application.
1. § 10, 11 (material from reading)
2. Find centers of gravity geometric shapes: square, triangle, circle.

Work progress Any real body, having finite dimensions and mass, can be considered as a set of its constituent parts. Each of these parts is individually affected by gravity. The force of gravity, which acts on the body as a whole, is the resultant of these forces. The point of application of this resultant is usually called the center of gravity of the body.

Task 1: Determine the position of the center of gravity of a flat figure of any shape. Using scissors, cut out a figure of any shape from cardboard. Attach the thread to it at point A with tape. Hang the figure by the thread to the tripod leg. Using a ruler and pencil, mark the vertical line AB on the cardboard.


Task 2: Using only a ruler and pencil, find the position of the center of gravity of a flat figure. Using a pencil and ruler, divide the figure into two rectangles. By construction, find the positions O 1 and O 2 of their centers of gravity. It is obvious that the center of gravity of the entire figure is on the line O 1 O 2

Task 2: Using only a ruler and pencil, find the position of the center of gravity of a flat figure. Divide the figure into two rectangles in another way. By construction, find the positions of the centers of gravity O 3 and O 4 of each of them. Connect points O 3 and O 4 with a line. The intersection point of lines O 1 O 2 and O 3 O 4 determines the position of the center of gravity of the figure

Task 3: Determine the position of the center of gravity of the triangle. Using tape, secure one end of the thread at the top of the triangle and hang it from the tripod leg. Using a ruler, mark the direction AB of the gravity line (make a mark on the opposite side of the triangle)

Task 3: Determine the position of the center of gravity of the triangle. Repeat the same procedure, hanging the triangle by vertex C. On the opposite vertex C side of the triangle, make a mark D. Using tape, attach lengths of threads AB and CD to the triangle. Point O of their intersection determines the position of the center of gravity of the triangle. In this case, the center of gravity of the figure is outside the body itself.


Purpose of the work: Using the proposed equipment, experimentally find the position of the center of gravity of two figures made of cardboard and a triangle. Purpose of the work: Using the proposed equipment, experimentally find the position of the center of gravity of two figures made of cardboard and a triangle. Equipment and materials: Tripod, thick cardboard, triangle from the school kit, ruler, tape, thread, pencil.
Progress of work Any real body with finite dimensions and mass can be considered as a collection of its constituent parts. Each of these parts is individually affected by gravity. The force of gravity, which acts on the body as a whole, is the resultant of these forces. The point of application of this resultant is usually called the center of gravity of the body.
Task 1: Determine the position of the center of gravity of a flat figure of any shape. Using scissors, cut out a figure of any shape from cardboard. Attach the thread to it at point A with tape. Hang the figure by the thread to the tripod leg. Using a ruler and pencil, mark the vertical line AB on the cardboard. .
Task 2: Using only a ruler and pencil, find the position of the center of gravity of a flat figure. Using a pencil and ruler, divide the figure into two rectangles. By construction, find the positions O1 and O2 of their centers of gravity. It is obvious that the center of gravity of the entire figure is on the O1O2 line
Task 2: Using only a ruler and pencil, find the position of the center of gravity of a flat figure. Divide the figure into two rectangles in another way. By construction, find the positions of the centers of gravity O3 and O4 of each of them. Connect points O3 and O4 with a line. The intersection point of lines O1O2 and O3O4 determines the position of the figure’s center of gravity
Task 3: Determine the position of the center of gravity of the triangle. Using tape, secure one end of the thread at the top of the triangle and hang it from the tripod leg. Using a ruler, mark the direction AB of the gravity line (make a mark on the opposite side of the triangle)
Task 3: Determine the position of the center of gravity of the triangle. Repeat the same procedure, hanging the triangle by vertex C. On the opposite vertex C side of the triangle, make a mark D. Using tape, attach lengths of threads AB and CD to the triangle. Point O of their intersection determines the position of the center of gravity of the triangle. In this case, the center of gravity of the figure is outside the body itself.
The work can be used for lessons and reports on the subject "Physics"
Our ready-made presentations do physics complex topics The lessons are simple, interesting and easy to understand. Most of the experiments studied in physics lessons cannot be carried out in ordinary school conditions, such experiments can be demonstrated using physics presentations.B this section site you can download ready-made presentations on physics for grades 7,8,9,10,11, as well as presentations-lectures and presentations-seminars on physics for students.
If a flat plate is suspended at any point, it will be positioned so that a vertical straight line drawn through the suspension point will pass through the center of gravity of the plate. This allows you to find the center of gravity of flat plates experimentally. To do this, you need to hang the plate at any point and draw a vertical line on it passing through the suspension point. Then perform the same operations again, hanging the plastiu at another point. The intersection point of the drawn lines will give the position of the center of gravity of the plate.To verify this, the plate can be suspended at the third point. The vertical line passing through the suspension point must pass through the intersection point of the first two lines.
You can also balance the plate on the head of a pin. The plate will be in equilibrium if the fulcrum coincides with the center of gravity.
Equipment and materials: 1) ruler, 2) flat plate of arbitrary shape, 3) plumb line,
4) pin, 5) tripod with foot and coupling, 6) cork.

Work order
1. Clamp the stopper into the tripod foot in a horizontal position.
2. Using a pin that sticks into the cork, hang the plate and plumb line.
3. Using a sharp pencil, mark the plumb line on the lower and upper edges of the plate.
4. Having removed the plate, draw a line on it connecting the marked points.
5. Repeat the experiment, hanging the plate at another point.
6. Make sure that the point of intersection of the drawn lines is the center of gravity of the plate.