If you're wondering how to celebrate your child's birthday, you might like the idea of hosting a science show for kids. Recently, scientific holidays have become increasingly popular. Almost all children enjoy entertaining experiences and experiments. For them it is something magical and incomprehensible, and therefore interesting. The cost of hosting a science show is quite high. But this is not a reason to deny yourself the pleasure of watching the amazed children’s faces. After all, you can do it on your own, without resorting to the help of animators and holiday agencies.
In this article, I have made a selection of simple chemical and physical experiments that can be carried out at home without any problems. Everything you need to carry them out can probably be found in your kitchen or medicine cabinet. You won't need any special skills either. All you need is desire and a good mood.
I tried to collect simple but spectacular experiments that will be interesting to children of different ages. For each experiment, I prepared a scientific explanation (it’s not for nothing that I studied to be a chemist!). Whether you explain to your children the essence of what is happening or not is up to you. It all depends on their age and level of training. If the children are small, you can skip the explanation and go straight to the spectacular experience, saying only that they will be able to learn the secrets of such “miracles” when they grow up, go to school and begin to study chemistry and physics. Perhaps this will make them interested in studying in the future.
Although I chose the safest experiments, they still need to be taken very seriously. It is better to perform all manipulations with gloves and a gown, at a safe distance from children. After all, vinegar and potassium permanganate can cause trouble.
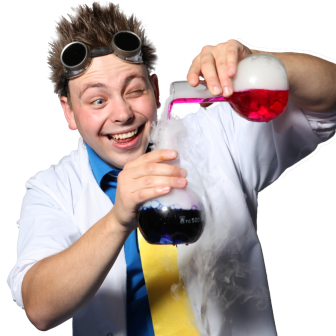
And, of course, when holding a children's science show, you need to take care of the image of a mad scientist. Your artistry and charisma will largely determine the success of the event. Transforming from an ordinary person into a funny scientific genius is not at all difficult - all you have to do is tousle your hair, put on big glasses and a white coat, get smeared with soot and make a facial expression appropriate to your new status. This is what a typical mad scientist looks like.


Before organizing a science show at a children's party (by the way, it can be not only a birthday, but also any other holiday), you should do all the experiments in the absence of children. Rehearse so that there are no unpleasant surprises later. You never know what can go wrong.
Children's experiments can be carried out without a festive occasion - just so that you can spend time with your child in an interesting and useful way.
Choose the experiences you like best and create a holiday script. In order not to overburden children with science, even if it is entertaining, dilute the event with fun games.
Part 1. Chemical show
Attention! When conducting chemical experiments, you should be extremely careful.
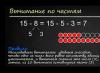
Foam fountain
Almost all children love foam - the more, the better. Even kids know how to make it: to do this, you need to pour shampoo into the water and shake it well. Can foam form on its own without shaking and also be colored?
Ask the children what they think foam is. What does it consist of and how can it be obtained. Let them express their guesses.
Then explain that foam is bubbles filled with gas. This means that for its formation you need some substance from which the walls of the bubbles will consist, and a gas that will fill them. For example, soap and air. When soap is added to water and stirred, air enters these bubbles from the environment. But gas can also be produced in another way - through a chemical reaction.
Option 1
- hydroperite tablets;
- potassium permanganate;
- liquid soap;
- water;
- glass vessel with a narrow neck (preferably beautiful);
- glass;
- hammer;
- tray.
Setting up the experiment
- Using a hammer, crush the hydroperite tablets into powder and pour it into the flask.
- Place the flask on a tray.
- Add liquid soap and water.
- Prepare an aqueous solution of potassium permanganate in a glass and pour it into the flask with hydroperide.
After the solutions of potassium permanganate (potassium permanganate) and hydroperide (hydrogen peroxide) merge, a reaction will begin to occur between them, accompanied by the release of oxygen.
4KMnO 4 + 4H 2 O 2 = 4MnO 2 ¯ + 5O 2 + 2H 2 O + 4KOH
Under the influence of oxygen, the soap present in the flask will begin to foam and lick out of the flask, forming a kind of fountain. Due to potassium permanganate, part of the foam will turn pink.
You can see how this happens in the video.
Important: The glass vessel must have a narrow neck. Do not take the resulting foam into your hands and do not give it to children.
Option 2
Another gas, for example carbon dioxide, is also suitable for foam formation. You can paint the foam any color you want.
To carry out the experiment you will need:
- plastic bottle;
- soda;
- vinegar;
- food coloring;
- liquid soap.
Setting up the experiment
- Pour vinegar into the bottle.
- Add liquid soap and food coloring.
- Add baking soda.
Result and scientific explanation
When soda and vinegar interact, a violent chemical reaction occurs, accompanied by the release of carbon dioxide CO 2 .
Under its influence, the soap will begin to foam and lick out of the bottle. The dye will color the foam in the color you choose.
Fun ball
What's a birthday without balloons? Show the children the balloon and ask how to inflate it. The guys, of course, will answer with their mouths. Explain that the balloon is inflated by the carbon dioxide that we exhale. But there is another way to inflate the balloon.
To carry out the experiment you will need:
- soda;
- vinegar;
- bottle;
- balloon.
Setting up the experiment
- Place a teaspoon of baking soda inside the balloon.
- Pour vinegar into the bottle.
- Place the balloon on the neck of the bottle and pour the baking soda into the bottle.
Result and scientific explanation
As soon as soda and vinegar come into contact, a violent chemical reaction will begin, accompanied by the release of carbon dioxide CO 2. The balloon will begin to inflate before your eyes.
CH 3 -COOH + Na + − → CH 3 -COO − Na + + H 2 O + CO 2
If you take a smiley ball, it will make an even greater impression on the guys. At the end of the experiment, tie a balloon and give it to the birthday person.
Watch the video for a demonstration of the experience.
Chameleon
Can liquids change color? If yes, why and how? Before you try the experiment, be sure to ask your children these questions. Let them think. They will remember how water is colored when you rinse a brush with paint in it. Is it possible to discolor the solution?
To carry out the experiment you will need:
- starch;
- alcohol burner;
- test tube;
- cup;
- water.
Setting up the experiment
- Pour a pinch of starch into a test tube and add water.
- Drop some iodine. The solution will turn blue.
- Light the burner.
- Heat the test tube until the solution becomes colorless.
- Pour cold water into a glass and immerse the test tube in it so that the solution cools and turns blue again.
Result and scientific explanation
When interacting with iodine, a starch solution turns blue, since this produces a dark blue compound I 2 * (C 6 H 10 O 5) n. However, this substance is unstable and, when heated, breaks down again into iodine and starch. When cooled, the reaction goes in the other direction and we again see the solution turning blue. This reaction demonstrates the reversibility of chemical processes and their dependence on temperature.
I 2 + (C 6 H 10 O 5) n => I 2 *(C 6 H 10 O 5) n
(iodine - yellow) (starch - clear) (dark blue)
Rubber egg
All children know that eggshells are very fragile and can break at the slightest blow. It would be nice if the eggs didn’t break! Then you wouldn’t have to worry about getting the eggs home when your mom sends you to the store.
To carry out the experiment you will need:
- vinegar;
- raw chicken egg;
- cup.
Setting up the experiment
- To surprise the children, you need to prepare for this experience in advance. 3 days before the holiday, pour vinegar into a glass and place a raw chicken egg in it. Leave for three days so that the shell has time to completely dissolve.
- Show the children a glass with an egg and invite everyone to say a magic spell together: “Tryn-dyrin, boom-burym!” Egg, become rubber!”
- Remove the egg with a spoon, wipe it with a napkin and demonstrate how it can now become deformed.
Result and scientific explanation
Eggshells are made of calcium carbonate, which dissolves when reacted with vinegar.
CaCO 3 + 2 CH 3 COOH = Ca(CH 3 COO) 2 + H 2 O + CO 2
Due to the presence of a film between the shell and the contents of the egg, it retains its shape. Watch the video to see what an egg looks like after vinegar.
Secret letter
Children love everything mysterious, and therefore this experiment will certainly seem like real magic to them.
Take an ordinary ballpoint pen and write a secret message from aliens on a piece of paper or draw some kind of secret sign that no one except the guys present can know about.
When the children read what is written there, tell them that this is a big secret and the inscription must be destroyed. Moreover, magic water will help you erase the inscription. If you treat the inscription with a solution of potassium permanganate and vinegar, then with hydrogen peroxide, the ink will wash off.
To carry out the experiment you will need:
- potassium permanganate;
- vinegar;
- hydrogen peroxide;
- flask;
- cotton buds;
- ball pen;
- paper;
- water;
- paper towels or napkins;
- iron.
Setting up the experiment
- Draw a picture or message on a piece of paper with a ballpoint pen.
- Pour some potassium permanganate into the test tube and add vinegar.
- Soak a cotton swab in this solution and swipe over the inscription.
- Take another cotton swab, moisten it with water and wash off the resulting stains.
- Blot with a napkin.
- Apply hydrogen peroxide to the inscription and blot it again with a napkin.
- Iron or place under a press.
Result and scientific explanation
After all the manipulations, you will receive a blank sheet of paper, which will greatly surprise the children.
Potassium permanganate is a very strong oxidizing agent, especially if the reaction occurs in an acidic environment:
MnO 4 ˉ+ 8 H + + 5 eˉ = Mn 2+ + 4 H 2 O
A strong acidified solution of potassium permanganate literally burns many organic compounds, turning them into carbon dioxide and water. To create an acidic environment, our experiment uses acetic acid.
The product of the reduction of potassium permanganate is manganese dioxide Mn0 2, which has a brown color and precipitates. To remove it, we use hydrogen peroxide H 2 O 2, which reduces the insoluble compound Mn0 2 to a highly soluble manganese (II) salt.
MnO 2 + H 2 O 2 + 2 H + = O 2 + Mn 2+ + 2 H 2 O.
I suggest you watch how the ink disappears in the video.
The power of thought
Before setting up the experiment, ask the children how to extinguish a candle flame. They, of course, will answer you that you need to blow out the candle. Ask if they believe you can put out a fire with an empty glass by casting a magic spell?
To carry out the experiment you will need:
- vinegar;
- soda;
- glasses;
- candles;
- matches.
Setting up the experiment
- Pour baking soda into a glass and fill it with vinegar.
- Light some candles.
- Bring a glass of baking soda and vinegar to another glass, tilting it slightly so that the carbon dioxide produced during the chemical reaction flows into the empty glass.
- Pass a glass of gas over the candles, as if pouring it on the flame. At the same time, make a mysterious expression on your face and say some incomprehensible spell, for example: “Chickens-borers, moors-pli!” Flame, don’t burn anymore!” Children must think that this is magic. You will reveal the secret after the delight.
Result and scientific explanation
When soda and vinegar interact, carbon dioxide is released, which, unlike oxygen, does not support combustion:
CH 3 -COOH + Na + − → CH 3 -COO − Na + + H 2 O + CO 2
CO 2 is heavier than air, and therefore does not fly up, but settles down. Thanks to this property, we have the opportunity to collect it in an empty glass, and then “pour” it onto the candles, thereby extinguishing their flame.
How this happens, watch the video.
Part 2. Entertaining physical experiments
Genie strongman
This experiment will allow children to look at their usual action from a different perspective. Place an empty wine bottle in front of the children (it is better to remove the label first) and push the cork into it. And then turn the bottle upside down and try to shake the cork out. Of course, you won't succeed. Ask the children: is there any way to get the cork out without breaking the bottle? Let them say what they think about this.
Since nothing can be used to pick up the cork through the neck, there is only one thing left to do - try to push it out from the inside. How to do it? You can call the genie for help!
The gin used in this experiment will be a large plastic bag. To enhance the effect, you can decorate the bag with colored markers - draw eyes, nose, mouth, hands, some patterns.
So, to conduct the experiment you will need:
- empty wine bottle;
- cork;
- plastic bag.
Setting up the experiment
- Twist the bag into a tube and insert it into the bottle so that the handles are on the outside.
- When turning the bottle over, ensure that the cork is on the side of the bag, closer to the neck.
- Inflate the bag.
- Carefully begin to pull the package out of the bottle. The cork will come out along with it.
Result and scientific explanation
As the bag is inflated, it expands inside the bottle, expelling air from it. When we begin to pull out the bag, a vacuum is created inside the bottle, due to which the walls of the bag wrap around the cork and drag it out with them. This is such a strong gin!
To see how this happens, watch the video.
Wrong glass
On the eve of the experiment, ask the children what will happen if you turn a glass of water upside down. They will answer that the water will pour out. Tell them that this only happens with the “right” glasses. And you have the “wrong” glass from which water does not pour out.
To carry out the experiment you will need:
- glasses of water;
- paints (you can do without them, but this way the experience looks more spectacular; it is better to use acrylic paints - they give more saturated colors);
- paper.
Setting up the experiment
- Pour water into glasses.
- Add some color to it.
- Wet the edges of the glasses with water and place a sheet of paper on top of them.
- Press the paper firmly against the glass, holding it with your hand, and turn the glasses upside down.
- Wait a moment until the paper sticks to the glass.
- Slowly remove your hand.
Result and scientific explanation
Surely all children know that we are surrounded by air. Although we cannot see him, he, like everything around him, has weight. We feel the touch of air, for example, when the wind blows on us. There is a lot of air, and therefore it presses on the ground and everything around. This is called atmospheric pressure.
When we apply paper to a wet glass, it sticks to its walls due to the force of surface tension.
In an inverted glass, between its bottom (which is now at the top) and the surface of the water, a space is formed filled with air and water vapor. The force of gravity acts on the water, pulling it down. At the same time, the space between the bottom of the glass and the surface of the water increases. Under conditions of constant temperature, the pressure in it decreases and becomes less than atmospheric. The total pressure of air and water on the paper from the inside is slightly less than the air pressure from the outside. That's why water doesn't pour out of the glass. However, after some time, the glass will lose its magical properties, and the water will still spill out. This is due to the evaporation of water, which increases the pressure inside the glass. When it becomes more atmospheric, the paper will fall off and the water will pour out. But you don’t have to bring it to this point. It will be more interesting this way.
You can watch the progress of the experiment in the video.
Gluttonous bottle
Ask your children if they like to eat. Do people like to eat glass bottles? No? Don't they eat bottles? But they are wrong. They don’t eat ordinary bottles, but they don’t even mind having a snack with magic bottles.
To carry out the experiment you will need:
- boiled chicken egg;
- bottle (to enhance the effect, the bottle can be painted or embellished in some way, but so that children can see what is happening inside it);
- matches;
- paper.
Setting up the experiment
- Peel the boiled egg from the shell. Who eats eggs in a shell?
- Set fire to a piece of paper.
- Throw the burning paper into the bottle.
- Place the egg on the neck of the bottle.
Result and scientific explanation
When we throw burning paper into a bottle, the air in it heats up and expands. By closing the neck with an egg, we prevent the flow of air, as a result of which the fire goes out. The air in the bottle cools and contracts. A pressure difference is created inside the bottle and outside, due to which the egg is sucked into the bottle.
That's all for now. However, over time I plan to add a few more experiments to the article. At home, you can, for example, conduct experiments with balloons. Therefore, if you are interested in this topic, add the site to your bookmarks or subscribe to the newsletter for updates. When I add something new, I will inform you about it by e-mail. It took me a lot of time to prepare this article, so please respect my work and when copying materials, be sure to include an active hyperlink to this page.
If you have ever conducted home experiments for children and organized a science show, write about your impressions in the comments and attach a photo. It will be interesting!
Chemist is a very interesting and multifaceted profession, uniting under its wing many different specialists: chemical scientists, chemical technologists, analytical chemists, petrochemists, chemistry teachers, pharmacists and many others. We decided to celebrate the upcoming Chemist’s Day 2017 with them, so we selected several interesting and impressive experiments in the field in question, which even those who are as far from the profession of a chemist as possible can repeat. The best chemical experiments at home - read, watch and remember!
When is Chemist's Day celebrated?
Before we begin to consider our chemical experiments, let us clarify that traditionally Chemist’s Day is celebrated in the countries of the post-Soviet space at the very end of spring, namely on the last Sunday of May. This means that the date is not fixed: for example, in 2017 Chemist’s Day is celebrated on May 28. And if you work in the chemical industry, or are studying a specialty in this area, or are otherwise directly related to chemistry on duty, then you have every right to join the celebration on this day.
Chemical experiments at home
Now let's get down to the main thing and begin to perform interesting chemical experiments: it is best to do this together with young children, who will definitely perceive what is happening as a magic trick. Moreover, we tried to select chemical experiments for which reagents can be easily obtained at a pharmacy or store.
Experiment No. 1 - Chemical traffic light
Let's start with a very simple and beautiful experiment, which received this name for good reason, because the liquid participating in the experiment will change its color exactly to the colors of the traffic light - red, yellow and green.
You will need:
- indigo carmine;
- glucose;
- caustic soda;
- water;
- 2 transparent glass containers.
Don't let the names of some ingredients scare you - you can easily buy glucose tablets at a pharmacy, indigo carmine is sold in stores as a food coloring, and you can find caustic soda in a hardware store. It is better to take tall containers, with a wide base and a narrower neck, for example, flasks, to make them easier to shake.


But what is interesting about chemical experiments is that there is an explanation for everything:
- By mixing glucose with caustic soda, i.e. sodium hydroxide, we obtained an alkaline solution of glucose. Then, by mixing it with a solution of indigo carmine, we oxidize the liquid with oxygen, which it was saturated with during pouring from the flask - this is the reason for the appearance of the green color. Next, glucose begins to work as a reducing agent, gradually changing color to yellow. But by shaking the flask, we saturate the liquid with oxygen again, allowing the chemical reaction to go through this circle again.
You will get an idea of how interesting it looks in real life from this short video:
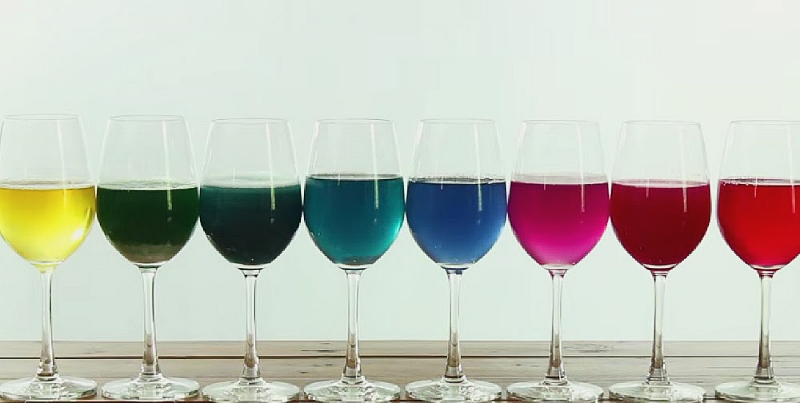
Experiment No. 2 - Universal acidity indicator from cabbage
Children love interesting chemical experiments with colorful liquids, it’s no secret. But we, as adults, responsibly declare that such chemical experiments look very spectacular and interesting. Therefore, we advise you to conduct another “color” experiment at home - a demonstration of the amazing properties of red cabbage. It, like many other vegetables and fruits, contains anthocyanins - natural indicator dyes that change color depending on the pH level - i.e. degree of acidity of the environment. This property of cabbage will be useful to us in order to obtain further multi-colored solutions.
What we need:
- 1/4 red cabbage;
- lemon juice;
- baking soda solution;
- vinegar;
- sugar solution;
- Sprite type drink;
- disinfectant;
- bleach;
- water;
- 8 flasks or glasses.
Many of the substances on this list are quite dangerous, so be careful when performing simple chemical experiments at home, wear gloves and, if possible, safety glasses. And don’t let children get too close - they may knock over the reagents or the final contents of the colored cones and even want to try them, which should not be allowed.

Let's get started:

How do these chemical experiments explain the color changes?
- The fact is that light falls on all objects that we see - and it contains all the colors of the rainbow. Moreover, each color in the spectrum has its own wavelength, and molecules of different shapes, in turn, reflect and absorb these waves. The wave that is reflected from the molecule is the one that we see, and this determines what color we perceive - because other waves are simply absorbed. And depending on what substance we add to the indicator, it begins to reflect only rays of a certain color. Nothing complicated!
For a slightly different version of this chemical experiment, with fewer reagents, see the video:
Experiment No. 3 - Dancing jelly worms
We continue to do chemical experiments at home - and we will conduct the third experiment on everyone’s favorite jelly candies in the form of worms. Even adults will find it funny, and children will be absolutely delighted.
Take the following ingredients:
- a handful of gummy worms;
- vinegar essence;
- ordinary water;
- baking soda;
- glasses - 2 pcs.

When choosing suitable candies, choose smooth, chewy worms without sugar coating. To make them less heavy and easier to move, cut each candy lengthwise into two halves. So, let's begin some interesting chemical experiments:
- Make a solution of warm water and 3 tablespoons of soda in one glass.
- Place the worms there and keep them there for about fifteen minutes.
- Fill another deep glass with essence. Now you can slowly drop the jellies into the vinegar, watching how they begin to move up and down, which is in some way similar to a dance:
Why is this happening?
- It's simple: baking soda, in which the worms are soaked for a quarter of an hour, is sodium bicarbonate, and the essence is an 80% solution of acetic acid. When they react, water, carbon dioxide in the form of small bubbles and sodium salt of acetic acid are formed. It is carbon dioxide in the form of bubbles that the worm becomes overgrown with, rises up, and then descends when they burst. But the process still continues, causing the candy to rise on the resulting bubbles and fall until it is completely completed.
And if you are seriously interested in chemistry, and want Chemist’s Day to become your professional holiday in the future, then you will probably be interested in watching the following video, which details the typical everyday life of chemistry students and their fascinating educational and scientific activities:
Take it for yourself and tell your friends!
Read also on our website:
show more
Our presentation of entertaining physics will tell you why in nature there cannot be two identical snowflakes and why an electric locomotive driver backs up before moving, where the largest reserves of water are located, and what invention of Pythagoras helps fight alcoholism.
Parents of little fidgets can surprise them with experiments that can be carried out at home. Light, but at the same time surprising and delightful, they can not only diversify a child’s leisure time, but also allow them to look at familiar things with completely different eyes. And discover their properties, functions, purpose.
Young naturalists
Experiments at home, great for children under 10 years of age, are the best way to help your child gain practical experience that will be useful in the future.
Safety precautions when conducting experiments
To ensure that educational experiments are not overshadowed by troubles and injuries, it is enough to remember a few simple but important rules.
 Safety comes first
 - Before you start working with chemicals, the work surface must be protected by covering it with film or paper. This will save parents from unnecessary cleaning and will preserve the appearance and functionality of the furniture.
- During work, you do not need to get too close to the reagents, bending over them. Especially if your plans include chemical experiments for young children that involve unsafe substances. The measure will protect the mucous membranes of the mouth and eyes from irritation and burns.
- If possible, you should use protective equipment: gloves, glasses. They must be suitable in size for the child and not interfere with him during the experiment.
Simple experiments for little ones
Developmental experiences and experiments for very young children (or for children under 10 years old) are usually simple and do not require parents to have any special skills or rare or expensive equipment. But the joy of discovery and miracle, which is so easy to do with your own hands, will remain with him for a long time.
For example, children will be indescribably delighted by a real seven-color rainbow, which they can create themselves with the help of an ordinary mirror, a container of water and a sheet of white paper.
 Rainbow in a Bottle Experience
 To begin with, place a mirror at the bottom of a small basin or bathtub. Then, it is filled with water; and the light of the lantern is directed onto the mirror. After the light is reflected and passes through the water, it is decomposed into its component colors, becoming the same rainbow that can be seen on a sheet of white paper.
Another very simple and beautiful experiment can be carried out using ordinary water, wire and salt.
To begin the experiment, you need to prepare a supersaturated salt solution. Calculating the required concentration of a substance is quite simple: with the required amount of salt in water, it stops dissolving when the next portion is added. It is very good to use warm distilled water for this purpose. To make the experiment more successful, the finished solution can also be poured into another container - this will remove dirt and make it cleaner.
 Experience "Salt on a Wire"
 When everything is ready, a small piece of copper wire with a loop at the end is lowered into the solution. The container itself is removed to a warm place and left there for a certain time. As the solution begins to cool, the solubility of the salt will decrease and it will begin to settle on the wire in the form of beautiful crystals. You will be able to notice the first results within a few days. By the way, you can use not only ordinary, straight wire in the experiment: by twisting fancy figures from it, you can grow crystals of very different sizes and shapes. By the way, this experiment will give your child a great idea for New Year's toys in the form of real ice snowflakes - you just need to find a flexible wire and form a beautiful symmetrical snowflake out of it.
Invisible ink can also make a lasting impression on a child. It’s very simple to prepare them: just take a cup of water, matches, cotton wool, half a lemon. And a sheet on which you can write text.
 Invisible ink can be purchased ready-made
 First, mix equal amounts of lemon juice and water in a cup. Then, a little cotton wool is wrapped around a toothpick or a thin match. The resulting “pencil” is dipped into the mixture in the resulting liquid; Then they can write any text on a piece of paper.
Even though the words on paper will be completely invisible at first, it will be very easy to manifest them. To do this, a sheet of already dried ink needs to be brought to the lamp. The written words will immediately appear on a heated sheet of paper.
Which child doesn't love balloons?
It turns out that you can even inflate an ordinary balloon in a very original way. To do this, dissolve one spoon of baking soda in a bottle of water. And in another cup, mix the juice of one lemon and three tablespoons of vinegar. Afterwards, the contents of the cup are introduced into the bottle (for convenience, you can use a small funnel). The ball must be placed on the neck of the bottle as quickly as possible until the chemical reaction is completed. During this time, carbon dioxide will be able to quickly inflate the balloon under pressure. To prevent the ball from jumping off the neck of the bottle, it can be secured with electrical tape or tape.
 "Inflate the balloon" experiment
 Colored milk looks very interesting and unusual, the colors of which will move, intricately mixing with each other. For this experiment, you need to pour some whole milk into a plate and add a few drops of food coloring to it. Individual areas of the liquid will turn different colors, but the spots will remain motionless. How to set them in motion? Very simple. It is enough to take a small cotton swab and, after dipping it in detergent, bring it to the surface of the colored milk. By reacting with the milk fat molecules, the detergent molecules will cause it to move.
 Experience “Drawings on milk”
 Important! Skim milk is not suitable for this experiment. Only whole ones can be used!
Surely all children have had the opportunity to observe funny air bubbles in mineral or sweet water at home and on the street. But are they strong enough to lift a grain of corn or raisins to the surface? It turns out yes! To check this, just pour any sparkling water into a bottle, and then throw some corn or raisins into it. The child will see for himself how easily, under the influence of air bubbles, both corn and raisins will begin to rise up, and then, having reached the surface of the liquid, fall down again.
Experiments for older children
Older children (from 10 years old) can be offered more complex chemical experiments that require more components. These experiments are a little more difficult for older children, but children can already take part in them.
To comply with safety precautions, children under 10 years of age should conduct experiments under the strict supervision of adults, mainly as a spectator. Children over 10 years old can take a more active part in the experiments.
An example of such an experiment would be the creation of a lava lamp. Surely many children dream of such a miracle. But it’s much more pleasant to make it yourself, using simple components that are probably found in every home.
 Lava Lamp Experience
 The basis of the lava lamp will be a small jar or an ordinary glass. In addition, for the experiment you will need vegetable oil, water, salt and a little food coloring.
The jar or other container used as the base of the lamp is filled two-thirds with water and one-third with oil. Since oil is much lighter in weight than water, it will remain on its surface without mixing with it. Then, a little food coloring is added to the jar - this will give the lava lamp color and make the experiment more beautiful and spectacular. And after that, add a teaspoon of salt to the resulting mixture. For what? Salt causes the oil to sink to the bottom in the form of bubbles, and then, dissolving, pushes them up.
The following chemical experiment will help make a school subject like geography exciting and interesting.
 Making a volcano with your own hands
 After all, studying volcanoes is much more interesting when there is not just a dry book text nearby, but a whole model! Especially if you can easily do it at home with your own hands, using available means at hand: sand, food coloring, soda, vinegar and a bottle are perfect.
To begin with, a bottle is placed on a tray - it will become the basis of the future volcano. Around it you need to mold a small cone of sand, clay or plasticine - this way the mountain will take on a more complete and believable appearance. Now you need to cause a volcanic eruption: a little warm water is poured into the bottle, then a little soda and food coloring (red or orange). The finishing touch will be a quarter glass of vinegar. Having reacted with soda, the vinegar will begin to actively push the contents of the bottle out. This explains the interesting effect of the eruption, which can be observed with the child.
 A volcano can be made from toothpaste
 Can paper burn without being burned?
It turns out yes. And an experiment with fireproof money will easily prove this. To do this, a ten-ruble banknote is immersed in a 50% alcohol solution (water is mixed with alcohol in a 1 to 1 ratio, a pinch of salt is added to it). After the bill is properly soaked, excess liquid is removed from it, and the bill itself is set on fire. Once it flares up, it will begin to burn, but will not burn out at all. This experience is quite simple to explain. The temperature at which alcohol burns is not high enough to evaporate the water. Thanks to this, even after the substance burns out completely, the money will remain slightly damp, but absolutely intact.
 Experiments with ice are always a success
 Young nature lovers can be encouraged to germinate seeds at home without using soil. How it's done?
A little cotton wool is placed in the eggshell; it is actively moistened with water, and then some seeds (for example, alfalfa) are placed in it. In just a few days you will be able to notice the first shoots. Thus, soil is not always needed for seed germination - only water is enough.
And the next experiment, which is easy to do at home for children, will certainly appeal to girls. After all, who doesn’t like flowers?
 A painted flower can be given to your mother
 Especially the most unusual, bright colors! Thanks to a simple experiment, right in front of amazed children, simple and familiar flowers can turn into the most unexpected color. Moreover, this is extremely simple to do: just put the cut flower in water with food coloring added to it. Climbing up the stem to the petals, chemical dyes will color them in the colors you want. To better absorb water, it is better to make a cut diagonally - this way it will have the maximum area. In order for the color to appear brighter, it is advisable to use light or white flowers. An even more interesting and fantastic effect will be obtained if, before starting the experiment, the stem is split into several parts and each of them is immersed in its own glass of colored water.
The petals will turn into all colors at once in the most unexpected and bizarre way. That we will undoubtedly make a lasting impression on the child!
 Experience "Colored foam"
 Everyone knows that under the influence of gravity, water can only flow downwards. But is it possible to make it rise up the napkin? To conduct this experiment, an ordinary glass is filled about a third with water. The napkin is folded several times to form a narrow rectangle. After this, the napkin unfolds again; Having stepped back a little from the bottom edge, you need to draw a line of colored dots of a sufficiently large diameter on it. The napkin is immersed in water so that about one and a half centimeters of its colored part is in it. Having come into contact with the napkin, the water will begin to gradually rise upward, coloring it with multi-colored stripes. This unusual effect occurs due to the fact that, having a porous structure, the fibers of the napkin easily allow water to pass upward.
 Experiment with water and napkin
 To carry out the following experiment, you will need a small blotter, cookie cutters of different shapes, some gelatin, a transparent bag, a glass and water.
 Gelatin water does not mix
 Gelatin dissolves in a quarter glass of water; it should swell and increase in volume. Then, the substance is dissolved in a water bath and brought to approximately 50 degrees. The resulting liquid should be distributed in a thin layer over a plastic bag. Using gelatin cookie cutters, shapes of various shapes are cut out. After this, you need to lay them on a blotter or napkin, and then breathe on them. Warm breath will cause the gelatin to increase in volume, causing the figures to begin to bend on one side.
Experiments conducted at home with children are very easy to diversify.
 Gelatin figures from molds
 In winter, you can try to slightly modify the experiment by taking the gelatin figures out onto the balcony or leaving them in the freezer for a while. When the gelatin hardens under the influence of cold, patterns of ice crystals will clearly appear on it.
Conclusion
 Description of other experiments
 Delight and a sea of positive emotions are what experimenting with adults will bring to curious children. And parents will allow themselves to share the joy of their first discoveries with young researchers. After all, no matter how old a person is, the opportunity to return to childhood at least for a short time is truly priceless.
Friends, good afternoon! Agree, how interesting it is sometimes to surprise our little ones! They have such a funny reaction to . It shows that they are ready to learn, ready to absorb new material. The whole world opens up at this moment before them and for them! And we, parents, act as real wizards with a hat from which we “pull out” something incredibly interesting, new and very important!
What will we get out of the “magic” hat today? We have 25 experimental experiments there for children and adults. They will be prepared for kids of different ages in order to interest them and involve them in the process. Some can be carried out without any preparation, using handy tools that each of us has at home. For others, we will buy some materials so that everything goes smoothly. Well? I wish us all good luck and move forward!
Today will be a real holiday! And in our program:
So let's decorate the holiday by preparing an experiment for a birthday, New Year, March 8, etc.
Ice soap bubbles
What do you think will happen if simple bubbles that are tiny in 4 years loves to inflate them, run after them and burst them, inflate them in the cold. Or rather, straight into a snowdrift.
I'll give you a hint:
- they will burst immediately!
- take off and fly away!
- will freeze!
Whatever you choose, I can tell you right away, it will surprise you! Can you imagine what will happen to the little one?!
But in slow motion it’s just a fairy tale!
I'm complicating the question. Is it possible to repeat the experiment in the summer in order to get a similar option?
Choose answers:
- Yes. But you need ice from the refrigerator.
You know, although I really want to tell you everything, this is exactly what I won’t do! Let there be at least one surprise for you too!
Paper vs water

The real one is waiting for us experiment. Is it really possible for paper to defeat water? This is a challenge for everyone who plays Rock-Paper-Scissors!
What we need:
- Paper;
- Water in a glass.
Cover the glass. It would be good if its edges were a little damp, then the paper would stick. Carefully turn the glass over... No water leaks!
Let's blow up balloons without breathing?

We have already carried out chemical children's experiments. Remember, the very first room for very little babies was a room with vinegar and soda. So, let's continue! And we use the energy, or rather, the air, that is released during the reaction for peaceful and inflatable purposes.
Ingredients:
- Soda;
- Plastic bottle;
- Vinegar;
- Ball.
Pour soda into the bottle and fill 1/3 with vinegar. Shake lightly and quickly pull the ball onto the neck. When it is inflated, bandage it and remove it from the bottle.
Such a small experience can show even in kindergarten.
Rain from a cloud

We need:
- Jar of water;
- Shaving foam;
- Food coloring (any color, several colors are possible).
We make a cloud of foam. A big and beautiful cloud! Entrust this to the best cloud maker, your child. 5 years. He will definitely make her real!
 author of the photo
All that remains is to distribute the dye over the cloud, and... drip-drip! Rain is coming!

Rainbow

Maybe, physics the children are still unknown. But after they make Rainbow, they will definitely love this science!
- Deep transparent container with water;
- Mirror;
- Flashlight;
- Paper.
Place a mirror at the bottom of the container. We shine a flashlight on the mirror at a slight angle. All that remains is to catch the Rainbow on paper.
Even easier is to use a disk and a flashlight.
Crystals

There is a similar, only already finished game. But our experience interesting the fact that we ourselves, from the very beginning, will grow crystals from salt in water. To do this, take a thread or wire. And let's keep it for several days in such salty water, where the salt can no longer dissolve, but accumulates in a layer on the wire.
Can be grown from sugar
Lava jar
If you add oil to a jar of water, it will all accumulate on top. It can be tinted with food coloring. But in order for the bright oil to sink to the bottom, you need to pour salt on top of it. Then the oil will settle. But not for long. The salt will gradually dissolve and release beautiful droplets of oil. The colored oil rises gradually, as if a mysterious volcano is bubbling inside the jar.
Eruption

For toddlers 7 years It will be very interesting to blow up, demolish, destroy something. In a word, this is a real element of nature for them. and therefore we create a real, exploding volcano!
We sculpt from plasticine or make a “mountain” from cardboard. We place a jar inside it. Yes, so that its neck fits the “crater”. Fill the jar with soda, dye, warm water and... vinegar. And everything will begin to “explode, lava will rush up and flood everything around!
A hole in the bag is no problem

This is what convinces book of scientific experiments for children and adults Dmitry Mokhov "Simple Science". And we can check this statement ourselves! First, fill the bag with water. and then we'll pierce it. But we won’t remove what we pierced with (a pencil, a toothpick or a pin). How much water will we leak? Let's check!
Water that doesn't spill
Only such water still needs to be produced.
Take water, paint and starch (as much as water) and mix. The end result is just plain water. You just can't spill it!
"Slippery" egg

In order for the egg to actually fit into the neck of the bottle, you should set fire to the piece of paper and throw it into the bottle. Cover the hole with an egg. When the fire goes out, the egg will slip inside.
Snow in summer

This trick is especially interesting to repeat in the warm season. Remove the contents of the diapers and wet them with water. All! The snow is ready! Nowadays such snow is easy to find in children's toys in stores. Ask the seller for artificial snow. And no need to ruin diapers.
Moving snakes
To make a moving figure we will need:
- Sand;
- Alcohol;
- Sugar;
- Soda;
- Fire.
Pour alcohol onto a pile of sand and let it soak. Then pour sugar and baking soda on top and set it on fire! Oh, what a funny this experiment! Children and adults will love what the animated snake gets up to!
Of course, this is for older children. And it looks pretty scary!
Battery train

The copper wire, which we twist into an even spiral, will become our tunnel. How? Let's connect its edges, forming a round tunnel. But before that, we “launch” the battery inside, only attaching neodymium magnets to its edges. And consider that you have invented a perpetual motion machine! The locomotive moved on its own.
Candle swing

To light both ends of the candle, you need to clear the wax from the bottom down to the wick. Heat a needle over the fire and pierce the candle in the middle with it. Place the candle on 2 glasses so that it rests on the needle. Burn the edges and shake slightly. Then the candle itself will swing.
Elephant tooth paste
The elephant needs everything big and a lot. Let's do it! Dissolve potassium permanganate in water. Add liquid soap. The last ingredient, hydrogen peroxide, turns our mixture into a giant elephant paste!
Let's drink a candle
For greater effect, color the water in a bright color. Place a candle in the middle of the saucer. We set it on fire and cover it with a transparent container. Pour water into a saucer. At first the water will be around the container, but then it will all be saturated inside, towards the candle.
Oxygen is burned, the pressure inside the glass decreases and
A real chameleon

What will help our chameleon change color? Cunning! Instruct your little one 6 years Decorate a plastic plate in different colors. And cut out the chameleon figure yourself on another plate, similar in shape and size. All that remains is to loosely connect both plates in the middle so that the top one, with the cut out figure, can rotate. Then the color of the animal will always change.
Light up the rainbow

Place Skittles in a circle on a plate. Pour water inside the plate. Just wait a little and we get a rainbow!
Smoke rings

Cut off the bottom of the plastic bottle. And stretch the edge of the cut balloon to get a membrane, as in the photo. Light an incense stick and place it in the bottle. Close the lid. When there is continuous smoke in the jar, unscrew the lid and tap on the membrane. Smoke will come out in rings.
Multicolored liquid
To make everything look more impressive, paint the liquid in different colors. Make 2-3 batches of multi-colored water. Pour water of the same color into the bottom of the jar. Then carefully pour vegetable oil along the wall from different sides. Pour water mixed with alcohol over it.
Egg without shell

Place a raw egg in vinegar for at least a day, some say for a week. And the trick is ready! An egg without a hard shell.
The egg shell contains calcium in abundance. Vinegar reacts actively with calcium and gradually dissolves it. As a result, the egg is covered with a film, but completely without a shell. It feels like an elastic ball.
And the egg will be larger than its original size, as it will absorb some of the vinegar.
Dancing men
It's time to get rowdy! Mix 2 parts starch with one part water. Place a bowl of starchy liquid on the speakers and turn up the bass!
Decorating the ice

We decorate ice figures of different shapes using food paint mixed with water and salt. The salt eats away at the ice and seeps deep, creating interesting passages. Great idea for color therapy.
Launching paper rockets
We empty the tea bags of tea by cutting off the top. Let's set it on fire! Warm air lifts the bag!
There are so many experiences that you will definitely find something to do with your children, just choose! And don't forget to come back for a new article, which you'll hear about if you subscribe! Invite your friends to visit us too! That's all for today! Bye!
Lecture 4.
Experiment
An experiment is a general empirical research method, the essence of which is that phenomena and processes are studied under strictly controlled and controlled conditions.
In science, an experiment refers to a way of studying phenomena under strictly regulated conditions that makes it possible to reproduce, observe and record these phenomena using instrumental methods or using appropriate scientific documentation.
In an experiment, a phenomenon can be studied under various conditions, repeated the required number of times under the same and constant circumstances, and divided into parts.
The essence of the experimental method is that it is aimed at studying the cause-and-effect relationships between the objects being studied (to determine whether a change in one variable causes a change in another variable). It contains features characteristic of theoretical knowledge - highlighting the side of the object, phenomenon, of interest to the researcher, and abstraction from its other aspects.
In the process of cognition, experiment and theory interact: 1. An experiment confirms or refutes a theory that is at the hypothesis stage, and provides material for its development.
2. Whatever experiment is carried out, it always serves only as a certain link in the general chain of scientific research. Therefore, it cannot be considered as an end in itself, much less opposed to theory, because without theory, scientific experimentation is impossible.
That is why in scientific research one can least of all talk about the independence of various methods of cognition. Only taking into account their dialectical relationship and interaction makes it possible to correctly represent the entire research process as a whole, its structure, stages and methods. Most often, the application of the experimental method in practice is combined with the use of such methods as observation, measurement, survey, questionnaire, interview, conversation.
Conducting an experiment can pursue various goals:
1.- empirical testing of a particular hypothesis or theory;
2. collecting the necessary empirical information to build any assumption.
In relation to previous knowledge, the experiment plays a dual role: criterion (testing) and heuristic (replenishes existing knowledge through the results of hypothesis testing).
1. One of the features of the experimental method and its advantage over the observation method is the creation of special experimental conditions for identifying cause-and-effect relationships, as well as the ability to vary these conditions in such a way that the results obtained can be analyzed by testing and proving various hypotheses about causal relationships .
2. Another advantage that the experiment gives over the observation method is the increased accuracy of recording the actions of the subjects, dependent and independent variables.
3. And finally, another characteristic feature of the experiment is its closer connection with theory - the experiment is not only guided by some theoretical hypothesis, but the experiment itself becomes possible only when the researcher has some idea about the nature of the process being studied, about the factors that determine it , otherwise the issue of creating an experimental situation, much less a targeted influence, simply cannot be resolved.
There is no single scheme with which one could construct an experiment for any problem. The problem itself determines the choice of the type of experiment and the specific plan for its implementation.
The general structure of the experiment includes:
- the cognizing subject and his activities;
- object of experimental research;
- means of influencing the object being studied.
The basic principle of any experiment is to change in each research procedure only one factor while keeping the others constant and controllable. If you need to check the influence of another factor, the next research procedure is carried out, where this last factor is changed, and all other controlled factors remain unchanged, etc. .d.
During an experiment, the researcher deliberately changes the course of a phenomenon by introducing a new factor into it.
A new factor introduced or changed by the experimenter is called an experimental factor, or independent variable. Those. the variable that is manipulated is called the independent variable.
A variable that is expected to change in response to a change in an independent variable is called a dependent variable. A dependent variable is any aspect observed or measured in response to an independent variable. Thus, the dependent variable is a function of the independent variable; it is “dependent” on changes caused by the experimenter's influence on the independent variable.
Although the logic of the experimental method is simple, the actual process of setting up an experiment is quite complex. A well-designed experiment must take into account many factors that can affect the accuracy and scientific significance of the results. In practice, this means that all variables and conditions (other than the independent variable of interest) that could have any effect on what we are measuring should be eliminated or maintained at a constant level throughout the experiment.
There are many ways to eliminate extraneous variables that may influence the dependent variable. But the most common is to randomly assign subjects to different experimental conditions or groups. Random assignment (often achieved by means such as throwing heads/tails or using a table of random numbers) ensures that all subjects have an equal chance of being assigned to any condition or group in an experiment. In this case, the researcher can be sure that any characteristics of the subject. that might influence the experiment (age, intelligence, etc.) all have an equal chance of being assigned to different experimental conditions or groups. The defining characteristic of the experimental method is the assumption that all subjects are the same at the beginning of the experiment except for one parameter: the presence or absence of the independent variable. Therefore, if a subject's behavior changes in response to a change in an independent variable, the researcher can be confident that it alone, and no other, is responsible for the change in behavior. Once the researcher has changed the independent variable, any aspect of the subject's observed or measured behavior cannot be due to the effect of any other variable, since no other is allowed to continue throughout the experiment.
An experiment in its simplest form requires that a comparison be made between at least two groups of subjects. Those subjects who are subjected to some special influences (manipulations undertaken by the experimenter) are called the experimental group. Other subjects who do not receive special treatment form a control group. Subjects from both groups are then compared to test whether the experimental intervention had any effect on the selected dependent variable.
For example, an experimental design with two groups, experimental and control. In the experimental group the independent variable is present, in the control group it is absent. The dependent variable is measured in both groups (description of the experimental design with one independent variable and one dependent variable). The control group serves as a starting point for evaluating the results of a special intervention on the experimental group. The crucial point here is that the only difference between the two groups is the effect of one factor, and this factor acts as the independent variable. This requirement contains the basic logic of the experimental method. If two groups are identical in all respects except for the presence or absence of an independent variable, then any difference between the groups on the dependent variable must be due to a change in the independent variable. In other words, if there are no other differences between the two groups differences other than those caused by the manipulation of the independent variable, it is reasonable to conclude that the introduction of the independent variable causes the change in the dependent variable.
Having defined some of the basic features and elements of the experimental method, we will consider it in action, using the procedure and data of one of the most ingenious experiments in the history of social personality psychology.
Psychologist Stanley Schachter became interested in the saying, “In peace and death is red.” A review of the relevant empirical literature led Schachter to the conclusion that people who are afraid of something unexpected that might happen to them in an unknown situation prefer to have another person, even a complete stranger, nearby than to be alone. To be more precise. , then Shakhter suggested the following: HYPOTHESIS - an increase in anxiety can cause an increasing preference to be close to others - what psychologists call the “need for affiliation” (that is, to join a group). To test this hypothesis, Shakhter invited female undergraduate students. When subjects arrived for testing, they were greeted by an experimenter wearing a white lab coat, surrounded by a variety of electrical equipment. He identified himself as Dr. Zillstein from the Department of Neurology and Psychiatry and explained that the purpose of the study was to study the effects of electric shock on heart rate and blood pressure. Each participant was then told (individually) that they would be given a series of electric shocks, while their pulse and blood pressure would be measured. To manipulate the subjects' anxiety level (the independent variable), Schachter used two different descriptions of the effect of the electric charge.
To create a “high anxiety” situation, half of the subjects received a warning, said in an ominous tone: “I will be frank with you and tell the truth about what awaits you. The current discharges will be very strong, very painful. As you understand, in research of this kind we have to study everything that can really help a person, and therefore it is simply necessary that the electric shocks be intense.” Shakhter told the other half of the subjects that the electric shocks would be very moderate and painless. For example, the following explanation was given: “Don’t let the word “blow” bother you. I have no doubt that the experiment will give you pleasure. I assure you that whatever you feel will not be painful in any way. It will feel more like a tickle than something unpleasant.” In fact, no shocks were planned in Schachter's study. The instructions served the purpose of modeling different levels of anxiety in the subjects.
After the subjects had been induced, using the instruction, to be in a high and low state of Independent Variable anxiety, respectively, the experimenter told them that they would have to wait ten minutes until he adjusted the equipment. Further, he explained that they could wait in a company place with everyone in the next room, or you can do it alone - as you wish. After this, each student was asked whether she could say how she preferred to spend those ten minutes or whether she had no particular preference. This or that statement (to be alone, to stay with others) was the dependent variable that interested Shakhter.
As expected, subjects with high levels of anxiety showed a much stronger preference to be with others than subjects with low levels of anxiety. The percentage of those who preferred to wait with others was almost twice as high in the case of a high anxiety situation as in the case of a low anxiety situation. This meant that changes in the level of anxiety had a decisive influence on affiliation behavior (high anxiety: together - 62.5%, alone - 9.4%, anyway - 28.1%; low anxiety: together - 33%; alone – 7.0%, still – 60.0%).
Schachter subsequently conducted another experiment to test the hypothesis that people experiencing anxiety only associate with others who experience the same feelings. The two groups of women were given the same instructions as the “highly anxious” group in the previous experiment. Subjects from one group were given the right to choose: to wait alone or together with other women participating in the experiment. Subjects from the other group had the opportunity to either be alone while waiting for the experiment to begin, or in the company of female students waiting for consultation. The results of the experiment showed that women who were in a state of anxiety preferred to wait only with the participants of this experiment; all (100%) of the participants refused to wait with those who were not participants in the experiment.
The miner summarized the results obtained, concluding that “in misfortune you need not just a comrade, but a suffering comrade.” Further research confirmed this discovery: people in an anxious situation prefer to join others like themselves.
Depending on the nature of the conditions of the experimental situation, experiments are divided into natural and laboratory.
1. A natural experiment (sometimes called a field experiment) is based on controlling the behavior of subjects in the everyday circumstances of their lives by introducing a number of factors influencing and controlled by the researcher. The conditions used when conducting a natural experiment do not contain anything unusual, artificial, unusual for the course, but are organically included in it, are its integral part. For example, you can apply new pedagogical methods in one or several classes and after some time then determine their effectiveness by comparing these classes with others where this change was not introduced.
The commonality and naturalness of conditions when experimental variables are introduced against their background allows the researcher to trace the action of these variables and thereby establish their role and features of influence on the phenomenon being studied.
To successfully conduct a natural experiment, it is often necessary for its participants to be completely unaware that they are being studied, that the situation created is experimental, otherwise the results of the experiment can be greatly distorted.
The field experiments of the American psychologist M. Sherif, who laid the foundation for a whole series of experimental studies of intergroup phenomena, are widely known. M. Sherif conducted his experiments at a summer recreation camp for teenagers. The camp administration acted as an active assistant to the experimenter, creating conditions that made it possible to study the effects of intergroup cooperation and conflict. At first glance, the life of teenagers in the camp was quite traditional, for example, competitions were held in the camp. But their peculiarity was that one of the groups was clearly the winner, while the other always suffered defeat. In another series of experiments, the camp administration artificially created difficulties that could only be eliminated through the joint efforts of competing groups, experimentally setting the nature of intergroup interaction. The researcher, studying the behavior of adolescents, could trace the history of the formation and development of interpersonal relationships.
A laboratory experiment is a study conducted in some artificial setting, which is based on a specially created situation that allows the experimenter to record the dependencies of interest to him.
Unlike a natural experiment, a laboratory experiment involves the organization of a rather artificial situation. The subject in a laboratory experiment knows that I am experimenting with him, but, as a rule, is deprived of information about the nature of the problems that are solved during the experiment.
Transferring an experiment to a laboratory setting provides the researcher with a number of advantages.
Firstly, the experimenter has the opportunity to eliminate extraneous influence, remove the excessive “noisiness” of the situation and thereby more clearly trace the dependence of interest to him.
Secondly, laboratory conditions make it possible to control several variables at once and accurately record the responses and actions of subjects.
Thirdly, the use of specially equipped premises, measuring equipment, and simulators allows the experimenter to simulate real conditions that are not so often encountered in everyday life or are inaccessible for observation.
One of the first in Russia to master a laboratory socio-psychological experiment was V.M. Bekhterev, who began researching the effectiveness of group activities. He showed that the accuracy of perception, memory productivity, and observation of individuals implementing joint activities in groups are higher than when working alone.
The laboratory experiment technique was further improved in the laboratories of B.G. Ananyev, E.S. Kuzmin, V.N. Myasishcheva and others.
A special place among laboratory experiments, for example, in social psychology, is occupied by an instrumental experiment. In socio-psychological research, instruments are often used that make it possible to simulate group activities.
An example of a hardware experiment is the use of the autokinetic effect (the visual illusion of the movement of a stationary luminous point in complete darkness) when studying the suggestibility of group members. Taking as a basis the fact that a flickering dot in the dark appears to be wandering to the observer, the researcher asked the subjects to carefully monitor the dot and not miss the moment when, in their opinion, it would begin to move, and to determine the direction of movement. While subjects were examined individually, their responses varied significantly from each other. So, to one it seemed that the point was moving “up and to the right”, to another – “only to the right”, to a third – “down and to the left”, etc. But as soon as the subjects were together and had the opportunity to exchange opinions, the picture changed dramatically - the content of their judgments began to converge. It turned out that the subject’s answer is somewhat influenced by the opinions of other subjects, and the presence or absence of this influence is associated with the membership of these others in the individual’s reference group and their sociometric status.
Conducting an experiment in socio-psychological research is always associated with certain difficulties and requires from the experimenter not only excellent mastery of the technique of conducting it, but above all the ability to plan it correctly: to structure a general hypothesis, determine the choice of a logical scheme that determines the nature of the procedures and the order of the various stages of the experiment, draw up a representative sample of subjects, etc.
It should be borne in mind that the reliability and reliability of the data obtained is influenced by the personality of the experimenter, his ability to work with subjects, the degree of his compatibility with them, as well as the voluntary consent of the subjects to participate in the experiment.
Depending on the goals, there are several types of experiments.
1. Experimental study of existing phenomena - ascertaining experiment. The essence of the ascertaining experiment is to determine the initial data for further research. Data from this type of experiment are used to organize the following types of experiment.
2. Experimental testing of the hypothesis created in the process of studying practical experience and analyzing literary sources -
- testing, or clarifying, experiment).
3. Experimental testing of new phenomena arising as a result of the introduction of a new factor, the implementation of newly created models and projects - a creative, constructive, transformative, formative experiment.
4. Control experiment - the main focus is on conducting a more thorough experimental verification (control experiment) of the results of the formative experiment.
The solution to the question of the types and types of experiment depends on a number of points:
- the purpose and specific task of the study;
- the stage of the researcher’s work on the problem;
- means used to conduct the experiment.
The initial stage of the study is indicative (trial, diagnostic. It can begin with a confirmatory experiment - to determine the initial data (for example, the level of preliminary knowledge necessary to work in new conditions).
If checking the initial data gives a positive result, i.e. If the presence of these data is confirmed, then we can proceed to the formative experiment. Having previously analyzed and processed the results obtained.
The next stage of the case study focuses on conducting a more thorough experimental verification (control experiment) of the results of the formative experiment.
When conducting any experiment to obtain objective and reliable data, experimental planning plays a significant role. The experimental plan determines the nature of the individual stages of the experiment and the order in which they are carried out.
Experiment planning
The experiment is preceded by significant theoretical work, which includes a study of the state of development of the problem both in scientific, theoretical and methodological literature, and in practice. This involves clarifying the relevance of the chosen direction of research, substantiating the initial conceptual provisions regarding the object and subject, the goals and objectives of the research, formulating a hypothesis for their successful solution and, finally, determining the conditions of the ascertaining or formative experiment and indicators of the effectiveness of its implementation.
Although the purpose of any experiment is to experimentally test a particular hypothesis or theory, before starting the experiment one should not only have its general idea, but also carefully consider the plan for its implementation, as well as possible results and ways of processing and interpreting them.
Actually, the choice of this or that type of experiment, as well as the specific plan for its implementation, largely depends on the scientific problem that is to be solved with the help of the experiment. It is one thing when an experiment is intended for a preliminary assessment and testing of a hypothesis (for example, in a stating, search-problem experiment), and quite another when it comes to a quantitative test of the same hypothesis (for example, in a formative, creative-transforming experiment).
In the first case, we can limit ourselves to a general, qualitative statement of the dependencies between the essential factors and properties of the process under study; in the second, it is necessary to quantitatively express these dependencies.
In general, it is accepted that there is no single template with the help of which one could construct an experiment to solve the problems under study. The most that can be done is to outline a general strategy and give some general guidelines for designing and designing an experiment.
The experimental plan should include:
- goals and objectives of the experiment;
- place and time of the experiment and its volume;
- determine the stages of the experiment;
- characteristics of those participating in the experiment;
- description of materials used for the experiment;
- description of the experimental methodology and application of private research methods;
- methods of observation, testing, etc. during the experiment (instrumentation);
- description of the methodology for processing the experimental results.
The experimental methodology is varied and depends on its duration and goals, on the complexity of the structure of the object being studied and other factors.
When developing it you must:
1. determine the initial data and hypothesis, having previously carried out an observation of the phenomenon or objects being studied (ascertaining experiment);
- select objects and create conditions that are as level as possible for experimentation;
- systematically monitor the development of the phenomenon being studied and accurately record the facts;
Carry out registration, measurements, assessment of facts using various means and methods (questionnaires, tests, mathematical apparatus);
- create repeating situations and situations with changing nature of conditions;
- confirm or refute previously obtained results;
Move from empirical materials to logical generalizations, understanding the collected data, comparing them with the requirements of science, formulating final conclusions about the results of the study, as well as developing recommendations for implementation in practice.
There is no doubt that the experimental method is a powerful empirical strategy. Unlike others, the experimental method allows researchers not only to control and predict certain phenomena, but also to explain them. Wherever it is used, this method makes it possible to obtain information that cannot be obtained using other methods. The experiment ensures the receipt of valuable factual material, its generalization and systematization, the establishment of relationships between various elements and components of the object (subject) of research, only the experiment leads to the accumulation of data, which is then analyzed using theoretical methods of cognition.
And, nevertheless, the experimental method has its limitations. For example, consider the limitations in the application of the experimental method in the field of personality psychology.
First, some problems are simply unethical to study experimentally, even though it would be very easy to do so. For example, psychologists cannot deliberately simulate conditions that pose a potential risk to subjects, which are threatening or fraught with the possibility of causing any harm. Imagine a researcher interested in studying the effects of chronic loneliness on self-esteem and the development of depression in children. This is undoubtedly an empirically important question, but obvious ethical considerations prevent one from collecting one hundred ten-year-old children, randomly selecting fifty of them, and placing them in such experimental conditions as whom they would not have the opportunity to communicate closely with others.