Origami leaves are one of the most popular paper origami. If you don’t know how to make origami leaves, then on this page you will find everything you need to assemble this simple paper figurine.
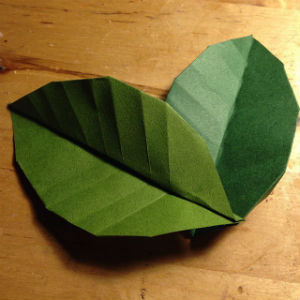
In the first photo you can see what you will get if you follow the assembly diagram below. The second photo of origami leaves was taken by one of our site users. These leaves are made from square sheets of paper without the use of scissors. If you have photos of origami you have collected, send them to:This address Email protected from spam bots. You must have JavaScript enabled to view it.
With the onset of autumn, not only the palettes of nature and climate undergo a rapid and tangible metamorphosis. Under the influence of these changes and emotional state general mood man has also entered a new phase when the comfort of home, the dim light of a fireplace, a table lamp or candles, the warmth of thick clothes, a cup of hot tea with honey and cinnamon and being taken by a loved one, acquire a special charm and creates an invisible protective layer, which pushes away sadness and melancholy to fly unnoticed with the warm rays of the sun of summer days.
It has been proven that creative activity helps people cope with transitions by engaging the mind and opening new horizons for the imagination. And what beautiful thing- turn your home into harmony with the coming autumn, without doing anything at all in the interior. That's the idea self made with amazingly realistic paper autumn leaves, which we will offer you in the following lines.
Assembly diagram
Below is a diagram of assembling origami leaves from the famous Japanese origami master Fumiaki Shingu. If you strictly follow the instructions, then assembling origami leaves will not take much time, and the result will be the same as in the picture. After doing what is described in the diagram several times, you will understand how to make origami leaves quickly and without looking at the diagram.
The materials you need to get started are rice paper, scissors and dummy or regular kitchen knife, an iron, a towel and a few sheets of paper towels, a few wax pencils with matching colors, a printed or hand-painted pattern from autumn leaves, like the ones you can download here. Place the towel on the ironing board and one of the two sheets on top. Apply two colored pastels of thin scales with scissors or a knife in a suitable combination of colors - for example, brown and orange, yellow and purple, orange and yellow, grass green and yellow, etc. A particularly beautiful combination of yellow and purple, suitable for maple leaves, which you will make with the templates suggested above.

Video master class
Assembling origami leaves for beginners may seem challenging task. Therefore, we advise you to enter the query “origami leaves video” on the largest video hosting site on the Internet, YouTube. There you will find a lot different videos about origami leaves, which clearly shows the steps of assembling leaves. We hope that after watching the assembly master class video, you will have no more questions about how to make origami leaves.
Simple origami from one sheet photo
Once you're done doing this, you can go ironing - turn the iron on to medium and, once warm enough, place another sheet of rice paper on the scraper sheet so they fit well. Place kitchen roll leaves on top and press smoothly and lightly into the middle of the sandwich along the edges of the leaves. You aim to spread the liquefied pastels as best as possible on both sheets, but be careful not to overdo it so that the towel and ultimately the iron gets stained with pastels.
Here is a good example of several other paper leaves:
But very interesting video, where origami is made directly from maple leaves:
Symbolism
Leaves different trees symbolize different things. For example, bay leaves are a symbol of wisdom, and oak leaves are a symbol of strength and self-confidence. This is why leaves are often used in various coats of arms.
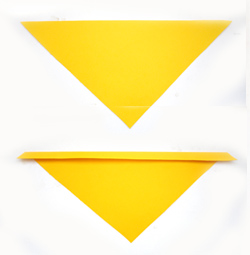
Step-by-step instructions for origami or how to fold a sheet.
Origami
Sheet
Materials for the bouquet:
Square sheets of multi-colored double-sided paper for leaves. Twigs or sticks (wooden skewers), glue.
 |
|
 |
|
 |
|
 |
|
Now we fix all the leaves on the branches with glue at a slight angle. It is advisable to have 2-3 leaves on each branch. We make several branches and make a bouquet of autumn leaves.
Add a few strips of paper twisted into spirals to complete the composition.
Here is the finished bouquet:
This is more of a spring craft, but also on a plant theme.
- flat flowers for decorating cards and creating voluminous applications.