Draw household objects using the material - a simple pencil, the size of the drawings - A4, landscape sheet. The task is to practice quick sketches to competently and correctly convey the shape of objects, tone and surface quality, lighting, and proportions.
Type of control: Demonstration of drawings.
> Drawing a chair
Draw a chair with a pencil on a sheet of A4 paper.
- Draw 45 degree lines from the outer edge to the ground plane.
- From this point, draw lines back towards the base of the cylinder, forming a shadow.
Before you start drawing, do a few test sketches to see how the structural box method works. First, extend your hand with a pencil in front of you and place the pencil horizontally at your eye level to determine the horizon line. Mark the horizon line with a dot on the paper.
We clarify the main contours
You can bring back your beauty using simple objects household items. Identify blurred, hardened, curled or brittle pencils and arrange them in piles according to the conditions they share. Pick dirty erasers from the pile. They usually contain a dirty stain on the surface. Place the eraser and ink pen on a flat surface and rub the dirty stain.
Place his eraser with the ink pen in the same way you would remove a pencil mark from paper. Make sure that the eraser does not break, as it may also harden and become brittle. Twist and gently press down on the rubber handle of the ink pen until the grease is completely wiped off from all sides. The ink furnace eraser is mixed with pulverized pumice, making it abrasive or smooth enough to remove dirt.
Then draw two boxes stacked on top of each other under the horizon line, having the same proportions as the chair. Construct perspective lines for the sides of the boxes that go to the vanishing point on the horizon line. Draw a chair inside the drawers, using the outlines of the drawers as guide lines. This will help you position the legs, back and seat of the chair correctly.
Choose a pencil eraser with a hard or brittle surface from the bunch. Hold it in your palms. Wrap your fingers over it, making sure the eraser is uncovered and facing you. Knead or squeeze the eraser with your fingers. Switch it between your hands to soften it with wet hands and body heat. Feel it thumb to confirm whether it has softened. Use a paper towel to clean the eraser.
We continue to add a dark tone
Select fragile pencil erasers from the pile. Pencil erasers are made of thick rubber that tends to harden and become brittle when exposed to direct sunlight. Hydrating them can get them working again. Pour a cup warm water into the bowl about a quarter of the way through. Place the bowl on the table or any raised flat surface.
1 Building a box
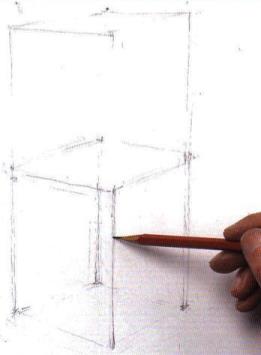
Step-by-step pencil drawing lesson - step 1
Study the chair carefully and measure its proportions using a pencil at arm's length. Take a pencil and draw in perspective two boxes standing on top of each other. It is very likely that the vanishing points will be outside the boundaries of your sheet of paper. You can place additional sheets of paper on the right and left to extend these lines.
Finishing work on chiaroscuro
Dip the eraser into the water. Gently knead it and squeeze it with your fingers until you feel it begin to soften. Find a paper towel and dry the eraser. Place it in a cool dry place to dry completely before normal condition. Choose pencil erasers that are curled or have lost their shape. Changing them again can return the desired regular surface to remove the pencil mark on the paper.
Hold it by the trash can or trash can. Remove dirt using sandpaper to remove dirt. Rub sandpaper around the eraser until the inner, cleaner, softer layer is exposed and it becomes correct form. Guide scrapes of rubber or shavings to end up in the trash bin. Alternatively, use a craft knife to scrape away the misshapen part of the pencil eraser until it reaches the correct shape.
2. Let's start drawing a chair
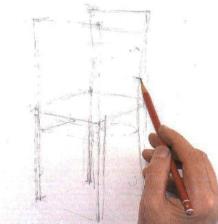
Step-by-step pencil drawing lesson - step 2
Mark the chair legs, seat and back so that they fit exactly into the drawers. The legs of our chair are beveled and the back is curved, so some of the contour lines of the chair will inevitably either go a little inside the drawers or go slightly beyond their boundaries. Draw the outlines of the three curved slats on the back of the chair.
John Derrick has been writing since his work was published in Thames Song of Leisure, Legal Forest, Canary Wharf and City Life. Derrick has an MA in Literature from the University of London. Drawing is limitless useful activity. In this article, Robin Landa presents ten tips to help you start drawing or improve or update your drawing skills. These ten key pointers to technique and graphic space will help you turn your marks into drawings that actually look like what you picture in your head.
Creating Perspective Lines It is very useful to have a diagram like this on hand while working, which shows perspective lines. When you create structural boxes, it will be easy to measure any lengths or angles with a pencil at arm's length.
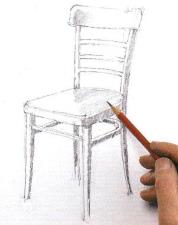
3. We clarify the main contours
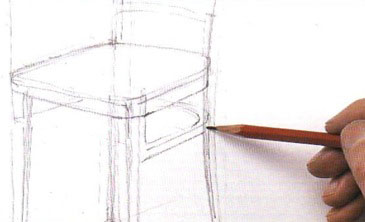
Step-by-step pencil drawing lesson - step 3
If you can brush your teeth, you can learn to draw. Of course, learning to draw is more difficult than brushing your teeth. However, this exciting process- one that many people find useful throughout their lives. Drawing engages your whole brain: you have to look, think and move. Here are ten interrelated drawing tips to help you.
Be patient. Drawing is not easy. Although drawing comes naturally to some people... various reasons, such as having good visual memories or being able to choose key elements to draw, you can learn to draw through study and practice. Learning to draw is no different in the amount of effort, hours enrolled, and passion required than learning to be a dancer or learning to play an instrument.
Outline the contours of the chair with a thicker line. Make sure that all parts of the chair are positioned in accordance with the structural lines. Emphasize the contours of the chair's slightly angled legs, the rounded corners of the seat, and the braces underneath.
Working on tone Evaluate the result of your work and make the necessary adjustments. After this you can start shading. It will give the chair volume and strength. As you work, do not forget to gradually erase structural lines that are no longer needed.
Hang it there because it's infinitely useful. artistic activity. You will find new ways to communicate visually, express yourself, think things through, explore and understand the natural world as well as your imagination. Drawing is a natural extension of curiosity - the desire to know what you don't know. Curiosity is at the core of creativity.
Practice active observation. Train yourself to see and evaluate visual relationships. If you approach a drawing subject with a keen eye, you will notice size, tone, color relationships, scale, angles, and specific shapes or outlines. By using careful observation while drawing, your overall observation skills will improve across the board.
4. Shade the back of the chair
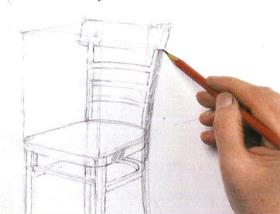
Step by step pencil drawing lesson - step 4
Change the pencil to 2B and start adding tone. The chair is brightly lit from the left, so its entire right side is in shadow. Using diagonal shading, apply a deep shadow to the vertical post of the back of the chair and to the end of the seat.
Active observation involves making judgments about apparent dimensional relationships when extracting from life. How tall is one object in relation to another? How far is one object from another? What is the angle or axis of a figure's pose or the specific curve of an apple's silhouette?
Pay attention to the specific attributes of an object or design—its particular shape and form and how it relates to all others in terms of size, angle, curve, spacing, tone, and color. Redefine any preconceived notions of what you think it's like to actually observe the shapes in front of you.
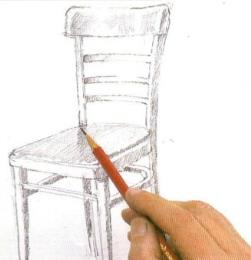
5. Continue adding dark tone
Step by step pencil drawing lesson - step 5
Shade the shaded edges of the chair with a dark tone. Erase unnecessary construction lines, and your drawing will appear much more clearly. Take a 2B pencil and use the side of the lead to color the seat of the chair using long strokes.
For example, when drawing a still life, judge all the relationships and overall proportions of the shapes. And don't exhibit one object and then move on to the next. Rather, work the entire composition at once, cultivating spatial relationships. Learn to judge the apparent size relationships and relative positions of shapes in relation to each other as you observe them.
Think about the page. Consider all the drawn elements in response to the edges of the format. Any rectangular page has four edges, and the marks you make will respond to these vertical and horizontal movements. If your page is round, the prints you make will respond to the circle. Whether paper or digital, each page has a defined perimeter - its outer boundaries or borders - as well as the field it covers. Think about what you're drawing and how the marks you make relate to the edges of the page and the outer shape.
5. Showing the reflection
Step-by-step pencil drawing lesson - step 6
The seat of the chair is covered with smooth fabric. The top crossbar of the chair back is reflected on it. Consider this reflection and apply it using shading. Show seat volume using narrow path intensive shading with right side. Add areas of intense dark tone on the back of the chair. The crossbars of the chair should be shaded with curved lines.
Drawing representatively or from observation entails translation three-dimensional space onto a two-dimensional surface. Your digital or paper page is much smaller than the world you look at. You need to scale down what you observe to translate it to the size of the drawing paper. The page orientation should in the best possible way match the direction or emphasis of your subject.
Just as you learn to draw from life, a viewfinder is a handy tool, not just for composing a single composition, but also for learning to see the world in the limited format of a rectangle. The edges of the viewfinder match the edges of the paper, allowing you to see how the shapes will be arranged in the composition.
7. Finishing the work on chiaroscuro
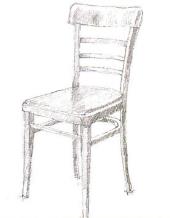
Step-by-step pencil drawing lesson - step 7
Go over the entire drawing again, clarifying and deepening the tone. Finish the shadow work on the cross bars of the back of the chair. Do not forget to leave unpainted those areas where highlights are visible. Then refine the light and shade on the chair legs. Surfaces in the shade should be covered with an intense tone, and those facing the light with a medium tone.
To make a viewfinder out of cardboard, simply cut a rectangular hole that will be the viewfinder. Consider all negative space. We call images, such as a pineapple or a human figure, positive forms. People who don't know how to draw focus on images. People who learn to draw should also observe negative spaces; that is, spaces that do not contain images - what many people consider to be background or "leftover" white space. Focus on the size and shape of negative space, or the empty space between parts of an object and between shapes.
Now remove the remaining construction lines and the drawing will look complete. True, if you wish, you can continue working to clarify the tone and add shadows. This will give the chair more stability in space and will allow you to firmly “tie” it to the floor surface.
8. Draw shadows on the floor
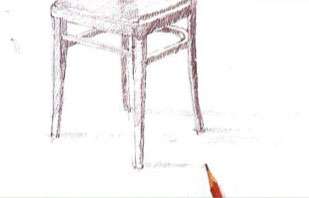
Step by step pencil drawing lesson - step 8
Here short exercise to learn to see negative space or shapes. Find two keys, leaves, or two objects with interesting silhouettes. Notice the negative space between the two objects and carefully examine the shape of the negative space. If the space between objects doesn't look interesting, rearrange the objects to create more intriguing negative space. Draw negative form space between two objects. Finally, draw the objects themselves.
Always consider the spaces between shapes as much as the shapes themselves. Please note that the spaces between leaves and stems are considered comprehensively. Draw spatial relationships. Instead of being object-oriented, focus on where the object is in the pictorial space and how it relates to the space and other shapes or objects surrounding it. Think about where the shapes are in space and fix them there. If you are painting a chair, anchor the chair in the space of the room, visualizing where it is on the floor in the painting space; draw the floor line in relation to the chair and other shapes in the space.
The chair is brightly lit, which means the shadows it casts should be clearly visible on your butt. Draw these shadows using diagonal lines, short at the base of the chair legs and then gradually widening.
Step-by-step pencil drawing lesson - step 9
To improve the drawing, you can give more expressiveness to individual areas of tone. Deepen the tone on the shadowed sides of the back, slats and legs of the chair. Do not forget to place a piece of paper under your hand while working so as not to smear the pencil. Use the eraser to create additional highlights.
An easy way to learn to see where to anchor shapes in space is to start dividing the page into quadrants, which allows you to identify and record the positions of objects in the actual space of the room onto a flat surface. The viewfinder with the same quadrants is convenient. The edges of the viewfinder match the edges of the paper, allowing you to see how the shapes will fit into the composition. You can make a quadrant viewfinder using clear, hard plastic and dry erase or permanent marker, or buy a pre-made one.
Set a visual accent. What do you want the viewer to see first? Consider emphasizing one shape or visual element and devalue others. Create a focal point - the part of the drawing that is most emphasized. To take it a step further, can you organize the composition using visual hierarchy and forms of positioning to guide the viewer through the pictorial space?
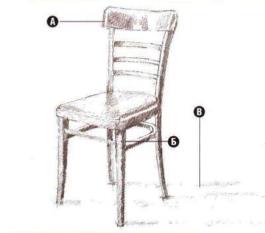
A Realistic outlines. This chair is drawn using construction lines and in full accordance with the laws of perspective, which is why the depicted object looks so realistic.
B Clearly defined tones. The darkest tones, created by intense strokes, expressively contrast with lighter and lighter gray intermediate tones.
The cast shadows depicted using shading help to give the chair stability in space. They firmly “tie” the object to the floor surface.
Type of control: Demonstration of the drawing.