Very often a scout needs to determine distances to various items on the ground, as well as estimate their size. Distances are most accurately and quickly determined using special instruments (rangefinders) and rangefinder scales of binoculars, stereo scopes, and sights. But due to the lack of instruments, distances are often determined using improvised means and by eye.
Among the simplest ways to determine the range (distances) to
objects on the ground include the following:
Eye-catching;
By linear dimensions of objects;
By visibility (discernibility) of objects;
By the angular size of known objects;
By sound.
By eye - this is the simplest and quick way. The main thing is training visual memory and the ability to mentally lay down a well-imagined constant measure on the ground (50, 100, 200, 500 meters). Having fixed these standards in memory, it is easy to compare with them and
estimate distances on the ground.
When measuring a distance by successively mentally putting aside a well-studied constant measure, one must remember that the terrain and local objects seem reduced in accordance with their distance, that is, when removed twice, the object will seem smaller.
two times less. Therefore, when measuring distances, the mentally plotted segments (measures of terrain) will decrease according to the distance.
The following must be taken into account:
How closer distance, the clearer and sharper the visible object seems to us;
The closer an object is, the larger it appears;
Larger objects appear closer small items located at the same distance;
A brighter colored object appears closer than a dark colored object;
Brightly lit objects appear closer to dimly lit ones at the same distance;
During fog, rain, at dusk, cloudy days, when the air is saturated with dust, the observed objects seem further away than in clear and sunny days;
The sharper the difference in color between the object and the background against which it is visible, the more reduced the distances seem; for example, in winter a snow field seems to bring the darker objects on it closer;
Objects on flat terrain seem closer than on hilly terrain, distances defined across vast expanses of water seem especially shortened;
Folds of the terrain (river valleys, depressions, ravines), invisible or not fully visible to the observer, conceal the distance;
When observing while lying down, objects appear closer than when observing while standing;
When observed from the bottom up - from the base of the mountain to the top, objects appear closer, and when observed from top to bottom - further away;
When the sun is behind the scout, the distance disappears; shines into the eyes - it seems larger than in reality;
The fewer objects there are in the area under consideration (when observed through a body of water, a flat meadow, steppe, arable land), the smaller the distances seem.
The accuracy of the eye depends on the intelligence of the scout. For a distance of 1000 m, the usual error ranges from 10-20%.
By linear dimensions. To determine the distance using this method, you need to:
Hold a ruler in front of you at arm's length (50-60 cm from the eye) and use it to measure in millimeters the apparent width or height of the object to which you want to determine the distance;
Divide the actual height (width) of the object, expressed in centimeters, by the apparent height (width) in millimeters, and multiply the result by 6 ( constant number), we get the distance.
For example, if a pole 4 m (400 cm) high is closed along an 8 mm ruler, then the distance to it will be 400 x 6 = 2400; 2400:8 = 300 m (actual distance).
To determine distances in this way, you need to have a good knowledge of linear dimensions various objects, or have this data at hand (on a tablet, in notebook). The reconnaissance officer must remember the dimensions of the most frequently encountered objects, since they are also required for the method of measuring by angular value, which is for reconnaissance
main
By visibility (discernibility) of objects. With the naked eye, you can approximately determine the distance to targets (objects) by the degree of their visibility. A scout with normal visual acuity can see and distinguish some objects from the following maximum distances,
indicated in the table. It must be borne in mind that the table indicates the maximum distances from which certain objects begin to be visible.
For example, if a scout saw a pipe on the roof of a house, then this
means that the house is no more than 3 km away, and not exactly 3 km. It is not recommended to use this table as a reference. Each intelligence officer must individually clarify this data for himself. When determining distances by eye, it is advisable to use landmarks, the distances to which are already precisely known.
By angular value. To apply this method, you need to know the linear magnitude of the observed object (its height, length or width) and the angle (in thousandths) at which this object is visible. For example, the height of a railway booth is 4 meters, the scout sees it at an angle of 25 thousandths (the thickness of a little finger). Then
800+ notes
for only 300 rubles!
* Old price - 500 rub.
The promotion is valid until 08/31/2018
Lesson questions:
1. Essence and methods of orientation.
When performing many combat missions, commanders' actions are inevitably related to terrain orientation. The ability to navigate is necessary, for example, on the march, in battle, in reconnaissance to maintain the direction of movement, target designation, drawing landmarks, targets and other objects on a map (terrain diagram), control of a unit and fire. Knowledge and skills in orienteering consolidated by experience help to perform more confidently and successfully combat missions V different conditions combat situation and in unfamiliar terrain.
Find your bearings- this means determining your location and directions to the sides of the horizon relative to surrounding local objects and relief forms, finding indicated direction movement and accurately maintain it along the way. When orienting in a combat situation, the location of the unit relative to friendly and enemy troops, the location of landmarks, and the direction and depth of operations are also determined.
The essence of orientation. Terrain orientation can be general or detailed.
General orientation consists in approximate determination of one’s location, direction of movement and the time required to reach the final destination of movement. This type of orientation is most often used on the march, when the crew of the vehicle does not have a map, but uses only a pre-compiled diagram or list of settlements and other landmarks along the route. To maintain the direction of movement in this case, it is necessary to constantly monitor the time of movement, the distance traveled, determined by the speedometer of the car, and control the passage of populated areas and other landmarks according to the diagram (list).
Detailed orientation is to accurately determine your location and direction of movement. It is used when orienting using a map, aerial photographs, land navigation instruments, when moving in azimuth, plotting explored objects and targets on a map or diagram, when determining achieved boundaries, and in other cases.
When navigating the terrain, the simplest elements are widely used. ways of orientation: by compass, celestial bodies and signs of local objects, as well as more the hard way– orientation on the map.
2. Orientation on the terrain without a map: determining the sides of the horizon by celestial bodies and signs of local objects.
To find the direction according to the cardinal points, first determine the north-south direction; after which, facing north, the determiner will have to the right - east, to the left - west. The cardinal directions are usually found using a compass, and in the absence of one, using the Sun, Moon, stars and some signs of local objects.
2.1 Determination of directions to the sides of the horizon using celestial bodies
When there is no compass or in areas magnetic anomalies, where the compass can give erroneous readings (readings), the sides of the horizon can be determined by the celestial bodies: during the day - by the Sun, and at night - by North Star or the Moon.
According to the Sun
In the northern hemisphere, the sunrise and sunset locations by season are as follows:
- in winter the Sun rises in the southeast and sets in the southwest;
- in summer the Sun rises in the northeast and sets in the northwest;
- In spring and autumn, the Sun rises in the east and sets in the west.
The sun is approximately at 7.00 in the east, at 13.00 in the south, at 19.00 in the west. The position of the Sun at these hours will indicate the directions east, south and west, respectively.
The shortest shadow from local objects occurs at 13 o'clock, and the direction of the shadow from vertically located local objects at this time will point to the north.
For more precise definition Wristwatches are used on the sides of the horizon according to the Sun.
Rice. 1. Determining the sides of the horizon by the Sun and the clock.
Rice. 2. Determining the sides of the horizon By the Moon |
According to the Sun and the clock By the North Star
Rice. 3. Determining the sides of the horizon |


Table 1
Cardinal directions |
First quarter (visible, right half disk of the Moon) |
Full Moon (the entire disk of the Moon is visible) |
Last quarter (the left half of the Moon's disk is visible) |
In the east |
01 o'clock (night) |
||
01 o'clock (night) |
07 o'clock (am) |
||
In the west |
01 o'clock (night) |
07 o'clock (am) |
2.2 Determination of directions to the sides of the horizon based on signs of local objects
If there is no compass and you can’t see heavenly bodies, then the sides of the horizon can be determined by some signs of local objects.
By melting snow
It is known that the southern side of objects heats up more than the northern side, and accordingly, the melting of snow on this side occurs faster. This is clearly visible in early spring and during thaws in winter on the slopes of ravines, holes near trees, and snow stuck to stones.
By the shadow
At noon, the direction of the shadow (it will be the shortest) points north. Without waiting for the shortest shadow, you can navigate in the following way. Stick a stick about 1 meter long into the ground. Mark the end of the shadow. Wait 10-15 minutes and repeat the procedure. Draw a line from the first shadow position to the second and extend one step beyond the second mark. Place the toe of your left foot opposite the first mark, and the toe of your right foot at the end of the line you drew. You are now facing north.
For local subjects
It is known that the resin protrudes more on the southern half of the trunk coniferous tree ants build their homes on the southern side of a tree or bush and make the southern slope of the anthill flatter than the northern one (Fig. 4).
 Rice. 4. Determining the sides of the horizon |
Birch and pine bark on north side darker than in the south, and tree trunks, stones, rock ledges are more densely covered with moss and lichens. |
By buildings
Buildings that are quite strictly oriented along the horizon include churches, mosques, and synagogues.
Altars and chapels of Christian and Lutheran churches face east, bell towers face west.
The lowered edge of the lower crossbar of the cross on the dome Orthodox Church facing south, raised - to the north.
The altars of Catholic churches are located on the western side.
The doors of Jewish synagogues and Muslim mosques face approximately north, their opposite sides are directed: mosques - to Mecca in Arabia, lying on the meridian of Voronezh, and synagogues - to Jerusalem in Palestine, lying on the meridian of Dnepropetrovsk.
Temples, pagodas, and Buddhist monasteries face south.
The exit from the yurts is usually made to the south.
In houses rural areas more windows in living quarters are cut on the south side, and the paint on the walls of buildings on the south side fades more and has a faded color.
3. Determination of the sides of the horizon, magnetic azimuths, horizontal angles and compass direction.
3.1 Determination of directions to the sides of the horizon using a compass
Using a compass, you can most conveniently and quickly determine north, south, west and east (Fig. 5). To do this you need to give the compass horizontal position, release the arrow from the clamp, let it calm down. Then the arrow-shaped end of the arrow will point north.
To determine the accuracy of the deviation of the direction of movement from the direction to the north or to determine the positions of terrain points in relation to the direction to the north and count them, divisions are marked on the compass, of which the lower ones are indicated in degree measures(the division value is 3°), and the upper divisions of the protractor are in tens of “thousandths”. Degrees are counted clockwise from 0 to 360°, and protractor divisions are counted counterclockwise from 0 to 600°. The zero division is located at the letter “C” (north), there is also a triangle glowing in the dark, which replaces the letter “C” in some compasses.
Under the letters “B” (east), “Y” (south), “3” (west) there are luminous dots. On the movable cover of the compass there is a sighting device (sight and front sight), against which luminous indicators are mounted, which serve to indicate the direction of movement at night. The most common compass in the army is the Andrianov system and the artillery compass.
When working with a compass, you should always remember that strong electromagnetic fields or nearby metal objects deflect the arrow from its correct position. Therefore, when determining compass directions, it is necessary to move 40-50 m away from power lines, railroad tracks, military vehicles and other large metal objects.
Determining directions to the sides of the horizon using a compass is performed as follows. The sighting device's front sight is placed on the zero scale division, and the compass is placed in a horizontal position. Then the brake of the magnetic needle is released and the compass is turned so that its northern end coincides with the zero reading. After this, without changing the position of the compass, a distant landmark is noticed by sighting through the rear sight and front sight, which is used to indicate the direction to the north.
Then, without changing the position of the compass, install the sighting device so that the line of sight through the rear sight and front sight coincides with the direction of the object. The scale reading against the front sight corresponds to the value of the determined magnetic azimuth of the direction at local item.
The direction azimuth from the standing point to a local object is called direct magnetic azimuth. In some cases, for example, to find a return path, they use back magnetic azimuth
, which differs from the straight line by 180°. To determine the reverse azimuth, you need to add 180° to the forward azimuth if it is less than 180°, or subtract 180° if it is greater than 180°.
3.3 Definition horizontal angles by compass
First, the front sight of the compass sighting device is set to zero on the scale. Then turn the compass to horizontal plane align the line of sight through the rear sight and front sight with the direction towards the left object (landmark).
After this, without changing the position of the compass, the sighting device is moved to the direction of the right object and a reading is taken on the scale, which will correspond to the value of the measured angle in degrees.
When measuring an angle in thousandths The line of sight is first aligned with the direction towards the right object (landmark), since the count of thousandths increases counterclockwise.
4. Methods for determining distances on the ground and target designation.
4.1. Methods for determining distances on the ground
Very often it is necessary to determine the distances to various objects on the ground. Distances are most accurately and quickly determined using special instruments (rangefinders) and rangefinder scales of binoculars, stereo scopes, and sights. But due to the lack of instruments, distances are often determined using improvised means and by eye.
Common methods for determining the range (distances) to objects on the ground include the following: by angular dimensions object; by linear dimensions of objects; eye; by visibility (discernibility) of objects; by sound, etc.
Determination of distances by angular dimensions objects (Fig. 8) is based on the relationship between angular and linear quantities. The angular dimensions of objects are measured in thousandths using binoculars, observation and aiming devices, a ruler, etc.
Some angular values (in thousandths of the distance) are given in Table 2.
Table 2
Name of items |
Size in thousandths |
Thickness thumb hands |
|
Thickness index finger |
|
Middle finger thickness |
|
Little finger thickness |
|
Cartridge along the width of the case neck (7.62 mm) |
|
Sleeve 7.62 mm across body width |
|
Simple pencil |
|
Matchbox length |
|
Matchbox width |
|
Matchbox height |
|
Match thickness |
The distance to objects in meters is determined by the formula: ,
where B is the height (width) of the object in meters; Y is the angular magnitude of the object in thousandths.
For example (see Fig. 8): 1) the angular size of a landmark observed through binoculars (a telegraph pole with a support), whose height is 6 m, is equal to the small division of the binocular reticle (0-05). Therefore, the distance to the landmark will be equal to: ![]() .
.
2) the angle in thousandths, measured with a ruler located at a distance of 50 cm from the eye, (1 mm is equal to 0-02) between two telegraph poles 0-32 (telegraph poles are located at a distance of 50 m from each other). Therefore, the distance to the landmark will be equal to: ![]() .
.
3) tree height in thousandths, measured with a 0-21 ruler (true tree height 6 m). Therefore, the distance to the landmark will be equal to: ![]() .
.
Determining distances by linear dimensions of objects is as follows (Fig. 9). Using a ruler located at a distance of 50 cm from the eye, measure the height (width) of the observed object in millimeters. Then the actual height (width) of the object in centimeters is divided by that measured by a ruler in millimeters, the result is multiplied by a constant number 5 and the desired height of the object in meters is obtained. ![]()
For example, a distance between telegraph poles equal to 50 m (Fig. 8) is closed on the ruler by a segment of 10 mm. Therefore, the distance to telegraph line equals: ![]()
Accuracy of determining distances by angular and linear quantities is 5-10% of the length of the measured distance. To determine distances based on the angular and linear dimensions of objects, it is recommended to remember the values (width, height, length) of some of them, given in table. 3.
Table 3
Dimensions, m |
|||
Medium tank |
|||
Armored personnel carrier |
|||
Motorcycle with sidecar |
|||
Truck |
|||
Car |
|||
Four-axle passenger car |
|||
Four-axle railway tank |
|||
Wooden communication line pole |
|||
Average height man |
|||
Determining distances by eye
Eye-measuring- this is the easiest and fastest way. The main thing in it is the training of visual memory and the ability to mentally lay down a well-imagined constant measure on the ground (50, 100, 200, 500 meters). Having fixed these standards in memory, it is not difficult to compare with them and estimate distances on the ground.
When measuring distance by successively mentally setting aside a well-studied constant measure, one must remember that the terrain and local objects seem reduced in accordance with their distance, that is, when removed by half, the object will seem half as large. Therefore, when measuring distances, the mentally plotted segments (measures of terrain) will decrease according to the distance.
The following must be taken into account:
- the closer the distance, the clearer and sharper the visible object seems to us;
- the closer an object is, the larger it appears;
- larger objects seem closer than small objects located at the same distance;
- an object of a brighter color appears closer than an object of a dark color;
- brightly lit objects seem closer to dimly lit ones that are at the same distance;
- during fog, rain, twilight, cloudy days, when the air is saturated with dust, observed objects seem further away than on clear and sunny days;
- the sharper the difference in color of the object and the background against which it is visible, the more reduced the distances seem; for example, in winter a snow field seems to bring the darker objects on it closer;
- objects on flat terrain seem closer than on hilly terrain, distances defined across vast expanses of water seem especially shortened;
- folds of the terrain (river valleys, depressions, ravines), invisible or not fully visible to the observer, conceal the distance;
- when observing while lying down, objects seem closer than when observing while standing;
- when observed from bottom to top - from the base of the mountain to the top, objects seem closer, and when observed from top to bottom - further;
- when the sun is behind the soldier, the distance disappears; shines into the eyes - it seems larger than in reality;
- The fewer objects there are in the area under consideration (when observed through a body of water, a flat meadow, steppe, arable land), the smaller the distances seem.
The accuracy of the eye meter depends on the training of the soldier. For a distance of 1000 m, the usual error ranges from 10-20%.
Determination of distances by visibility (discernibility) of objects
With the naked eye, you can approximately determine the distance to targets (objects) by the degree of their visibility. A soldier with normal visual acuity can see and distinguish some objects from the following maximum distances indicated in Table 4.
It must be borne in mind that the table indicates the maximum distances from which certain objects begin to be visible. For example, if a serviceman saw a pipe on the roof of a house, this means that the house is no more than 3 km away, and not exactly 3 km. It is not recommended to use this table as a reference. Each serviceman must individually clarify this data for himself.
Table 4
Objects and attributes |
The distances from which they |
Separate small house, hut |
|
Pipe on the roof |
|
Airplane on the ground tank in place |
|
Tree trunks, kilometer posts and communication lines |
|
Movement of the legs and arms of a running or walking person |
|
Heavy machine gun, mortar, anti-tank gun, wire fence stakes |
|
Light machine gun, rifle, color and parts of clothing on a man, the oval of his face |
|
Roof tiles, tree leaves, wire on stakes |
|
Buttons and buckles, details of a soldier's weapons |
|
Human facial features, hands, details of small arms |
Orientation by sounds.
At night and in fog, when observation is limited or impossible at all (and in very rough terrain and in the forest, both at night and during the day), hearing comes to the aid of vision.
Military personnel must learn to determine the nature of sounds (that is, what they mean), the distance to the sources of sounds and the direction from which they come. If you can hear various sounds, the soldier must be able to distinguish them from one another. The development of such an ability is achieved through long-term training (in the same way a professional musician distinguishes the voices of instruments in an orchestra).
Almost all sounds that indicate danger are made by humans. Therefore, if a soldier hears even the faintest suspicious noise, he should freeze in place and listen. If the enemy starts moving first, thereby giving away his location, then he will be the first to be detected.
On a quiet summer night, even an ordinary human voice in an open space can be heard far away, sometimes half a kilometer. In the frosty autumn or winter night all kinds of sounds and noises can be heard very far away. This applies to speech, steps, and the clinking of dishes or weapons. In foggy weather, sounds can also be heard far away, but their direction is difficult to determine. On the surface of calm water and in the forest, when there is no wind, sounds travel a very long distance. But the rain greatly muffles the sounds. The wind blowing towards the soldier brings sounds closer and away from him. It also carries sound away, creating a distorted picture of the location of its source. Mountains, forests, buildings, ravines, gorges and deep hollows change the direction of sound, creating an echo. They also generate echoes and water spaces, facilitating its spread over long distances.
The sound changes when its source moves on soft, wet or hard soil, along the street, along a country or field road, on pavement or soil covered with leaves. It must be taken into account that dry soil transmits sounds better than air. At night, sounds are transmitted especially well through the ground. That’s why they often listen by putting their ears to the ground or tree trunks. The average audibility range of various sounds during the day on flat terrain, km (in summer), is given in Table 5.
Table 5
Character of sound |
Range |
The crack of a broken branch |
|
Steps of a man walking along the road |
|
Strike the oars on the water |
|
The blow of an ax, the ringing of a cross-saw |
|
Digging trenches with shovels in hard ground |
|
Quiet conversation |
|
Loud scream |
|
The sound of metal parts of equipment |
|
Loading small arms |
|
Tank engine running on site |
|
Movement of troops on foot: |
|
|
|
|
|
Vehicle movement: |
|
|
|
|
|
Tank movement: |
|
|
|
|
|
|
|
|
5000 or more |
Gun firing |
To listen to sounds while lying down, you need to lie on your stomach and listen while lying down, trying to determine the direction of the sounds. This is easier to do by turning one ear in the direction from which the suspicious noise is coming. To improve audibility, it is recommended to apply auricle bent palms, a bowler hat, a piece of pipe.
To better listen to sounds, you can put your ear to a dry board placed on the ground, which acts as a sound collector, or to a dry log dug into the ground.
Determining distances using the speedometer. The distance traveled by a car is determined as the difference between the speedometer readings at the beginning and end of the journey. When driving on roads with hard surface it will be 3-5%, and on viscous soil 8-12% more than the actual distance. Such errors in determining distances using the speedometer arise from wheel slip (track slippage), tire tread wear and changes in tire pressure. If you need to determine the distance traveled by the car as accurately as possible, you need to make an amendment to the speedometer readings. This need arises, for example, when moving in azimuth or when orienting using navigation devices.
The amount of correction is determined before the march. For this purpose, a section of the road is selected, which, due to the nature of the relief and soil cover similar to the upcoming route. This section is passed at marching speed in the forward and reverse directions, taking speedometer readings at the beginning and end of the section. Based on the data obtained, the average length of the control section is determined and the value of the same section, determined from a map or on the ground with a tape (roulette), is subtracted from it. Dividing the result obtained by the length of the section measured on the map (on the ground) and multiplying by 100, the correction factor is obtained.
For example, if the average value of the control section is 4.2 km, and the measured value on the map is 3.8 km, then the correction factor is: ![]()
Thus, if the length of the route measured on the map is 50 km, then the speedometer will read 55 km, i.e. 10% more. The difference of 5 km is the magnitude of the correction. In some cases it may be negative.
Measuring distances in steps. This method is usually used when moving in azimuth, drawing up terrain diagrams, drawing individual objects and landmarks on a map (diagram), and in other cases. Steps are usually counted in pairs. When measuring a long distance, it is more convenient to count steps in threes, alternately under the left and right foot. After every hundred pairs or triplets of steps, a mark is made in some way and the countdown begins again.
When converting the measured distance in steps into meters, the number of pairs or triplets of steps is multiplied by the length of one pair or triple of steps.
For example, there are 254 pairs of steps taken between turning points on the route. The length of one pair of steps is 1.6 m. Then
Typically, the step of a person of average height is 0.7-0.8 m. The length of your step can be determined quite accurately using the formula: , where D is the length of one step in meters; P is a person’s height in meters.
For example, if a person is 1.72 m tall, then his step length will be equal to: ![]()
More precisely, the step length is determined by measuring some flat linear section of terrain, for example a road, with a length of 200-300 m, which is measured in advance with a measuring tape (tape measure, range finder, etc.).
When measuring distances approximately, the length of a pair of steps is taken to be 1.5 m.
Average error Measuring distances in steps, depending on driving conditions, is about 2-5% of the distance traveled.
Determination of distance by time and speed. This method is used to approximate the distance traveled, for which the average speed is multiplied by the time of movement. Average speed pedestrian speed is about 5, and when skiing 8-10 km/h.
For example, if a reconnaissance patrol skied for 3 hours, then it covered about 30 km.
Determination of distances by the ratio of the speeds of sound and light. Sound travels in the air at a speed of 330 m/s, i.e. approximately 1 km per 3 s, and light travels almost instantly (300,000 km/h). Thus, the distance in kilometers to the place of the flash of the shot (explosion) is equal to the number of seconds that passed from the moment of the flash to the moment when the sound of the shot (explosion) was heard, divided by 3.
For example, an observer heard the sound of an explosion 11 seconds after the flash. The distance to the flash point will be: ![]()
Determining distances geometric constructions on the ground. This method can be used to determine the width of difficult or impassable terrain and obstacles (rivers, lakes, flooded areas, etc.). Figure 10 shows the determination of the width of the river by constructing an isosceles triangle on the ground.
Since in such a triangle the legs are equal, the width of the river AB is equal to the length of the leg AC.
Point A is selected on the ground so that a local object (point B) on the opposite bank can be seen from it, and a distance equal to its width can be measured along the river bank.
In both the first and second cases, the angle at point A should be equal to 90°.
Orientation by light very convenient for maintaining direction or for determining the position of an object on the ground. Moving at night towards a light source is most reliable. The distances at which light sources can be detected by the naked eye at night are given in Table 6.
Measure the corresponding segment using a ruler. It is preferable that it be made from sheet material that is as thin as possible. If the surface on which it is spread is not flat, a tailor's meter will help. And if you don’t have a thin ruler, and if you don’t mind piercing the card, it’s convenient to use a compass for measuring, preferably with two needles. Then you can transfer it to graph paper and measure the length of the segment along it.
Roads between two points are rarely straight. A convenient device - a curvimeter - will help you measure the length of the line. To use it, first rotate the roller to align the arrow with zero. If the curvimeter is electronic, it is not necessary to set it to zero manually - just press the reset button. Hold the roller and press it against starting point segment so that the mark on the body (it is located above the roller) points directly to this point. Then move the roller along the line until the mark is aligned with end point. Read the testimony. Please note that some curvimeters have two scales, one of which is graduated in centimeters, and the other in inches.
Find the scale indicator on the map - it is usually located in the lower right corner. Sometimes this indicator is a piece of calibrated length, next to which it is indicated what distance it corresponds to. Measure the length of this segment with a ruler. If it turns out, for example, that it has a length of 4 centimeters, and next to it it is indicated that it corresponds to 200 meters, divide the second number by the first, and you will find out that each on the map corresponds to 50 meters on the ground. On some, instead of a segment there is ready-made phrase, which may look, for example, like this: “There are 150 meters in one centimeter.” Also, the scale can be indicated in the form of a ratio of the following form: 1:100000. In this case, we can calculate that a centimeter on the map corresponds to 1000 meters on the ground, since 100000/100 (centimeters in a meter) = 1000 m.
Multiply the distance measured with a ruler or curvimeter, expressed in centimeters, by the number of meters indicated on the map or calculated in one centimeter. The result will be the actual distance, expressed, respectively, in kilometers.
Any map is a miniature image of some territory. A coefficient showing how much the image is reduced in relation to real object, is called scale. Knowing it, you can determine distance By . For real existing maps on paper, the scale is a fixed value. For virtual electronic cards this value changes as the magnification of the map image on the monitor screen changes.
Instructions
If yours is based, then find it, which is called a legend. Most often, it is framed. The legend must indicate the scale of the map, which will tell you, measured in distance according to this will be in reality, at . So, if the scale is 1:15000, then this means that 1 cm per map equal to 150 meters on the ground. If the map scale is 1:200000, then 1 cm laid out on it is equal to 2 km in reality
That distance, which interests you. Please note that if you want to determine how quickly you will walk or get from one house to another in or from one settlement to another, then your route will consist of straight segments. You will not move in a straight line, but along a route that runs along streets and roads.
When you are in an unfamiliar area, especially if the map is not detailed enough with a conditional coordinate reference or with no such reference at all, it becomes necessary to navigate by eye, determining the distance to the target in various ways. For experienced travelers and hunters, determining distances is carried out not only with the help of many years of practice and skills, but also special tool– range finder. Using this equipment, a hunter can accurately determine the distance to an animal in order to kill it with one shot. The distance is measured with a laser beam, the device runs on rechargeable batteries. By using this device on a hunt or under other circumstances, the ability to determine distance by eye is gradually developed, since when using it, the real value and the reading of the laser rangefinder are always compared. Next, methods for determining distances without the use of special equipment will be described.
Determining distances on the ground is carried out in a variety of ways. Some of them fall into the category of sniper or military reconnaissance methods. In particular, when navigating the area, an ordinary tourist may find the following useful:
- Measuring in steps
This method is often used to draw maps of the area. Typically, steps are counted in pairs. A mark is made after every pair or three steps, after which the distance in meters is calculated. To do this, the number of pairs or triples of steps is multiplied by the length of one pair or triple.
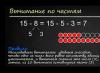
- Angle measurement method.
All objects are visible under certain angles. Knowing this angle, you can measure the distance between the object and the observer. Considering that 1 cm from a distance of 57 cm is visible at an angle of 1 degree, we can take the thumbnail of the hand extended forward, equal to 1 cm (1 degree), as the standard for measuring this angle. The entire index finger is a 10 degree reference. Other standards are summarized in a table that will help you navigate the measurement. Knowing the angle, you can determine the length of the object: if it is covered by your thumbnail, then it is at an angle of 1 degree. Therefore, the distance from the observer to the object is approximately 60 m.
- By a flash of light
The difference between the flash of light and the sound is determined using a stopwatch. From this the distance is calculated. Typically, this is calculated by finding a firearm.
- By speedometer
- By time speed
- By match
Divisions equal to 1 mm are applied to the match. Holding it in your hand, you need to pull it forward, hold it horizontally, while closing one eye, then align one end with top part defined object. After this, you need to move your thumbnail to the base of the object and calculate the distance using the formula: the distance to the object, equal to its height, divided by the distance from the observer’s eyes to the match, equal to the marked number of divisions on the match.

The method of determining the distance on the ground using the thumb helps to calculate the location of both a moving and a stationary object. To calculate, you need to stretch your hand forward and raise your thumb up. You need to close one eye, and if the target moves from left to right, the left eye closes and vice versa. At the moment when the target closes with your finger, you need to close the other eye, opening the one that was closed. In this case, the object will be moved back. Now you need to count the time (or steps, if the person is being observed) until the object is covered with your finger again. The distance to the target is calculated simply: the amount of time (or steps of the pedestrian) before closing the finger a second time, multiplied by 10. The resulting value is converted into meters.
The eye distance recognition method is the simplest, but requires practice. This is the most common method because it does not require the use of any devices. Ways visual determination There are several distances to the target: according to sections of terrain, the degree of visibility of the object, as well as its approximate size, which appears to the eye. To train your eye, you need to practice by comparing the apparent distance to the target with double-checking on a map or steps (you can use a pedometer). With this method, it is important to fix in memory certain standards of distance measures (50,100,200,300 meters), which are then mentally set aside on the ground, and estimate the approximate distance, comparing the real value and the reference value. Consolidating specific distance segments in memory also requires practice: for this you need to remember the usual distance from one object to another. It should be taken into account that the length of the segment decreases with increasing distance to it.
The degree of visibility and distinguishability of objects affects the setting of the distance to them with the naked eye. There is a table of maximum distances, based on which you can imagine the approximate distance to an object that can be seen by a person with normal visual acuity. This method is designed for approximate, individual determination of object ranges. So, if, in accordance with the table, a person’s facial features become distinguishable from a hundred meters, this means that in reality the distance to him is not exactly 100 m, and no more. For a person with low visual acuity, it is necessary to make individual adjustments regarding the reference table.

When establishing the distance to an object using an eye meter, the following features should be taken into account:
- Brightly lit objects, as well as objects marked bright color, seem closer to the true distance. This should be taken into account if you notice a fire, fire or distress signal. The same applies to large objects. Small ones seem smaller.
- At twilight, on the contrary, all objects seem further away. A similar situation occurs during fog.
- After rain, in the absence of dust, the target always seems closer than it actually is.
- If the sun is located in front of the observer, the right goal will appear closer than it actually is. If it is located behind, the distance to the desired target is greater.
- A target located on a flat bank will always appear closer than one located on a hilly one. This is explained by the fact that uneven terrain conceals the distance.
- When viewed from high point objects will appear closer downward than when viewed from bottom to top.
- Objects located on a dark background always seem further away than on a light background.
- The distance to an object appears shorter if there are very few observed targets in the field of view.
It should be remembered that than longer distance to a determined goal, the more likely an error in calculations is. In addition, the more trained the eye is, the higher the accuracy of calculations can be achieved.
Sound guidance
In cases where it is impossible to determine the distance to the target by eye, for example, in conditions of poor visibility, very rough terrain or at night, you can navigate by sounds. This ability must also be trained. Identification of target range by sounds is determined by various weather conditions:
- Clear sound human speech heard from afar in quiet conditions summer night, if the space is open. Audibility can reach 500m.
- Speech, steps, various sounds are clearly audible in frosty winter or autumn night, as well as foggy weather. IN the latter case It is difficult to determine the direction of the object because the sound is clear but diffuse.
- In a windless forest and over calm water, sounds travel very quickly, and rain greatly muffles them.
- Dry soil transmits sound better than air, especially at night.
To determine the location of the target, there is a table corresponding to the range of audibility and the nature of the sound. If you use it, you can focus on the most common objects in each area (screams, steps, sounds of vehicles, shots, conversations, etc.).
Useful tips for tourists. How to determine distance by sound and eye. Ranging.
On a hike, especially in unknown terrain and with not very detailed map Often there is a need for orientation and determining the range to any objects or objects. And even a GPS receiver will not help you here, since it must also come with a map. And with them (on Russian territory) it’s very difficult. Linking the same coordinates with tourist map very conditional (+- kilometer).
Perhaps they will help you simple tips accumulated by many years of tourist experience of predecessors.
1. In open areas settlements visible from 10-12 km.
2. Multi-storey buildings - 8-10 km.
3. Separate one-story (private) houses - 5-6 km.
4. The windows in the houses are visible from 4 km away.
5. Roof stove pipes - 3 km.
6. Individual trees are visible from 2 km away.
7. People (in the form of points) - 1.5 - 2 km.
8. The movement of a person's arms and legs is 700 meters.
9. Window frames - 500 meters.
10. Human head - 400 m.
11. Color and parts of clothing - 250-300 m.
12. Leaves on trees - 200 m.
13. Facial features and hands - 100 m.
14. Eyes in the form of dots - 60-80 m.
At night:
1. A burning fire (of normal size) is visible at a distance of 6-8 km.
2. Light of an electric flashlight (regular) - 1.5 - 2 km.
3. Burning match - 1-1.5 km.
4. Cigarette fire - 400-500 m.
Determining distance by sound strongly depends on air density and also to a greater extent from its humidity. The higher the pressure and the higher the humidity, the farther sounds travel. This must be taken into account. For a quiet place and normal humidity:
1. Noise railway(of a running train) can be heard 5-10 km away.
2. Shot from a gun - 2-4 km.
3. A car horn, a tractor starter crackling, a loud whistle - 2-3 km.
4. Barking dogs - 1-2 km.
5. Car traffic on the highway is 1-2 km.
6. Human screams are unintelligible - 1 - 1.5 km.
7. The sound of a car engine revving - 0.5 - 1 km.
8. The sound of a falling tree (crackling) - 800 - 1000 meters.
9. Knocking of an ax, knocking on metal objects - 300-500 meters.
10. Calm conversation between people - 200 meters.
11. Low speech, cough - 50 - 100 meters.
Psychological adjustments that need to be taken into account:
2. The distance on a “smooth” surface (snow, water, flat field) seems less than actual. The width of the river from the flat bank is greater than from the cliff.
3. When looking from the bottom up, the slope appears less steep, and the distance to objects is less than actual.
4. Night any light seems significant (!) closer real distance. During the day, light objects also appear closer.
5. Bare slopes appear steeper than those covered with vegetation.
6. The way back seems shorter. A smooth road seems shorter than a rough one.
A simple way to determine the distance to objects using the method similar triangles.
This method is based on a simple mathematical ratio of the sides of triangles and knowledge of a couple of quantities, such as: 1) The length of a person's thumb is approximately 6 cm (60 mm) and 2) The distance from the thumb to the person's eyes with an outstretched arm is approximately 60 cm. ( Of course, you can accurately measure your own parameters and make appropriate adjustments to the formula. By the way, it is more convenient to use a regular match (length 45 mm) instead of your thumb.
In order to accurately determine the distance to an object, you also need to know its dimensions, height, in particular.
For example, we need to determine the distance to a village. Average height house walls - approx. 3 meters. The roof is the same height. Those. The height of the house is about 6 meters. We stretch out our hand with our thumb up and evaluate which part of the finger “fits” the house. Let's say it's about 1/3 of a finger, i.e. 2 cm.
In such triangles, the true height will be as related to the true distance as the "projection" of the height will be to the distance to that projection from the viewpoint. (or vice versa).
Those. 6 meters height / X meters (distance) = 2 cm / 60 cm, or
X meters / 6 = 60/2
From here we get that X = 6 x 30, i.e. 180 meters to the house.
If you know the height of an object and have a ruler (tape measure) with you, then you can calculate distances very accurately (with sufficient accuracy for tourist purposes).
If the height of the object is unknown, even approximately, then a slightly more complex problem needs to be solved, which will allow us to calculate both the distance to the object and its height. To do this, you will need to take two measurements of the projection of the height of the object from two different points. After the first measurement, you need to approach the object at some distance (and remember this distance, let’s denote it “L”, the first projection “h1”, and the second “h2”).
I won’t bore you with mathematical calculations, but will immediately give you the formula:
X = (L x h1) / (h2 - h1) (h2 will be larger if you were moving closer to the object).
Well, now knowing the distance to the object it is easy to calculate its height (H):
H (m) = X x h2 / 0.6
These simple formulas will allow you to very accurately navigate the terrain and determine distances without a rangefinder.
DETERMINING DISTANCE - BY CONSTRUCTING SIMILAR TRIANGLES
When determining the distance to inaccessible objects, use various techniques related to the construction of similar triangles.
Determination of distance by linear dimensions of objects. To measure the distance, the tourist, holding a ruler at arm's length, points it at an object (Fig. 56), the height (length) of which is approximately known to him. Thus, a person’s height in meters is 1.7, a bicycle wheel has a height of 0.75, a wooden communication line pole has a height of 5-7, a one-story house with a roof has a height of 7-8, a middle-aged forest has a height of 18-20; a passenger car has a length of 4-4.5, truck- 5-6, railway passenger car - 24-25; The distance between communication line poles is on average 50-60 m, etc. Let's say we need to determine the distance to the communication line pole. On the ruler, his image took 20 mm. Taking the arm length of an adult to be approximately 60 cm, we create the proportion:
Length of the arm/distance to the pillar=size of the image on the ruler/height of the pillar
X=(0.6*6)/0.02=180
Thus, the distance to the post is 180 m.
Hiking standards. To take measurements along the route using the construction of similar triangles, it is useful for tourists to know some other hiking standards.
The length of the “quarter”, that is, the distance between the ends of the spaced thumb and little finger of an adult, is approximately 18-22 cm. The length of the index finger from the base of the thumb is 11-13 cm, from the base of the middle finger - 7-8 cm. Longest distance between the ends of the large and index finger 16-18 cm, between the ends of the index and middle fingers - 8-10 cm. The distance from the eyes to the raised thumb of an outstretched hand is 60-70 cm. The width of the index finger is about 2 cm, the width of its nail is 1 cm. The width of the four fingers of the palm is 7 -8 cm.
Each tourist determines the specific length of these and other standards independently and writes it down in his hiking notebook.