I haven’t been to the Museum of the Arctic and Antarctic for about a hundred years (or a little less), but then I found something, and I decided to refresh my childhood impressions. Report on current state I will definitely prepare this most worthy museum, but for now - for starters - one of its exhibits: the Sh-2 amphibious aircraft.
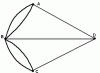
1. The plane is suspended almost above the entrance to the museum:
2. By the way, here is the Museum of the Arctic and Antarctic itself - in the very center of St. Petersburg, it’s very convenient to get there. When looking at the museum, it immediately becomes clear that it is located in the building of a former church: 
3. But let's return to the amphibious aircraft "Sh-2". 
4. The amphibious aircraft "Sh-2" ("АШ-2") was designed by designer V. B. Shavrov. The first flight took place on November 11, 1930. "Sh-2" was operated until the mid-1960s. 
5. This is one of two surviving copies. Another plane is located, if Wikipedia does not lie, in the Historical Aviation Restoration Museum in Maryland Hayes (Missouri, USA). 
7. The plane was equipped with a very weak M-11 engine with a power of 100 hp. The maximum speed was 139 km/h. 
9. The plane's crew consisted of 2 people (pilot and mechanic), and 1 passenger could also be taken on board. 
10. The first series of aircraft was produced from 1932 to 1934. (270 pcs.), after which production was stopped. But already in progress Soviet-Finnish War an acute shortage of small seaplanes was noticed to solve communication problems, evacuate the wounded, etc. 
11. As a result, the production of this simple and, nevertheless, very successful aircraft was resumed and continued even after the end of the Great Patriotic War. 
12. In total, about 1000 copies of this aircraft were built (in various modifications).
"...If we don't take off, we'll float." From the song
Preface
@@ This article begins another branch of park-class semi-copy electric aircraft - seaplanes. Here we describe the design of a relatively simple model of the Sh-2 flying amphibian, built a long time ago, back in 2000, and noted in the very first article about parkflyers, where a review of 8 more models was given. It would have been logical to write it immediately after the first article, but then the choice was made in favor of the Po-2 as the most typical and technologically advanced. Using the example of this simple and small model Sh-2, many principles of construction and operation of “water” models, which are also characteristic of larger amphibians, are described.
Prototype
@@ I would conditionally divide aircraft that use water surfaces as airfields into 3 groups:
@@ - Seaplanes. This could be an ordinary, “traditional” aircraft, in which the landing gear wheels are replaced with floats. Among them, most of them are training high-wing aircraft, but there are also mid-wing and even low-wing aircraft. Often the length and midsection of the floats are comparable to those of the fuselage. Which, of course, gives something extra during the flight. drag and requires additional motor power. However, among seaplanes in the 30s of the last century there were many racing aircraft that set their own records. This is explained by the fact that the surface of the water in the absence of waves gives the runway almost infinite length, which can facilitate both the takeoff and landing of a high-speed aircraft. And the floats are made in a streamlined teardrop shape.
@@ - flying boats. These aircraft the fuselage has the shape of a hydroplane boat. That. The fuselage and float functions are combined. The gliding gear makes it possible to accelerate the aircraft to takeoff speed. The boat is more resistant to rough seas, the CG of the vehicle can be made lower, and the total drag of the fuselage-boat is still less than that of the fuselage + floats combination. Small side floats supporting the consoles add stability. Many warships of the beginning of the last century had flying boats in their arsenal, performing mainly reconnaissance functions.
@@ - Amphibians. They differ from the previous ones by the presence of a wheeled chassis, usually retractable. That. the machine turns out to be more universal and all 3 elements become subject to it: water, earth, sky.
@@ (There is also a 4th group, which our designers turned out especially well - ekranoplanes.. The epigraph of the article is especially suitable for them. I don’t know if it’s right to consider them full-fledged aviation.)
@@ Sh-2 designed by Shavrov belongs to the 3rd group - a flying amphibian. The merits of this machine are invaluable, especially in the development of the Arctic, as well as during military operations in this region.
@@ It seemed significant to me that this vehicle was also equipped with the M-11 engine, used on the Po-2 and early versions of the Yak-12 that we had already modeled. If a car can fly well with a not very strong engine, then this once again speaks of its quality.
@@ When analyzing the design of the prototype, the simplicity and functionality of the elements were noted. Some parts had a dual purpose. This is the already mentioned boat fuselage. The aircraft was made according to the sesquiplane design, the most stable for that time. The small lower wing is also a mount for the side floats, and its large angle of installation gives a decent screen effect during take-off. And the floats are also profiled and participate in creating lift.
@@ Modellers love the swift shape of the Sh-2 and reproduce it in models of various scales. These include traditional 1.5-meter internal combustion engines and small electric trains. And the Sh-2 models do not deceive their builders, faithfully reproducing the qualities of a real amphibian.
@@ In general, a mastered and tested prototype.
@@ This was my first self-designed and built semi-copy, which flew exactly as I wanted, and even in some ways better.
@@ She is still alive and still flying.
Drawings and calculations
@@ One of the main factors when designing the model for me then was the moment of transportation. This is what forced the models to be made collapsible and with a span of 1 m. It was this, and nothing else, that led to the choice of a scale of approximately 1:12, which, as it turned out, was very popular.
@@ Below is why my drawing scale is chosen to be slightly smaller than 1:12.)
Drawing Ш-2 (click to display) (opens in a new window)
@@ One of bottlenecks model, as can be seen from the drawing, is the limitation of the propeller diameter. The motor here is located in the wing, above the fuselage, and the propeller blades pass literally a few millimeters above the hull of the boat, in front of the cockpit. This results in direct airflow into the cabin, which is completely unnecessary. (Oh, and it must have been hard for the pilot in the open cockpit, when the propeller was blowing directly at him. Especially in the Arctic.) But the airflow on the wings and empennage - you couldn’t imagine anything better; the fuselage does not interfere, being, as it were, “separately.”
@@ But then it turns out that with a model span of about 900mm, the diameter of the propeller is less than 200mm (less than 8"). This means that it is impossible to use the traditional slow-flyer economical motor mount with a weak 280m motor, with a large reduction and a large propeller of 9-10". This means that you will have to install a screw with a small, large-scale diameter and, probably, big step, and to create the necessary traction, use a high-speed motor of the Speed 300 type and a small reduction gear. And the model should be made light, streamlined, and designed to run at speeds faster than the Parkflyer Po-2. The contours of the Sh-2 allow this in principle. But this mode is not economical, and the main thing is, in this case, will the static thrust be enough to take off and lift the model off the water, a viscous and treacherous environment?
@@ Since there were doubts about the volatility and performance characteristics of the model, the wing profile, in the original this profile (will open in a new window), was replaced with a more technologically advanced flat-convex one (the closest analogue is Clark-Y) with a thickness of 10%, which was used and on the Po-2 model profile (will open in a new window). (Below is the same profile for the lower wing.)
@@ Back then I didn’t have any MotoCalcs and no simulators or the Internet, so I had to build, relying on the one hand on an insignificant personal experience, and on the other hand - into the famous Russian "maybe". In hindsight I give the calculation. Calculation (opens in a new window)
@@ This experience was based on the operation of my first educational model Hobbico Skyrunner, where the 300th motor through a 1:2.67 gearbox from 6 NiCd 500mAh turned a propeller with a diameter of 180mm with a fairly large pitch, gave a static thrust of about 220g, and quite quickly dragged a model weighing from 550g (up to 700g in the biplane version). This screw is sold separately and is what I used in this model. True, the standard gearbox of this model was bulky and had an end mount, which is inconvenient for installation in the Sh-2 wing. On occasion, I purchased a Graupner gearbox for a 280 engine with a similar 1:3 reduction and mounting with side axles, like an internal combustion engine. If you remove the 280th motor from it, then the 300th will not fit in its place, since its diameter is literally a millimeter larger. Therefore, the housing housing of the gearbox was cut lengthwise, which, however, did not affect the strength of the structure, because the motor in the housing is attached with screws to its end, where it already has holes and even threads.
@@ (For the more common Graupner CamSlimProp 8"x6" propeller, the model can be made more suitable for 1:12 scale, but more reduction will be required.)
@@ It is with this gearbox and screw that the calculation is given. The measurements did not show any noticeable reduction in static thrust due to the increase in reduction from 1:2.67 to 1:3, but the current decreased slightly. It cannot be said that this mode is beneficial and favorable for the motor. (And this can be seen in the red lines of the calculation table - propeller overload.) Judging by the operating statistics of the Skyrunner, where the engine life was exhausted in approximately 2.5 hours of flight time, the gain is small. But at that time I had no other choice (in the form of a brushless motor).
Design
@@ Just in case, I present two options for a 3D drawing (opens in a new window) - technological (multi-colored details) and textural (foam texture), whichever is more convenient for you.

@@ There are no fundamentally new materials in the model compared to Po-2. Except that instead of blue Floormate construction foam (the existence of which I didn’t even know at the time), white PS-35 construction foam was used. I bought it once in Krasnogorsk, near Moscow, where there is a construction foam materials plant. Its density is approximately the same, but it is large-spherical. True, its balls are sintered quite tightly, to a “honeycomb” state, but its strength properties are still worse than those of the homogeneous Floormate. At that time, only the “ceiling” was better in quality, but here I needed monolithic parts of arbitrary thickness.
@@ As can be seen from the assembly drawing, the model is simple and unpretentious. The wing consoles W1, W2, the center section W3 and the empennage ST, E1, E2, K, R are monolithic, have a constant profile, and therefore are made by longitudinal cutting, as in the case of the Po-2. The wing profile here has been changed to flat-convex, similar to that used in the Po-2. And the ends are smoothly cut and sanded in the same way complex shape.
@@ The shape of the vertical plumage K,R in fact, it is successfully reproduced from profile blanks similar to the tips of the upper wing.
@@ But for the lower wing LW1, LW2 and floats CW1, CW2 I had to work with transverse cutting, using aluminum templates.
The W3 center section is simply a fragment of a wing blank cut down according to the profile.
@@ Compared to the Po-2, the E1-E2 elevator on the Sh-2 occupies a smaller part of the chord of the horizontal tail. This is why the elevator turns out to be thin, and from PS-35 foam it should be expected to be too flexible. Therefore, I made both halves of the elevator from the more durable PS-60. But another option is also possible, which weighs less on the tail - the power element of the STP stabilizer, a textolite strip “on the edge” should be made along the entire length of the stabilizer, thereby simultaneously strengthening the elevator. And the stabilizer struts - made from a bent cocktail tube - also help with this.

@@ In any case, during transportation and storage, a large protective cube made of packing foam is placed on the tail surface.
@@ The hull of the fuselage boat is built like a “box” even without frames, with curved 6mm sheets of sides F4 and F5 along the guides of the bottoms F1, F2 and covers F3, F6, F7. These side sheets close in front with the bottom, resting inside on the cracker F9 from PS-60.

@@ The bottoms F1 and F2 can be glued together from two halves with a trapezoidal cross-section, or they can be cut out entirely by longitudinal cutting, removing a “triangle” from each edge. Since F1 has a complex shape in plan, the workpiece will have to be tucked when cutting. Then it bends in accordance with the drawing and the contour of the sides. Since the connection is tense, a fast-curing adhesive, such as five-minute epoxy, is used. In other cases, where the connection is not stressed, I made do with regular PVA and secure the seam with pins. The statement that the PVA seam is afraid of water is not entirely true - this is only true during the first week, while the glue is still polymerizing. Along the way, the adhesive seams are also additional stiffeners. True, in the case of the boat hood there was not enough rigidity, and already during operation (when, after another, rather innocent landing, it was bent like an accordion), I had to cut it lengthwise and glue a thin 0.5mm FP3 textolite strip.
@@ Pay attention to the bevels of the sides in those places where parts F6, F7 are glued to them. This is a necessary measure, otherwise the lid in these places will be too thin and will break.
@@ The most “suffering” part of the model is, of course, the nose. The model classical scheme there is a motor in the nose, a strong motor mount, and in general this place is usually reinforced. Here it must be done artificially. Cracker F9, although inside, helps a lot, along with FP3. And on the outside I strengthened the nose by covering it with fiberglass. And in the same way, with strips of fiberglass on epoxy, the boat's redan is reinforced - a traditionally loaded area of any glider.

@@ I also considered it necessary to strengthen the leading edges of the empennage and especially the fin, since it also houses the stabilizer. But I did not strengthen the leading edges of the wing consoles, limiting myself to strips of tissue paper on the same PVA.
@@ The F3 cover is the thickest and most massive foam part of the model. It is not possible to repeat experiment Po-2 in this area (hollow part = thin bent lid + flat shelf) due to the shape of the part, so I made it monolithic. Since it was difficult to achieve a neat shape in the frontal part, with the desired angle, I did not do this, but simply covered this place with an F8 foam pad, and did not create a windshield at all (it will interfere with the installation of the battery, as on the Po-2) .
@@ Since the prototype for transportation on ships was made with folding consoles (see drawing), the issue of disassembly of the model was also logical. Just like on the Po-2, there are two guide pins made of 3mm aluminum wire for connecting the consoles with the center section, and the truss is also made of 2.5mm aluminum wire. The back of the truss passes through a tube along the seam connecting the sides to the F3 monolithic cover. And the front one, with its loops, goes around another part made of 2.5mm aluminum wire - the rotating chassis.


@@ (Here it must be said that the issue of fixing this chassis in the raised and extended positions was never really resolved. I didn’t want to poke around the side to install any kind of fastener, and Velcro and double-sided tape quickly “failed” in the water. So I I temporarily tied the landing gear struts over the hood with a thread, providing some fixation in the raised position. I note that in the extended position, when landing, the landing gear struts “crawl” back, but they immediately rest against the lower wing, ensuring a normal landing on the wheels. a strip of thin textolite, bent in an arc and glued into the side under the rack. Small cuts in this strip can somehow fix the racks.)
Wing Farm (opens in a new window)
@@ From the figure it is easy to calculate the lengths of the wire blanks for the chassis 93+(55+20)x2=243mm and for the truss (10+15+80+15+98+15+90)x2+80=726mm.
@@ The lower wing consoles are also mounted on wire rods (only thinner, 2mm). It is advisable that the front rod reaches the end of the console - then the thin foam tips protruding from the floats will not bend and wrinkle.
These rods in the fuselage pass not only through the sides, but also through the croutons of the servo block, which gives much greater structural strength. And although the holes for them are above the waterline, the channels are separated from internal space boats, which also prevents water penetration. Because of this mounting, the servos have to be installed high and upside down, pressing them against the lid, and not against the bottom. And they turn out to be non-removable.


@@ The strange bevel on the front of the SB1 cracker is caused by the need to make it easier to insert the battery.
@@ The only gap in the fuselage-boat is the hole for the cockpit, through which the battery is inserted. In the area of this cutout, the sides are reinforced from the inside with 2mm thick PS-60 plates FP1, FP2, which extend to the chassis assembly. These plates also support the wing truss struts and at the same time act as the walls of the battery compartment. To prevent the battery from dangling there, soft polyurethane foam blocks A1, A2, A3 are glued in, clamping it.
@@ The wheels of the model are completely identical to the wheels on Po-2, adjusted for the color of the material. Polystyrene foam PS-60 was also useful here, but to prevent the wheel hub from becoming loose on the aluminum wire, a tube made of a strip of fiberglass rolled to size was glued in. Not a racing wheel, but ok for a dirt runway...
@@ The M1 motor frame is cut out of 1mm PCB and not only inserted into the cutout of part W3, but also screwed to the aluminum wing rods with threads, for which there are corresponding holes in it. In front on the sides it is clamped by the hinges of the wing truss. So, in principle, the motor mount is removable. At the front there is a slot for the gearbox, angled 3 degrees to the right, and in the middle I subsequently had to make a slot for the aileron servo, closer to the front rod.

@@ The foam cover of the M2 motor mount is easier to make from two parts - a profile piece cut from the center section, and a rounded overlay glued on top (the most complex foam part in shape).
@@ For a successful take-off from water, it is recommended to install the motor so that the propeller axis “looks” up.” Since a high-mounted motor also has a forward-tipping moment during takeoff, this angle is made quite decent - up to 5 degrees. This can also be seen in the original drawing Ш -2. This is what I did at the beginning. However, this contradicts the condition for the stability of normal flight of the aircraft - the result is a vertical tilt of the engine relative to the wing. And if we add to this the huge, judging by the drawing, angle of the wing - 3 degrees, then we get it. good conditions for takeoff, but, as practice shows, ugly for ordinary horizontal flight. In conditions of a weak engine, the task of which is only to maintain the altitude of horizontal flight in normal weather conditions, this is still somehow acceptable. But on a small model, which is exposed to a variety of winds and turbulence, and where the thrust-to-weight ratio is clearly required to be higher, the slope has to be done downwards. So we had to not only reduce the wing installation angle to 2 degrees, but also completely abandon the vertical tilt of the motor upward relative to the wing. And since the propeller rested against the hood, we had to slightly raise the gearbox mount, placing small spacers under its trunnions.


@@ Since the gearbox is not coaxial, it turned out that the electric motor itself seemed to fall out of the motor mount fairing, but it was wonderfully blown by the flow from the propeller.

@@ Decorative “cylinder shirts” made of small foam cylinders covered with tissue paper, glued to the motor mount fairing with double-sided tape, partly compensate for the “non-scale” nature of the “real” engine protruding from below
 .
.

@@ During operation and transportation, it turned out that there is no need to remove the lower wing consoles - the dimensions of the model remain small. Therefore, in transport state the model looks like this:
![]()
@@ And assembled - like this:


@@ A few words about the used on-board equipment components. Jeti Rex 4 receiver, Graupner C141 servos (0.6 kg/cm force, 6 g weight) for elevators and rudder, Cirrus C22 (1.2 kg/cm force, 9 g weight) for ailerons, Robbe 110 speed controller for 10 A and 12 g weight - this the choice was mainly dictated by low cost and light weight.
Tests, modifications and flights
@@ A mandatory stage of seaplane testing is checking for tightness and buoyancy. In a home bathtub, a model with a NiCd Sanyo 6x500AR battery showed a waterline at the same scale level as the prototype, as well as acceptable lateral stability when the consoles were temporarily attached to the top (it did not fit into the bathtub when fully assembled). The model's inversion was achieved at a roll of about 50 degrees. In reality, a roll of more than 30 degrees when landing on water is unlikely, because then the end of the console enters the water and its displacement begins to work. And a landing with a bank of more than 90 degrees is no longer a landing.
@@ During operation of the model, the following control feature was discovered. When flying at half throttle, the model behaves like an ordinary slow flyer, stable and almost independent, obeying the rudders well and being completely controlled by the roll through the rudder. Formally, the plane is a sesquiplane, although with a miniscule size of the lower wing. That. it is subject to the aileron-free high-wing trainer design. However, as soon as you increase the throttle to full, the model quickly accelerates, the efficiency of the steering wheels increases sharply, and stability is lost. The slightest movement of the rudders - and the model writes pretzels in the sky, characteristic of aerobatics. And the rudder begins to work not as a means of roll control, but in its own way" direct purpose", wagging the tail of the model. Testing the model on the CSM simulator fully confirmed this feature. And only installing ailerons on the virtual model gave controllability in both modes.
@@ That's what I did real model, cutting large-scale ailerons directly into the wing consoles without affecting the top of the skin. To control them, we had to embed a third servo, a 9-gram CS21, into the wing center section, for which a slot was made in the textolite motor mount. It is also installed upside down, with a single rod running through its rocker. It is easy to understand that the force to bend the spring ring of this single rod behind the rocker is much less than the pulling-pushing forces on the linear sections of this rod, which are transmitted to the ailerons. This technique gives some losses, but such a single rod will never fall out of the rocking chair and will not be lost, unlike meek straight rods, which are always unscrewed somewhere without connection.


@@ When connecting the wing consoles, the Z-shaped grip of the rod is inserted into the wire loop of the torsion bar, which I placed in a tube and laid in a groove on the underside of the console - from the end of the aileron to the end of the console itself.

@@ In principle, this field assembly of the consoles on the center section and connecting the rods can be done by hand, but it is better with the help of small pliers.


@@ At first glance, this rod design looks flimsy, but unlike all sorts of flexible bowdens, it ensures quick disassembly of the wing. In flight, it provides controllability much higher than without ailerons. And no one here even imagined the precision of amphibian aerobatics that is required from aerobatics.
@@ There is another feature of the flight of this Sh-2 model, which is perfectly reproduced by the simulator. Since the motor with the propeller is not located in the nose of the aircraft, but almost above the CG, the arm of the motor as a traction point becomes very small and even with front centering the model holds its pitch disgustingly. (It’s not for nothing that a classic aerobatics has a motor on a long narrow nose. This greatly increases longitudinal stability - the model clearly maintains a given pitch even with neutral alignment.) It is known that on electric models the battery can account for up to a third of the flight weight of the model. In other words, the battery becomes the center of mass of the model. Therefore, on electric trains the issue of alignment is solved more simply - roughly speaking, where the battery is placed, that’s where the central heating will be. Small movements of the battery can significantly change the alignment. The only thing that outweighs the battery is the motor in the nose and the weight of the tail. This is in the longitudinal direction. And in the transverse - only dead weight consoles. ICE models do not have such a “weight”, and the mass of the engine can be comparable to the mass of the consoles, and indeed all parts of the model. It turns out that the internal combustion engine model better distribution mass according to the model - due to the “relatively heavier material” of the model. The train is another matter. And Sh-2 - even more so. It turns out that she has a situation" kite with a weight in the center." The huge windage of the light consoles and the tail with the nose - and the concentrated mass of the battery-motor almost in one place. As long as the flight is in calm air, this does not bother. The very first strong gust of wind in the tail of the model gives the feeling that the model gave a strong kick, and she abruptly went into a dive. There was a case when the model suddenly, abruptly, and at first glance, unmotivated, “jumped” into an almost vertical dive from a height of 50 meters right into my head. Having emerged from the jet of the gust, it leveled out on its own, but the feeling was there. It was not pleasant. In terms of lateral stability, we have long been accustomed to the fact that without constant operation of the ailerons in gusty conditions. the wind is light Driving an electric train is extremely uncomfortable. There were cases when even a fast fighter in a gusty turbulent wind occasionally “spontaneously” almost flipped over its wing. On the other hand, twin-engine vehicles, even light ones (especially double-fuselage "frames") had extraordinary lateral stability. (It is not for nothing that the "frame" design was used for photographic reconnaissance during the Second World War.)
@@ So there is no way to do without ailerons. However, ailerons are completely useless on land, and especially on water. There is nothing to do here without a rudder. Better yet, have a water rudder too. On this model I did not do it, because it seemed that in the drawing the waterline runs much lower than the tail boom, and the water simply would not reach the rudder. Without a rudder, the model always turns against the wind, which is good on takeoff, but interferes with taxiing to the shore after landing on the water.
@@ IN in a certain sense The model is all-season, like any amphibian - it is used in winter and summer approximately equally.
@@ Take off from hand did not present any difficulties, except for the direction of the throw strictly against the wind and the above-described longitudinal instability.


@@ In flight, the car can withstand winds of 5-7 m/s. The flights were carried out without braces, so that when performing strong turns, some deflection of the wing was observed in flight. That’s why I didn’t test the model to perform loops and rolls, maneuvers that are generally atypical for flying boats. Although, with the strengthening of the wing and especially the struts, in terms of thrust-to-weight ratio and maneuverability, I think the model is capable of such maneuvers. At least it does horizontal figure eight and slide perfectly.
@@ Taking off from a hard surface complicated by the fact that a method for reliably fixing the landing gear in the lowered position was never developed. After a sharp increase in gas due to the narrow track, the model immediately stood on the left wheel, struck the left float and began to spin on the asphalt. Thanks to the incredible work of the rudders, after several attempts we managed to select the throttle increase mode on takeoff so that the car, although zigzag, still took off, lifting off the asphalt quite abruptly. During these experiments, the tail ventral fin was broken off (and this can be seen in the photo), which subsequently made direct takeoff from the water somewhat difficult.
@@ Landing on the surface does not present any difficulty. Because the model, due to its long, low bow, is not able to jack up the boat, even despite the high-mounted heavy engine. Moreover, there is a feeling that it is in landing mode, when the engine is turned off or running at low gas, that the model is most stable and lands on its own. There was an occasion when a sudden gust of wind sent the model into a tailspin away from me, so that it was difficult to discern its orientation - I simply turned off the engine, and the model righted itself and landed quite gently.
@@ The first hard landing on the ground led to the folding of the wing truss struts so that the propeller rested against the hood of the boat and could not rotate (it even sawed through the hood foam a little). Immediately after this, the aluminum wire of the truss was replaced with a thicker one - from 2mm to 2.5mm. If this happened when landing on water, the model would simply become uncontrollable on the water, and we would have to wait a long time until it was washed ashore by the wind. This happened once, but for a different reason - the locknut securing the screw to the shaft had come loose (at that time I didn’t even know the word “Loctite”), so the motor was running “idle”. If the screw had been completely unscrewed, I think it would have been completely lost - it would have drowned and that was it. The same applies to any accident over water in general. If the model falls to the ground or even into thick grass, there is still a chance to find the flying part, but in the event of an accident on the water, these parts immediately sink. Moreover, the car is deprived of the opportunity to return to the owner from the middle of the pond (namely, this is where the model must be planted, because the danger of crashing into the shore due to inertia is incomparably worse.) So it is useful to have a friend with a rubber boat, especially for the autumn and spring periods, when it is better not bathe. It is also advisable to have a comrade on duty on the opposite bank of the reservoir and drive away curious and dashing people, especially boys. In the event of an emergency landing in that area, you may simply not have time to reach the shore around the reservoir (unless, of course, you walk on dry water like saints.) Those who like to “put their feet” on your model are almost always found, despite the obvious uselessness of the model without transmitter.
@@ Once I slightly missed the mark and when landing, by inertia, I flew/swimmed into the coastal reeds. The problem turned out to be quite serious - after all, the plane does not have reverse gear. And even with his trousers rolled up, it was difficult to get close to the model from the water. The fishermen came to the rescue. After fruitless attempts to hook the model with a hook from the rod (the covered foam does not catch), we wound the long rod so that the line lay on the screw, and then I turned on the low gas and wound it a little around the screw and the shaft. And then joint efforts They pulled out a “fish” on top of the reeds (or a hippopotamus from a swamp, whatever you like.) Thus, a method was found for “shore rescue” of the model, which, fortunately, was no longer used.
@@ And regarding “distant rescue”, thoughts began to arise about a small r/o boat with high-set nets for hooking the model.
Construction of the first prototype began on April 16, 1928, and the first taxiing on the water was performed by pilot L.I. Giksa on June 4, 1929. The design bureau quickly took into account all the comments and on June 21, after finalizing the design and floats, the first flight took place.
From July 1-8, pilot B.V. Glagolev conducted all test flights in winds of 7.5 m/s and waves of up to 0.6 meters, proving the high performance of the aircraft. The landing gear and crutch were soon installed on the Sh-1, and on July 6, the ground part of testing the aircraft as an amphibian began. In some cases, four people flew at once, testing the machines for endurance, which could not but please the designers, and after a series of 10 flights, a flight from Leningrad to Moscow took place.
State tests were carried out from September 20 to 28, 1929. In addition to Glagolev, test pilots M.A. flew on the Sh-1. Korovin and A.V. Chekarev. The aircraft was recognized as suitable for use as a sports aircraft, but it was recommended to create an enlarged version with the domestic M-11 engine.
Sh-1 was destroyed on February 26, 1930 at settlement Borovichi due to pilot error. And the pilots Chkalov and Ivanov flew on it that day...
The task was completed quite quickly. On November 11, 1930, Glagolev made the first flight on the Ш-2 (АШ-2), a modified amphibious vehicle with a three-seater cabin and an M-11 engine. The flight over land was successful, but the flight on November 14 ended very badly. Having departed to strong wind Glagolev and Shavrov suffered an accident, breaking a redan during a rough landing on the water. The boat, fortunately, did not sink, only listing on its wing.
From June 12 to June 17, 1931, the Sh-2 was tested at the Civil Air Fleet Research Institute. They did not hesitate with serial production, selecting plant No. 31 for the construction of the amphibian. The head Sh-2 was produced there on April 1, 1932, and in total, by the end of 1934, 270 aircraft were assembled. Production of the Sh-2 continued at the Civil Air Fleet bases, where about 430 more vehicles were assembled until 1952. The last Sh-2s flew back in 1964, until they were finally written off due to obsolescence and dilapidated condition.
In 1938, one Sh-2 made an emergency landing on Finnish territory. The plane was returned to its rightful owners, but the Finns’ acquaintance with it did not end there. In the summer of 1942, as trophies, they received two aircraft from the AG Civil Air Fleet of the 7th VA, which landed near Sapsayarvi and were captured Finnish troops. The plane, with the number AV-186 assigned to it, was quickly destroyed - it was written off on October 3, and the second Sh-2, with the number AV-187, was successfully used as a liaison officer in Er.P 4 until September 13, 1944.
 |
 |
 |
 |
 |
Sources:
V.N. Shunkov “Red Army”. Moscow. AST\Minsk. Harvest. 2003
S. Malik “Amphibious aircraft Sh-2” (“Modelist-Constructor”)
A. Zablotsky “95 years of Taganrog aircraft construction” (“Aviation and Cosmonautics” 2011-12)
K.-F. Geust "Secrets" long war"("Aviation and Cosmonautics" 1997-11)
I. Sultanov, N. Svishcheva “The unknown about the known” (“Aviation and Cosmonautics” 1998-11)
Tactical and technical data of the Sh-2 flying boat:
Length – 8.2 m
Wingspan – 13 m
Wing area – 24.7 sq.m.
Empty weight – 937
Maximum speed – 130 km/h
Range – 500 km
Ceiling – 3850 meters
Engine - one in-line M-11, air-cooled, 100 hp.
Crew - 1 person
Payload: 3 passengers or equivalent cargo
Weapon - not installed

Created taking into account the flight experience of the Sh-1, the second experimental aircraft, designated Sh-2, differed from the prototype not only in the M-11 air-cooled engine with a power of 100 hp. s., but also increased flight weight by almost 150 kg. According to the type and design of the Sh-2, it is a direct development of the Sh-1 amphibian. Having lengthened the boat by 0.5 m, the designer also increased the size of the upper wing (its area became 21.75 square meters), leaving the lower wing, floats and cockpit unchanged. In addition to the pilot, it could accommodate 2–3 passengers. The planform shape of the upper wing also changed: the center section span decreased, and the detachable parts of the wing began to have a slight sweep along the leading edge and the outline of the trailing edge was close to elliptical. In addition, for the convenience of storing the aircraft on ships and in small hangars, the detachable parts of the Sh-2 wing began to be foldable: they rotated back 90° around an axis passing along the rear spar and the rear wing strut mounting bolt. The amphibian structure is wooden. The frame of the boat is made of pine and ash, the covering is mostly 3 mm plywood, on the step 6 mm, in the tail, on the lower wings and float 2 and 1 mm. For better protection from water, the boat's hull and lower wings were covered with dope cloth.
The first flight of Sh-2 took place on November 11, 1930, and already in the summer next year it successfully passed state tests. With a normal flight weight of 931 kg, it had maximum speed 139 km/h, service ceiling 3850 m and flight duration from 4 to 11 hours; landing speed was only 60 km/h. The flight characteristics of the Sh-2 were considered sufficient, and the stability and controllability were acceptable: when climbing, the efficiency of the rudders and ailerons was low, but at cruising flight speeds the aircraft's controllability improved significantly. When driving along water surface the bow of the Sh-2 boat, sitting deep in the water, created strong splashing with increasing speed, but as the bow rose, the splashing decreased, and before it reached the redundant it completely disappeared. To reduce the time it takes to reach the step and stop splashing the pilot's cabin on the Sh-2, as well as on other aircraft with a low-keel bottom of the boat, a take-off method was used with alternating kickback of the control stick during the take-off run “from oneself” and “toward oneself”. Under normal loading conditions, the aircraft had a fairly rearward operational CG range of 27–34.5% of the MAC. If these limits were exceeded, for example, in the overload version (with two crew members and two passengers on board), the alignment of the aircraft reached 37.5% of the maximum maximum, and it became very strict in piloting - “hanging on the handle”, and the pilot’s inattention could lead to a loss of speed. In order to make the alignment more forward and simplify control, later Sh-2 aircraft were equipped with front luggage racks in the bow of the boat, which housed a load weighing 25 kg.
The first production aircraft Sh-2 was produced in April 1932, its serial production continued until 1934. They were widely used on local airlines in Siberia, Far East and the Far North, took off and landed on small land airfields, on numerous rivers and lakes in those parts. As aircraft for ice and fishery reconnaissance and for rescuing people in distress, the Sh-2s were used in all seas washing the territory Soviet Union. These amphibians patrolled forests and served as guards. state borders, was carried out on them initial preparation pilots naval aviation. A sanitary version of the aircraft, the Sh-2S, was also serially built. On it, behind the front seats, where the pilot and doctor were located, there was a cabin for a stretcher with a patient, covered with a transparent canopy.
In 1939, due to the lack of more advanced amphibious aircraft, the repair bases of the Civil Air Fleet began to build the Sh-2 on their own, and such production of these machines continued until the early 50s. They were produced with more powerful M-11L and M-11D engines (115 and 125 hp, respectively), with single control, equipped with a compressed air engine starting system, and had trimmers on the elevators. In 1952, Sh-2 aircraft with a closed cockpit were built. Their operation continued until the mid-60s. The relatively large number of Sh-2 aircraft built could not, of course, meet all the needs of the various regions of the USSR that were rapidly developing in those years. air transport, and from the beginning of the 30s, individual design groups came up with projects for amphibious aircraft for national economy. Until 1940, experimental seaplanes were built for aerial photography (Sh-5), for the northern region (ACK), for local airlines (MA-1 and Sh-7), but all of them were not mass-produced.
The operator was OMOS (Department of Marine Experimental Aircraft Engineering). Produced in 1930. foto foto foto foto The first flight from the ground took place on November 11, 1930 (pilot B.V. Glagolev). foto On November 14, 1930, during the first flight from water, the boat's rail came off due to an impact (pilot B.V. Glagolev). Restored (the boat's edge was not removable). On June 12-17, 1931, state tests of the Civil Air Fleet Scientific Research Institute took place in Leningrad.
1932 - 30 aircraft.
1933 - 200 aircraft.
1934 - 40 aircraft.
Plant No. 31 in Taganrog in 1930 accepted following system factory numbering: two letters (OA, OB, OV, OG, etc.) and a number from 1 to 99. For example: OA-1, OA-2, etc. Sh-2 aircraft at the start of production in 1932 were numbered in the range OZh-32 to OZ-8 (probably the first 100 aircraft). In 1933, the factory numbering system changed again, to "31" plant number 31 and aircraft number. For example: 31101, 31102, etc. The Sh-2s were numbered in the range 31101 - 31302. Since a total of 270 Sh-2s were produced, there are clearly too many serial numbers. There are several theories to explain this. One theory is that early Sh-2s from the OZh-32 - OZ-8 serial number range were renumbered in the range 31101-31200 in 1933, which is highly unlikely. Another theory is that in these serial number ranges there were not only Sh-2s, because. plant No. 31 in 2 R-1, 5 ANT-9, 56 MBR-4, 51 R-6 in 1932-1933. It is possible that some of these aircraft were assigned serial numbers from the Sh-2 range.
Based on a post by Lennart Andersson.
83 Sh-2 aircraft produced on the ARB-21 in Leningrad in 1940-1941years on ARB-403 in Irkutskin 1942-1944.
During the 1930s, Sh-2s were repaired in the Leningrad aircraft repair shops of the Civil Air Fleet. A proposal arose to produce a number of new amphibians with the introduction of appropriate improvements.With the beginning of the Great Patriotic War The ARB-21 workshops were evacuated to Irkutsk, where until 1944 they produced another 33 copies from the ARB-21 stock.
Sh-2 aircraft produced on the ARB-403 in Irkutsk in 1946-1947.
In the mid-1940s, the need to restore the production of Sh-2 amphibians arose again, so it was decided to again produce a certain number of them. Exact quantity The aircraft produced are unknown, but V.B. Shavrov estimated the number of cars newly built since 1940 at several hundred copies.
0146? Sh-2 The lead example of the 1946 series of ARB-403.
0246?
0346? Sh-2 Historically unknown, no data.
0446? Sh-2 Historically unknown, no data.
0546 Sh-2 Produced in 1946. Used to remove the flight characteristics (in the book by M. Maslov “Amphibian Sh-2 and other aircraft by Vadim Shavrov” comparative flight characteristics are indicated).
0646? - ....
0347 USSR-A1802 Sh-2 The operator was the Civil Air Fleet State Administration. Registered as USSR-A1802. In 1955 it was in operation. Used in geological exploration to deliver geologists and supply geological parties.
Sh-2 aircraft produced on the ARB-403 in Irkutsk in 1951-1952.
By 1950, the need for the production of Sh-2 amphibians reappeared, so it was decided to produce another additional series. The exact number of aircraft produced is unknown, but V.B. Shavrov estimated the number of cars newly built since 1940 at several hundred copies.