Whether you're a fan or not, there is no doubt that the Star Wars movie inspires both children and adults who dream of becoming a Jedi and wielding the most powerful weapon in the entire galaxy... the laser sword!
Since release last episode movie, I thought now was the time the right time prepare a lesson on the topic ‘How to create a laser sword in Photoshop’. When I suggested this idea to my 12 year old son, you can imagine how excited he was to see himself as a Jedi!
In this tutorial you'll learn how to create a realistic laser sword effect in Photoshop and learn how to turn your kids into Jedi Knights!
So let's get started!
Final result:
1. Preparation for the Photo Shoot
We know that in all the images where the Jedi are, they are holding laser swords. Every Star Wars fan dreams of owning such an elegant weapon from a more civilized era. In addition, props and costumes are very important here, because... they make the effect believable. Props don't have to be complicated and can be created from items you can find around your home.
Step 1
The background should be plain. We used a white curtain, but a plain wall would also work for this tutorial.
We will also need a costume that will represent the Jedi cape. For the cape we used a cloak that we borrowed from a friend, but you can use any dark fabric large sizes, only it should be correctly thrown over the shoulders and head.
The handle of the laser sword is a regular attachment from a vacuum cleaner. Instead of a sword blade, I used a metal rod to mount the microphone, although a broom handle will work too.

Step 2
Come up with different poses and stances. Encourage your young knight show creativity when setting up your fighting stance. The laser sword should always be in front and nothing should block it.

2. Processing the Photograph
Step 1
Together with your child, choose the best photo you will use. Jedi are bold and courageous without looking threatening, so the photo should reflect this character.

Step 2
The background needs to be replaced to give our picture more originality. Using a tool Quick selection(Quick Selection Tool (W)), create an active selection around the main character's figure. If you have selected extra areas, then holding down the Alt key while working with the tool will help you subtract the extra selected areas.

Step 3
In settings of this instrument, press the button Refine edge(Refine Edge). Apply the following settings:
- Check the box Smart radius( Smart Radius)
- Radius(Radius): 3 px
- Offset Edge(Shift Edge): -10%
- ConclusionV(Output to): Layer-mask(Layer Mask)

Step 4
Convert the layer into a smart object, for this we go (Layer > Smart Objects > Convert to Smart Object). Name this layer ' Jedi’ (Jedi).

Step 5

Step 6
Next, let's go Image- Correction- Sveta/ Shadows(Image > Adjustments > Shadows/Highlights). Adjust the settings so that the gloss of the cape is visible, while the shadows are still saturated. For our image, we set Shadows(Shadows) at 24%, Sveta(Highlights) at around 32%.

Step 7
Apply the tool Frame(Crop Tool (C)). Pull the edges to enlarge the image, making it more suitable for a cinematic composition.

Step 8
Create a new layer below the 'Jedi' layer. Name this layer ' Gradient 1’ (Gradient 1). Select a tool Gradient(Gradient Tool (G)), set Linear Gradient(linear gradient). Drag a gradient from the bottom right corner (color #525156) to the top left corner (color #6 d 6 c 6 c).

Step 9
Next, let's go Window- Extensions - Adobe Paper Texture Pro(Window > Extensions > Adobe Paper Texture Pro) to add a paper texture extension. Select the Newt texture and Photoshop will automatically add the texture to a new layer. Change the blending mode of the added texture layer to Overlap(Overlay) to combine the texture with the bottom gradient layer.
Translator's note: in a programmePhotoshopCS 4 andCS 5 has a new option Extensions(Extensions), which helps to apply textures to images. By default, the extension has 20 textures installed, but you can easily load your own texture sets into the extension. If you do not have extensions installed, you can download them for free on the Internet. If you have an earlier version, you can choose an interesting texture, preferably with a space theme (or choose a suitable one in the archive with materials for the lesson) and simply add it to the background, placing it on top of the gradient layer and playing with the blending modes.

Step 10
Create another new layer, name this layer ‘ Gradient 2’ (Gradient 2). Select a tool Gradient(Gradient Tool (G)), set the gradient colors from black to transparent. Pull the gradient from the bottom right corner to the side opposite corner. Then reduce Opacity(Opacity) of the layer up to 20%.

At this stage, all the main elements are already located. Except for one...laser sword! To do this, we will call our young students who will do this.
3. Hello children!
It's time for the most interesting (and most fun) part of this lesson. I know that you have always wanted to have your own laser sword! Now, this is your chance to show what it would be like if you were a Jedi Knight!
Step 1
First, click on the 'Jedi' layer to make sure it is active. Next, let's go Layer - New - New Layer(Layer > New > New Layer (Shift+Ctrl+N)). Name the new layer ' Laser sword’ (Lightsaber).

Step 2
Using a tool Rectangular area(Rectangular Marquee Tool (M)), draw an elongated rectangle. Try to make the rectangle slightly larger than our toy sword, which is shown in the photo.

Step 3
Next, let's go (Edit > Content(Contents), install White(White). Next, click OK to fill the rectangular selection with white.

Step 4
(Select > Deselect (Ctrl+D)). Next, convert the layer into a smart object, for this we go Layer - Smart Object - Convert to Smart Object(Layer > Smart Objects > Convert to Smart Object). The layer's thumbnail will change in the Layers panel and you will see a Smart Object icon appear.

Step 5
To soften the edges of the white rectangle, we go Filter- Blur- BlurByGauss(Filter > Blur > Gaussian Blur). Install Radius(Radius) blur 4.0 px.

Step 6
Every true Star Wars fan knows that a laser sword tapers and has round shape at the end. To create a similar form, go Editing - Transformation - Warp(Edit > Transform > Warp). In setting Deformation(Warp) install Convex(Bulge), and Bend(Bend) 100%.

Step 7
To create a tapering shape, we go Editing - Transformation - Perspective(Edit > Transform > Perspective). Pull the top anchor points inward to make the top narrower than the base.

Step 8
At the bottom of the layers panel, click on the icon (Fx) and in the layer style menu that appears, select External glow(Outer Glow).

Set the following settings for the layer style External glow(Outer Glow):
- Blend Mode(Blend Mode): Lightening(Screen)
- Opacity(Opacity): 100%
- Color(Color): #0068cb
- Scope(Spread): 15%
- Size(Size): 70 px

Step 9
The brightness of the blade looks good, the only thing is that we need to add the same glow around the blade. Create another new layer, for this we go Layer - New - New Layer(Layer > New > New Layer (Shift+Ctrl+N)), name this layer ‘ Glow’ (Glow). Make sure the 'Glow' layer is below the 'Laser Sword' layer.

Step 10
Hold down Ctrl+click on the 'Laser Sword' layer thumbnail to load the active selection. Go to the 'Glow' layer. Next, let's go Editing - Fill(Edit > Fill) and in the window that appears, in the line Content(Contents), install Color(Color). Using an eyedropper, sample the color shade from the glow that is present around the sword.

Step 11
Deselect the active selection, for this we go Selection - Deselect(Select > Deselect (Ctrl+D)) and then add a blur, for this we go Filter - Blur - Gaussian Blur(Filter > Blur > Gaussian Blur). Install Radius(Radius) blur 35 px.

Step 12
At the top of the Layers panel, change the Blend Mode of the glow layer to Lightening(Screen). This mode will enhance the brightness of the effect and also complete the work on it. Your laser sword is ready! Now, you need to put it in your hands.

Step 13
Shift+click on the 'Laser Sword' layer and then on the 'Glow' layer to select both layers. Next, click on the chain link icon at the bottom of the layers panel. This option links the selected layers together so they will always snap to each other when moved.

Step 14
Next, let's go Editing - Free Transformation(Edit > Free Transform (Ctrl+T)) so that transformation anchor points appear around the laser sword. Move the glowing blade to the hilt area of the sword, and then rotate the blade to the desired angle. When the glowing blade is in the appropriate position, press the 'Enter' key to apply the transformation.

Wow, look! Looks like real Jedi! Warriors are invincible with these weapons, rest assured. Now invite your parents back to help complete this lesson.
4. Final Effects
Thank your wonderful children, the most hard work behind. But there is still a lot left to do. The laser blade needs to be made to look like it is inserted into the sword hilt, and the metal rod for attaching the microphone needs to be removed.
Step 1
To the ‘Laser Sword’ layer, add a layer mask, for this we go Layer - Layer Mask - Show All(Layer > Layer Mask > Reveal All). Next, using the tool Brush(Brush Tool (B)) with black color, carefully hide the glow of the blade where the glow overlaps the hilt of the sword.

Step 2
The black metal rod is still visible behind the laser blade and this needs to be corrected. Go to the 'Jedi' layer and use the tool Straight-line lasso(Polygonal Lasso Tool (L)), create a rough selection around the black rod area. Next, let's go Layer - Layer Mask - Hide Selection(Layer > Layer Mask > Hide Selection) to hide the selected area.

Step 3
We need the blue light from the glow of the laser sword to fall on the Jedi. Create a new layer on top of the 'Jedi' layer, name this layer ' blue light’ (Blue Light), change the blending mode for this layer to Lightening(Screen).

Step 4
Go to bookmark Channels(Channels) in the layers palette. Ctrl+click on the RGB channel thumbnail to create an active highlight of the highlight pixels. Go back to bookmark Layers(Layers) and then click the button Add a layer mask(Add Layer Mask) at the bottom of the Layers panel to create a mask from the selection. This way, the blue glow will only apply to the highlight areas of the main character.

Step 5
Click on the Blue Light layer thumbnail so that the active layer is the active layer and not the mask. Select a tool Brush(Brush Tool (B)), select a soft round brush. Take a sample of the light blue color from the glow of the laser sword and carefully paint over the Jedi's face, as well as the folds of the cape just behind the sword, adding a lighting effect. If the effect is too intense, reduce it Opacity(Opacity) of the layer.

Step 6
Go to the most upper layer‘Laser sword’, and holding down the (Alt) key, go Layer - Merge Visible(Layer > Merge Visible (Shift+Ctrl+E)). This way we will create a merged layer from all visible layers on top of all other layers in the Layers panel. Name this layer 'Combined'(Merged) and then convert it to a Smart Object.

Step 7
- Definition(Clarity): +40
- Saturation(Vibrance): +20

Next, go to the tab Effects(Effects) and at the bottom of the window in the section Vintage after cropping(Post Crop Vignetting), in Effects(Amount) Set it to -20 to darken the corners.

That's all! We have completed the lesson! Our warrior has undergone training.
Well done, my young friends! Welcome to the Order of the Jedi Knights!
How did you do it? We will be glad to see your Jedi Knights.
How to become a Jedi in the real world? “ star Wars”, which became classics of modern science fiction, gave people incredible pictures of battles in space and a desire to see the landscapes of other worlds, and most importantly, the mystical philosophy of the Jedi. Today on the site we will learn how you can become one of George Lucas’s peacekeeping knights, only not in the movies, but in the real world.
How to become a Jedi
What distinguishes a true Jedi from ordinary mortals? In fact, it is not the possession of supernatural abilities, but internal harmony, calmness, balance and lifestyle. We present to you simple steps that you can take every day to change your own life!

A difficult situation? Take a deep breath
At any critical situation that makes you nervous, worried, afraid, angry, hateful, you need to take a few deep breaths and exhales. This effective method influence on one’s own neurobiological processes that affect hormonal composition and behavior. Slow and deep diaphragmatic breathing stimulates the vagus nerve, which leads to activation of the respiratory and nervous systems. As a result, comes peace and a more stable state of mind. By the way, this effect can be accelerated and enhanced by lightly massaging the neck on the left and right.
Give your own body a feeling of care!
Touch yourself! And this is not at all what some people thought :) Scientific research has shown that physical touch activates the production of the hormone oxytocin, produced by the hypothalamus. Oxytocin has an important effect on the production of other hormones, and helps to establish emotional contacts with each other. At the same time, the body doesn’t care whose hand touches it: its own or someone else’s.
Kristin Neff and Christopher Germer, known in the West clinical psychologists, have developed an appropriate touch-based practice. According to it, you need to place your hand on your chest in the area of your heart and take deep breaths and exhales. The touch should not be forceful, the main thing is to feel the warmth and slight pressure of the palm. If someone does not like such sensations in the chest area, then you can put your hand on your stomach or other part of the body. It is effective and quick way calm yourself down, calm down heartache and just improve emotional condition. People suffering from diabetes will especially appreciate the effectiveness of this practice. panic attacks. Kristin Neff and Christopher Germer advise such people to combine touch with calm self-talk.Voicing your own emotions and self-control
Fear and anger can poison the life of every person, causing such negative consequences as self-doubt, jealousy, irritability, and temper. Scientists have found that such destructive emotions are born in the subcortical areas of the brain. But another fact has also been established: using your own speech to voice your feelings activates the frontal lobes of the brain. Thus, each person can independently establish a balance in the functioning of the brain. Dan Siegel, a well-known specialist, calls this process the words “name it and tame it.” Voice acting own feelings releases neurotransmitters, which calms the subcortical lobes of the brain. So next time if you get beat negative emotions, just say it out loud: I’m angry. Or I feel sad. This effective tool self-control!

Talking to yourself
If the previous advice concerned speech, then this one stops our attention on the mental dialogue that constantly sounds in our heads. And the process internal dialogue must be taken under control, since he has great value in the context of personal effectiveness. Research has shown that athletes who motivate and encourage themselves mentally have, on average, best result during training and competitions! Three types of self-dialogue have been identified:
- Motivational. This option should be used to inspire yourself: “You will do it!”;
- Instructing. It’s worth mentally instructing yourself when you need to concentrate or master new skills: “So, I’m doing an incline with sub-steps. And I throw a right hook...";
- Evaluator. Mental self-assessment helps to analyze the work done: “In general, everything went at a decent level. But next time I should relax better and feel the Force...”
An important nuance - you need to mentally talk to yourself the way a coach, a real friend, or Master Yoda himself would do with you 😉
Regular training
How do you become a Jedi? In addition to learning the philosophy of the Knight Peacekeepers, young Padawans train regularly to develop their bodies. This is not surprising, since in addition to the obvious advantages of this practice (strengthening the body, mastering the art of combat, health), regular training helps develop self-discipline and learn to set priorities. By the way, the fifth postulate of the Jedi Creed reads like this: Jedi strive for self-improvement through knowledge and training.
Is the question still relevant for you? Then, finally, we present for you the code of peacekeeping knights:
- There is no worry - there is peace
- There is no ignorance - there is knowledge
- There is no passion - there is serenity
- There is no chaos - there is harmony
- There is no death - there is Power
The topic of improving time management efficiency. The best answer came from entrepreneur Oliver Emberton, who suggested thinking about time like a real Jedi.
Like a Jedi
Emberton is convinced that you can learn to effectively manage time by imagining yourself as a Jedi (a peacekeeping knight from the famous Star Wars saga), who seeks to save his beloved princess imprisoned in a castle. She personifies the dreams and aspirations of a person, what is dearest to him.
Before the brave knight can save his beloved, a crowd of imperial stormtroopers appears and unleashes a tornado of laser beams from blasters on the hero. These rays distract the hero from main goal- rescuing the princess.
The situation is not easy - the hero can fight with enemies, but there are too many of them, so no matter how many of them he kills, he will not get closer to his goal. At the same time, the castle where the princess is imprisoned is on fire, and we cannot hesitate for too long. Everything is as in real life- there are very important things, and there are very urgent ones, and there is always a struggle between them:
Emberton says the secret is effective management time is to focus on what is important and suppress everything urgent. According to the entrepreneur, human nature is such that it is easier for him to pay attention to things that require an immediate response, such as notifications in an application on the phone. However, more important things (for example, going to the gym) have more chances to be postponed. It is necessary to do the opposite - but this goes against the behavior accepted in society.
You need to learn to say “no”
According to Emberton, throughout the day, most of people's actions are determined external factors, like the same notifications on your smartphone or requests from colleagues. You need to learn to say “no” to those who are not the most important things. Typically, when someone asks a person to do something, it is difficult for them to say no. Emberton is sure that despite all the nobility of such behavior, the princess in the burning castle is unlikely to be happy - instead of moving intensively towards her, her savior decided to be distracted because he was asked.
To achieve truly important goals, you will have to sacrifice some of the moral comfort that comes from fulfilling other people's requests (however, the bonus will be the fact that petitioners will expect a negative answer and will be less bothered by their affairs).
TV makes it difficult to concentrate
A Quora user says he didn't watch TV for seven years, saving him 12,376 hours of time—the average American spends 34 hours a week watching TV. Amberton does watch some TV shows, but only those that he actually likes and has paid to watch.
You can get a lot done in 12,000 hours, even if you stop to watch Mad Men.
Alerts are evil
Modern technologies use the human tendency to react to emerging stimuli - Email, Facebook, Twitter, Quora and dozens of other social services are a constant source of distraction. The advantage is the fact that this problem is easily solved - once you turn off notifications, you will spend much less time on social networks, Emberton is sure.
He advises dedicating time to watching feeds non-working hours when you can be distracted without the risk of not doing an important task - for example, during lunch.
It's worth prioritizing
People sometimes behave strangely - for example, if a person makes an appointment with friends at a bar, he will make an appointment exact time. However, when he needs to do a really important thing (write a book or go to the gym), he often will not choose the exact time. “It needs to be done” and when is not so important. This is the wrong tactic.
Emberton advises treating important things like airline flights that you must be on time for - set an exact time when you must start solving the task, and refuse all other things that could lead to “missing the plane.”
Important things cannot be put off “for later”
Emberton says that in life there is great amount distracting things, so the strategy is “I’ll watch one video and get busy important matter" simply won't work. It is necessary to keep in mind a list of the most important tasks, and every day deal with at least one of them.
You can't do too many things
Very often the number of things that can and should be done is simply overwhelming. To save maximum productivity Emberton advises choosing one to three tasks a day and focusing only on them, ruthlessly cutting off everything unnecessary.
This is unusual and may cause discomfort, and is also unlikely to please other people, but you cannot give up. Working hard on one thing will bring more results than superficially doing several things.
TNR is tired of modern blockbusters about space freaks and raccoons, those cheap special effects, stupid humor and lack of plot. Such a variety of fantasy films about space made us despondent and inspired nostalgia for the beautiful. We decided to review the good old film that made everyone cry, laugh, and dream of finding a magic sword - “Star Wars.” And the director's cut! And all the films in a row! Moreover, lighting an incomprehensible rolled-up cigarette! And then, as always, the smartest idea in the world came to our minds - to become a real Jedi and save this world. The rolling cigarette went away, but the thought remained, and we began to figure out how to become a real Jedi and not screw it up.
Oleg

First, you need to develop a high number of midichlorians (microscopic organisms that allow you to connect the living organism of a person and its strength). But they won't help you if you're already old. Even as a child, your potential should have been noticed by the Jedi Order. But this is also not all. First, you will be a padawan (give the teacher a chair, a stick, a hand, toilet paper) to a Jedi knight, who will show you everything that he himself can do (from how to drink for takeoff to controlling his sword). Besides your uncle teaching you, there is also homework– you must learn the Jedi code (and for one the Criminal Code of the Russian Federation, the Civil Code of the Russian Federation, the Housing Code of the Russian Federation, etc.) in order to better understand what, how, and where you can do, and how to control force. The final test is the test. This is a test by the Council of the Jedi Order, only after which you can become a Jedi.
Sasha

Every warrior can go through his own way and receive the well-deserved rank of the Jedi Order.
The first rank is Yuling. This is the rank you get when you walk under the table and write on everything and suddenly begin to control your power and control a lightsaber that emits yellow streams.
Second rank - Padawan. Don’t strive to be smart, be a schoolboy who is dumber than everyone else, who won’t be accepted into school, so that your parents will leave you homeschooling, so that they hire you an experienced warrior of the rank of Knight or Master. Ordinary children learn to control their swords on their own, but you will have to work with a mentor.
The fourth is the Knight - a disciplined Padawan who has become a full member of the Jedi Order. To do this, he had to successfully pass 5 tests, no, not fire, not water, and not even 3 copper pipes. This is a test of mastery of a sword (usually a stick), a test of courage, a test of mastery of one’s flesh (body) while intoxicated, a test of spirit (the ability to meditate in different situations), test of knowledge (the test can probably do something Unified State Exam type or GIA, and maybe Rostest in general) and make a lightsaber for yourself.
The fifth is the Master. You can become one only when you find and guide true path a Jedi, the same idiot like you as a child, who will pass all the tests that you went through and will be able to become a knight.
The sixth rank is Magister (Grandmaster). You must start drinking heavily, playing dominoes in the yard, turn green, grow old, and you must be chosen by the council of the order. Something like this!
Anton (Jedi affairs expert)

There is no emotion, there is peace.
There is no ignorance, there is knowledge.
There is no passion, there is serenity.
There is no chaos, there is harmony.
There is no death, there is Great Power.
So says the ancient Jedi code.
On our planet, the religion of Jediism is even officially registered, which only a few years ago
belonged to more than ten thousand people.
The Jedi don't teach you to be emotionless robots, they teach you to be wise and make decisions with a cool head.
They teach you to be patient and organized. They teach selflessness, how to help others without sparing yourself.
And even though in ancient times the Jedi were forbidden to fall in love, since strong attachments can drag a person down
into darkness, it was later proven that it is love that can pull a person out of this darkness.
It doesn't matter whether you have the Force or not (probably not), what matters is what's in your heart.
You need to believe in your Inner Light, no matter how dull he may seem at times (c) Luke Skywalker
Karina

To buy in children's world a glow stick, call your father Darth Vader, consider yourself incredibly cool, and everything will work out.
Egor
1) We need a father who has switched to dark power.
2) Steal the colored sword. Why steal? Well, you don’t have a father and you obviously have problems with lava.
3) To avoid screwing things up, you should make friends with Yoda.
4) Build a starship in your garage. (Well, or steal, but if you constantly fuck everything up, then, like your father, you will become an evil bastard)
5) Well, and of course, we need this egg-headed robot, I don’t know what his name is.
Igor

To become a Jedi, you need to think carefully about this, because you will be a peacekeeper knight and you will honor the Jedi codes and always be on bright side strength. So, to become a Jedi, you need to go to the Jedi Academy on the planet Ossus, there is a new Jedi Academy, where the masters will first look at you, and then they will make a verdict on whether you should study at all, because... to be a Jedi, not only must you have a pure heart, but you must also have at least a little supernatural abilities. After they made a verdict, and if it turned out to be positive, then you stay in this academy and study, you will study for a long time. At first you will have the rank of youngling. Over time and your efforts in studying, you will raise your rank to padawan, and you will have a personal Jedi teacher who will teach you further in everything, take you on some tasks in which you will help him, and so on.
In general, to become a Jedi and not screw up, you just need to have pure heart and good intentions so as not to go to dark side forces (Sith).
Thank you for your attention.
Dmitriy

First of all, you need a laser sword. Without it, you are not a Jedi at all. Also, you should have a friend like “Jar Jar Binks” - a sick person. I must buy myself a smart vacuum cleaner and a radio-controlled robot. When you find all this for yourself, you lock yourself in the apartment, call an ambulance and say: “Darth Vader, I will soon come for your head” - laughing loudly, you hang up. Then you call back and laugh again. After this, you will enter the Jedi Order and become a full-fledged Jedi. They will also provide free food.
Michael

You need to be spiritually attuned to this. You have to want it with all your heart, desire it and crave it. Never forget about this, fly in the clouds all the time, imagine how your sword beats Decepticons and Androids (or whoever they have). In the evening, when you go to bed, imagine how you defeat their army. Before each responsible action (eating or going to the toilet), you must read a prayer to the great Yoda. Constantly think about it and dream about it. And as you know, thoughts are material.
Novel

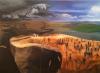
Oh you know, I never thought about that. Probably, find your master and carve a sword for yourself from a laser stone, learn telekinesis. We need to find a place of spiritual solitude, a place where two worlds come into contact, where there is a line between the living and the cosmic. There you can calmly learn all the mysteries of the Jedi. Don't forget about Master Yoda, because if he is the one who recognizes you, then you become something perfect in Jediism.

After hearing the opinions, we again decided to roll up our Siberian medicinal herb into paper and bring all the ideas to life! TNR Jedi is already saving the world on the streets of our city with a green paper sword.
 |
| Photo 2 |
All this can be done using photomontage. First, we cut out the dreamer’s face, for which we take the already familiar Magnetic Lasso Tool (see No. dated December 9, 2004). Carefully select the face along with the neck. This may not work the first time, but don’t despair. The main thing is to remember that a “smart” tool can be helped to stay on course by left-clicking on points along the perimeter, so to speak, faces. Also, if suddenly the selection curve has already gone very far to where it shouldn’t go, press Esc. This helps quite often.
When the object is finally selected, copy it (remember that to do this you need to press the combination Ctrl + Insert). Just don’t rush to paste the saved piece into another photo. First you need to select create a new file in the File menu (you can just Ctrl + N). A dialog box will appear, click OK. Now insert the face into this file (Shift + Insert). We need to slightly expand the size of the canvas, that is, the white space in which we placed the object. To do this, select Canvas Size from the Image menu. In the window that opens, put a checkmark next to Relative. Then we increase the height by a few centimeters (the Height column) and do the same with the width (Width). Now we have the cut out object surrounded by a snow-white background, giving us some room to maneuver. Despite efforts, often the object is not cut 100 percent straight. To smooth out burrs, take an eraser. For this thing to really work, you need to check if the right layer is selected. After all, we are now dealing not with an ordinary picture, but with a two-layer one. First layer - White background, the second is the object of our photo "bullying. To select the one you need, turn your attention to the window in the lower right corner. There should be a Layers tab, in Russian "Layers" (if there is no such window, go to the Window menu and select these same Layers The program names the layers automatically. The one we need is called Layer 1, and the bottom one is called Background (that is, the background).
When all the burrs are smoothed out, it’s time to select the fragment again, but not with the Magnetic Lasso, but with the Rectangular Marquee Tool. Then we insert the object into the photo with the Jedi. After this manipulation, it turns out that the face is either too large or too small compared to the Jedi. But it is important for us to understand what the difference in size is. This is why we make this test insertion using the usual Undo command from the Edit menu. In general, the chronology of our actions in each of the images is recorded in the same window where the Layers are located (the History tab).
It's time to adjust the two pictures to each other, changing the size. To do this, go to the Image menu and click Image Size. A dialog box appears that allows you to change the size of pictures at the pixel level or at the centimeter level (or you can select inches). In general, we change the size, insert the fragment again... After five or seven attempts everything will work out. And to make our task easier, we make the same scale for the picture with a white background and a fragment, as well as for the poster. It is best to select a magnifying glass (Zoom Tool) for this and right-click to set Actual Pixels (real size).
And finally, a consensus has been reached. Here I have to admit that I cheated a little when I said that you need to cut it out with the Rectangular Marquee Tool. Actually, to do this, you can just take the Move Tool and make sure that the desired layer is selected in the window with a white background and a fragment. Then, holding down the Alt key, click on this very fragment of ours and drag it into the window with the Jedi. And I also admit that I was hiding a terrible secret from you. In Photoshop's seventh version (and not only) it is possible to quickly switch between some tools. For example, if you urgently need to take the Move Tool, and you have the Rectangular Marquee Tool activated, then you need to hold Ctrl. Then your current tool will temporarily become not just anything, but the Move Tool.
But let's not get distracted. So, we covered the Jedi's face. Let's do the hair. We take the scissors..., that is, our old faithful Clone Stamp, and carefully cover up the hair, replanting fragments of the background, selecting the Background layer. Then move on to another layer. Move Tool" we move the head so that it is not set too low (make sure that it does not “go” to the right). The Adam’s apple should be slightly below the right (relative to us) shoulder, because the Jedi does not stand with his head extended hands at the seams, and turned around a little and raised this very shoulder. In short, it all depends on the eye. We got what is shown in photo 3 (only a fragment of the whole picture is shown).
 |
| Photo 3 |
I still have a problem with my neck. With Eraser, we erase unnecessary parts of it. In this case, only the selected layer disappears. Then we smooth out the silhouette of the inserted face. Along the very edge of the top layer, carefully draw with the Blur Tool. It blurs the image. By the way, to quickly switch to the Blur Tool, you can press “R” (provided that the English layout is enabled) In general, each tool has such a shortcut key. It is displayed along with the name of the tool when we move the mouse cursor to its icon on the panel.
But let's not deviate from the central storyline our space saga... In our business, the main thing is realism, so you need to not only erase the neck, but also where you need to add a Clone Stamp (shortcut key "S"). And if it seems to you that the skin on the inserted face is a little darker or lighter than some areas of the body on which this face is transplanted, do not despair. Photoshop has two excellent tools: the Burn Tool (darkens the image, called with the "O" key) and the Dodge Tool (highlights it, but it has the same key, so you need to change the tool in the toolbar with a right click). When you are sure, that everything is done correctly, reaches 99.99999999%, you can merge the layers (in the Layer menu, select Merge Down or press Ctrl + E) or save the file in JPEG format. The photo montage seems to be ready, but something is still wrong. .. Some kind of intergalactic battle is in full swing, everyone is running somewhere and aiming at someone. And our hero stands and smiles. First, we’ll crop the picture. Then we’ll take the Crop Tool. so we crop the frame so that everything on the left remains as before, on the top and bottom too, and the space infantryman on the right will have to cut off half of his face. Then we select our entire canvas using the Rectangular Marquee Tool. Then we copy it and create a new file. size, like our photo. Now we need to place our brave Jedi on this very white, untouched canvas. Select it with the Magnetic Lasso Tool. You just have to cut off the shine of the sword. For our “smart” lasso, this is too amorphous an object. You need to cut along the edges of the white core of the blade.
Now let's create the background. With one click (in as a last resort, two) make a champion galactic forces good invisible and calmly let's start working with the bottom layer. To do this, in the layer control window next to Layer 1, click on the black eye. To disable the function, you need to click on the place where the black eye was.
Now select the Background layer. Fill it with black paint using the Paint Bucket Tool (button "G"). The desired color can be selected by activating the Eyedropper Tool ("I"). With this very tool we poke at the palette in the Color window (Window => Color menu) or in Swatches (Window => Swatches). In this case, choose a black background. Now let's take a brush, that is, the Brush Tool ("B"). Choose white paint. Make the diameter of the brush approximately the size of half the Jedi's eye and draw a lot of white dots on our black background. It should be the wall of a saloon after it was visited by cowboys who had an extra box of cartridges with them. Now we pass this sieve through a special filter. Go to the Filter menu, in the Blur section, select Radial Blur. In the dialog box that appears, check the box next to Zoom. We set the Amount indicator to about 95 units. After the traditional press of Enter, we should get the picture that the starship pilot sees when accelerating his aircraft to mega-hyper-super-duper speed.
Now we make the Jedi visible. It turned out to be a good advertising poster (see photo 4).
 |
| Photo 4 |
The only thing missing is the inscription: “Have you signed up for courses to fight space villains?” But what is definitely missing is the shine around the sword. To create it, select the layer with our Jedi hero who endured a lot. Eyedropper Tool" select the color of the glow of the sword, which is preserved on our sleeve. Then take the Brush Tool. Create a new layer (Layer menu, section New, then Layer or just Shift + Ctrl + N). In this layer on both sides around draw vertical stripes on the sword (approximately the same as the shaft of the blade). We pass them through the already familiar Radial Blur filter (we also select Zoom, set the Amount to about 50). This is how we achieve the shine of the sword. Only the cosmetic detail remains. all layers (Layer menu, then Merge Visible or Merge Down). Use the Blur Tool (R button) on the Jedi’s silhouette. And this is what happens as a result (photo 5). You can print it out and give it to a friend.
 |
| Photo 5 |
May Photopower be with you!
Vasil MALASHENKOV